
Navigation Manual
Before starting with the detailed steps, we recommend exploring this interactive resource to get a quick overview of the platform.
1. Virtual Campus Access
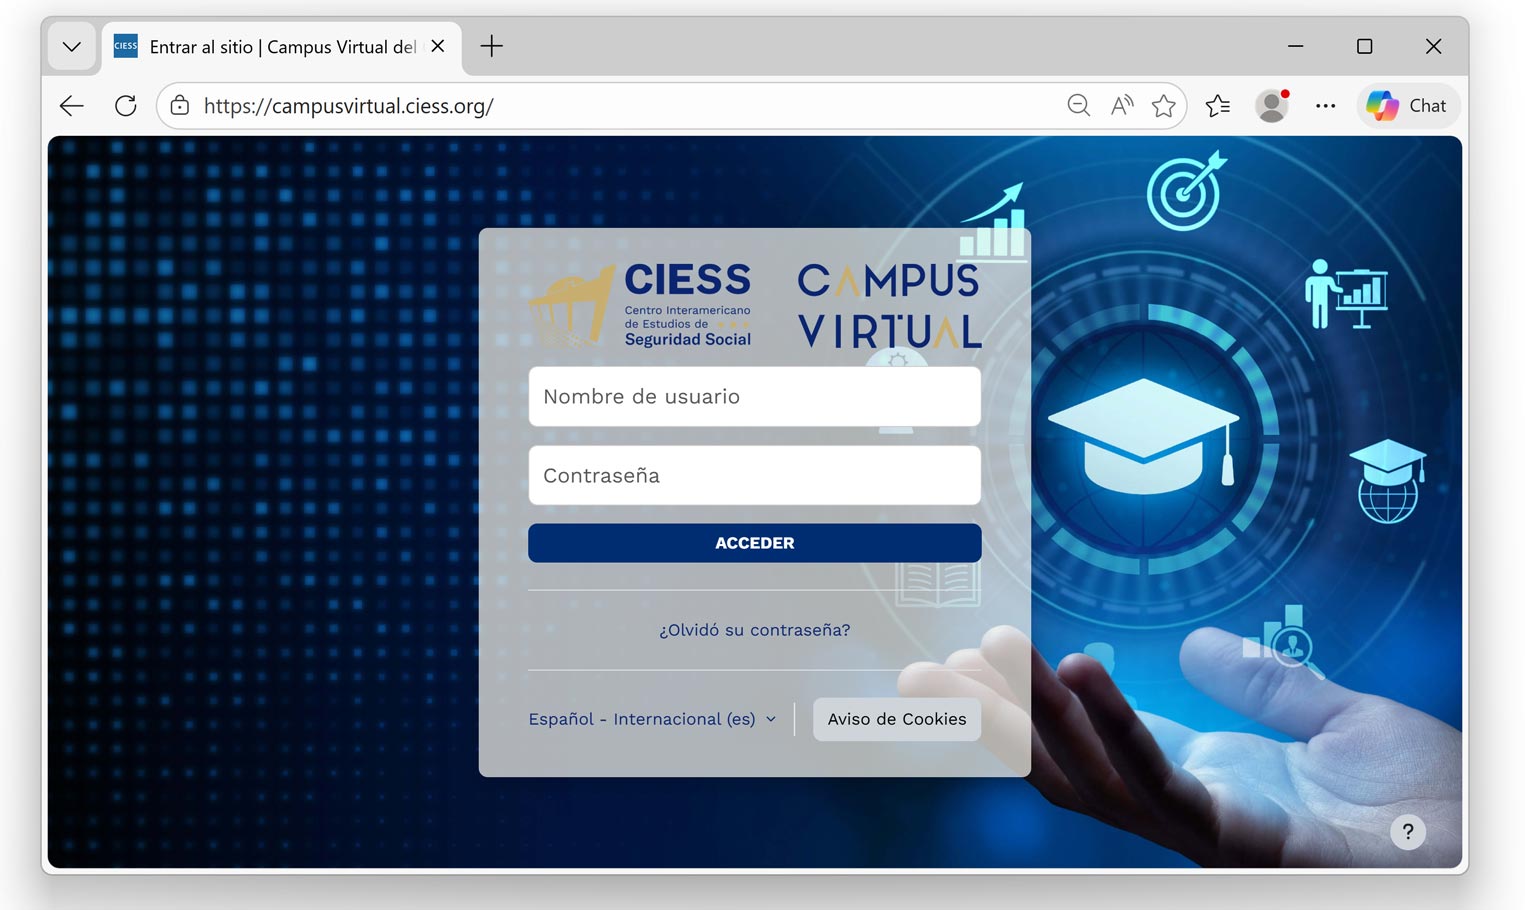
Open your web browser (Chrome or Firefox recommended) and go to the address: campusvirtual.ciess.org
Enter your username and password as sent to your registered email address.
Locate and click the "Log in" button.
2. Main Interface and Navigation
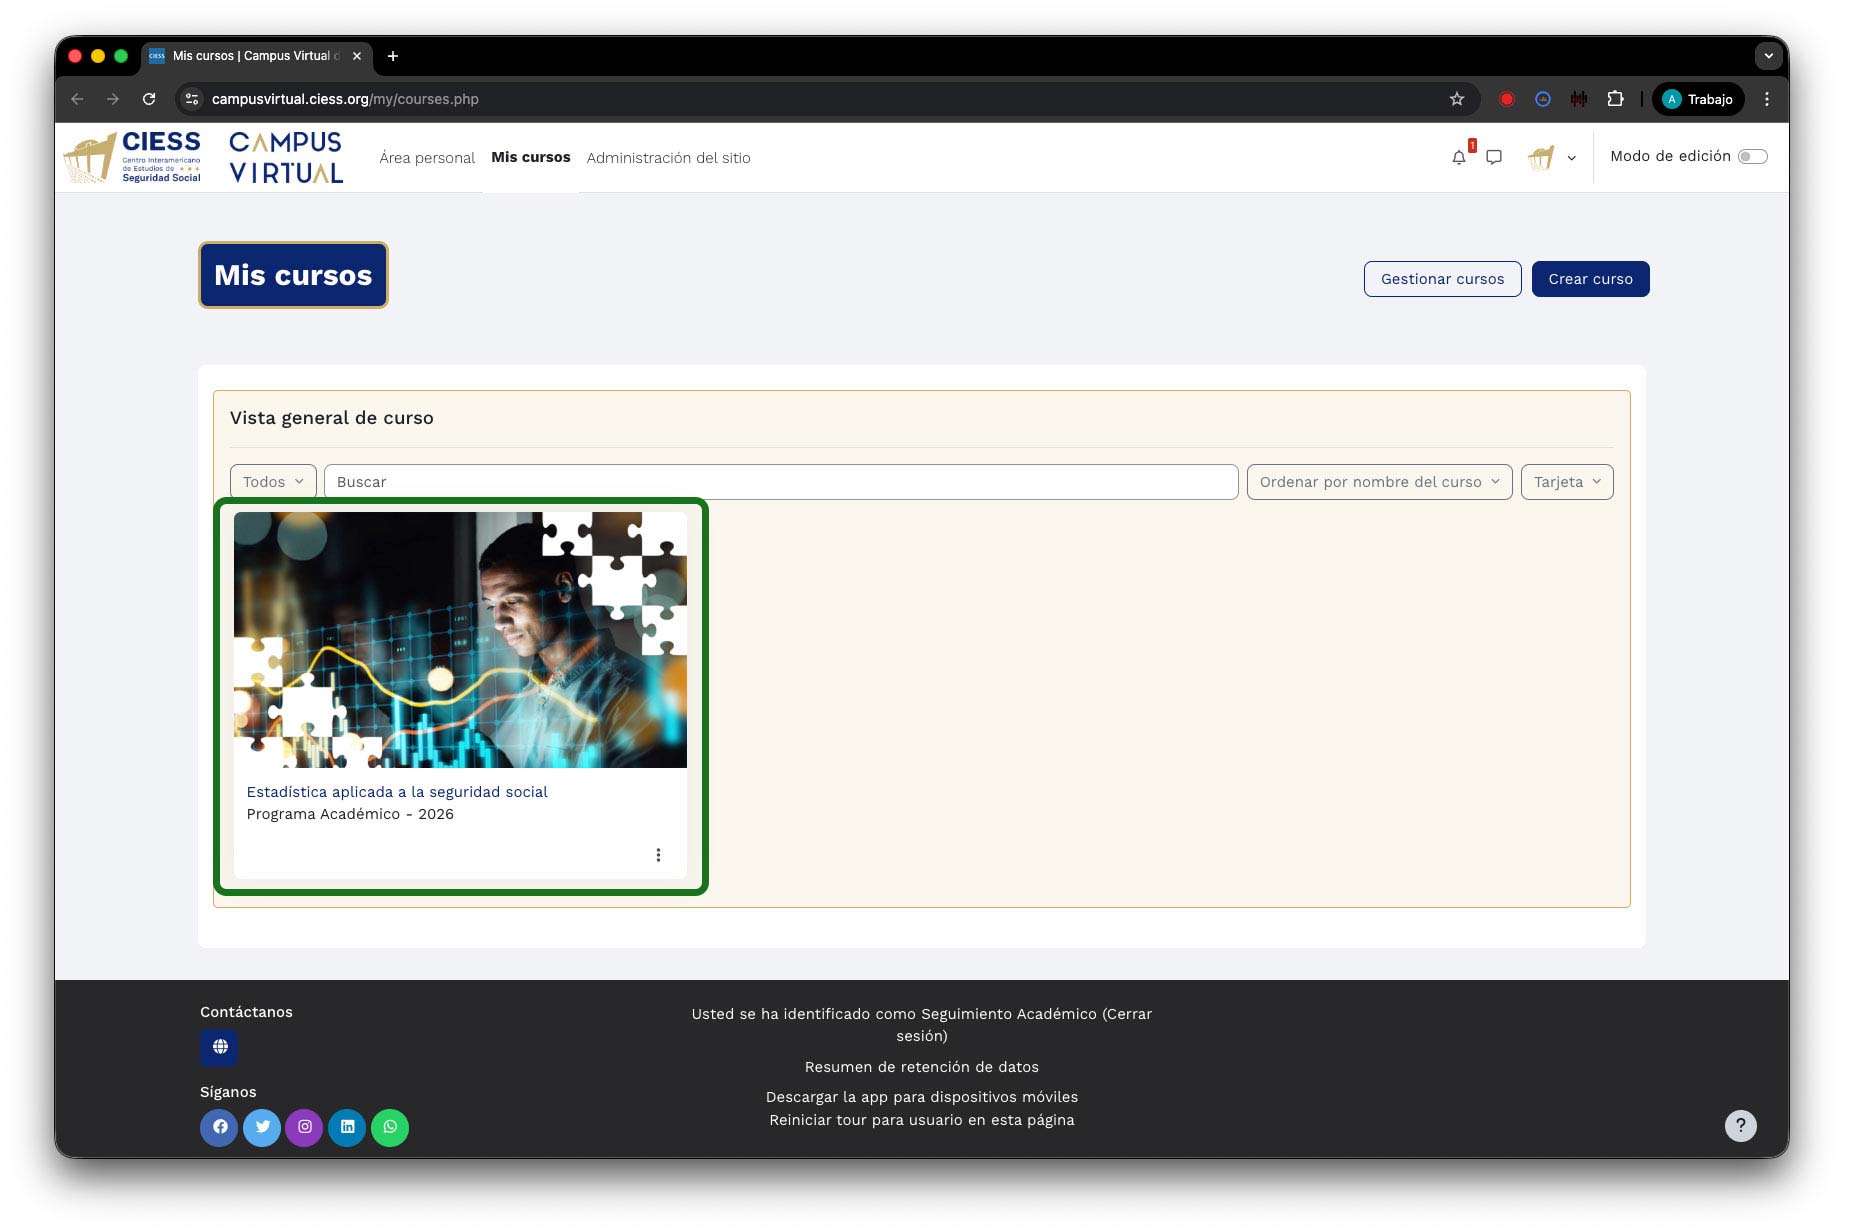
Upon logging in, you will see the My courses screen. Here you will find a list of all academic activities in which you are enrolled as an instructor.
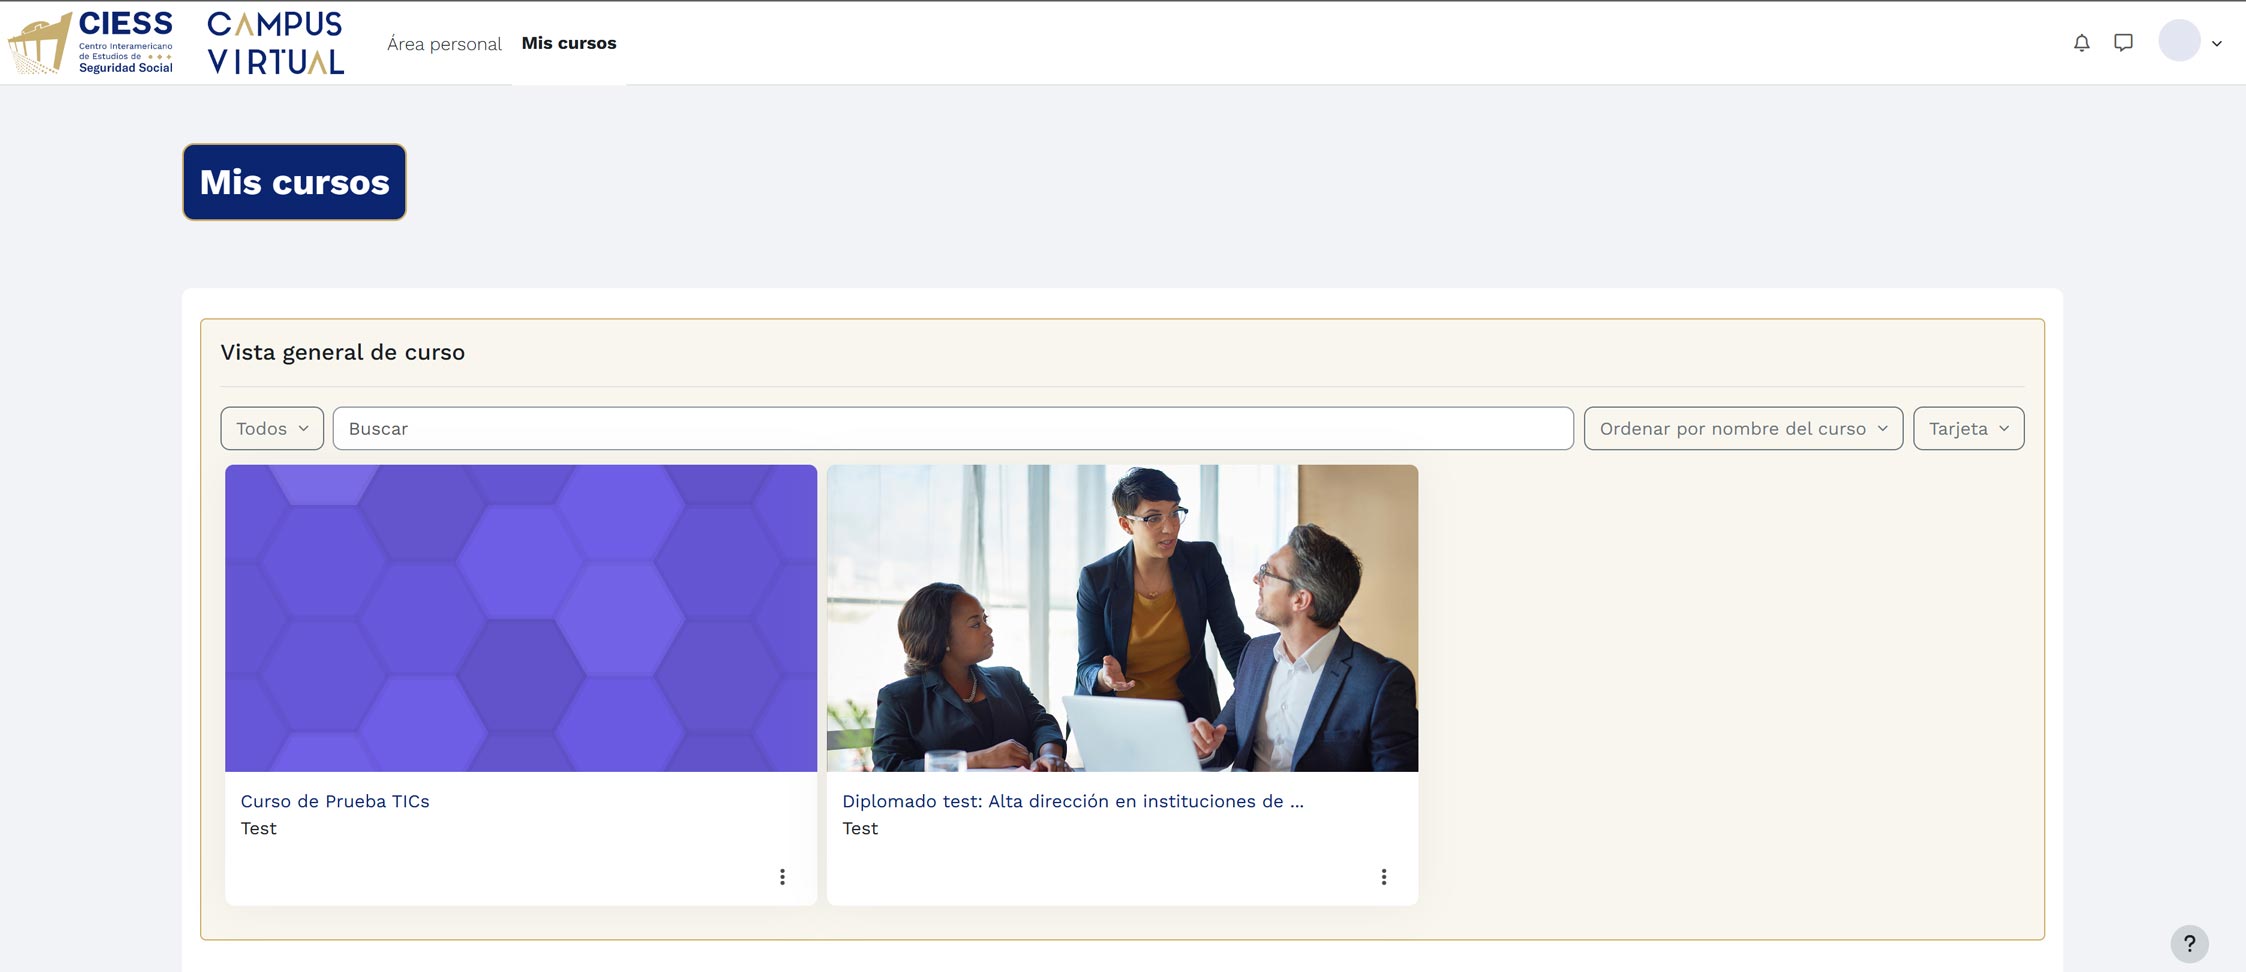
On this screen you will see the list of assigned activities in card format:
- Filtering: Use the tabs to view "In progress", "Future", or "Past" activities.
- Access: Click on the name or image of the activity to enter the virtual classroom.
- Sorting: You can sort your activities by name or by last access date.
At the top you will find the Navigation bar:
- Personal area: To access your personal dashboard.
- My courses: Direct access to the list of activities in which you participate.
To access your personal dashboard, click on the "Personal area" option located in the top navigation bar.
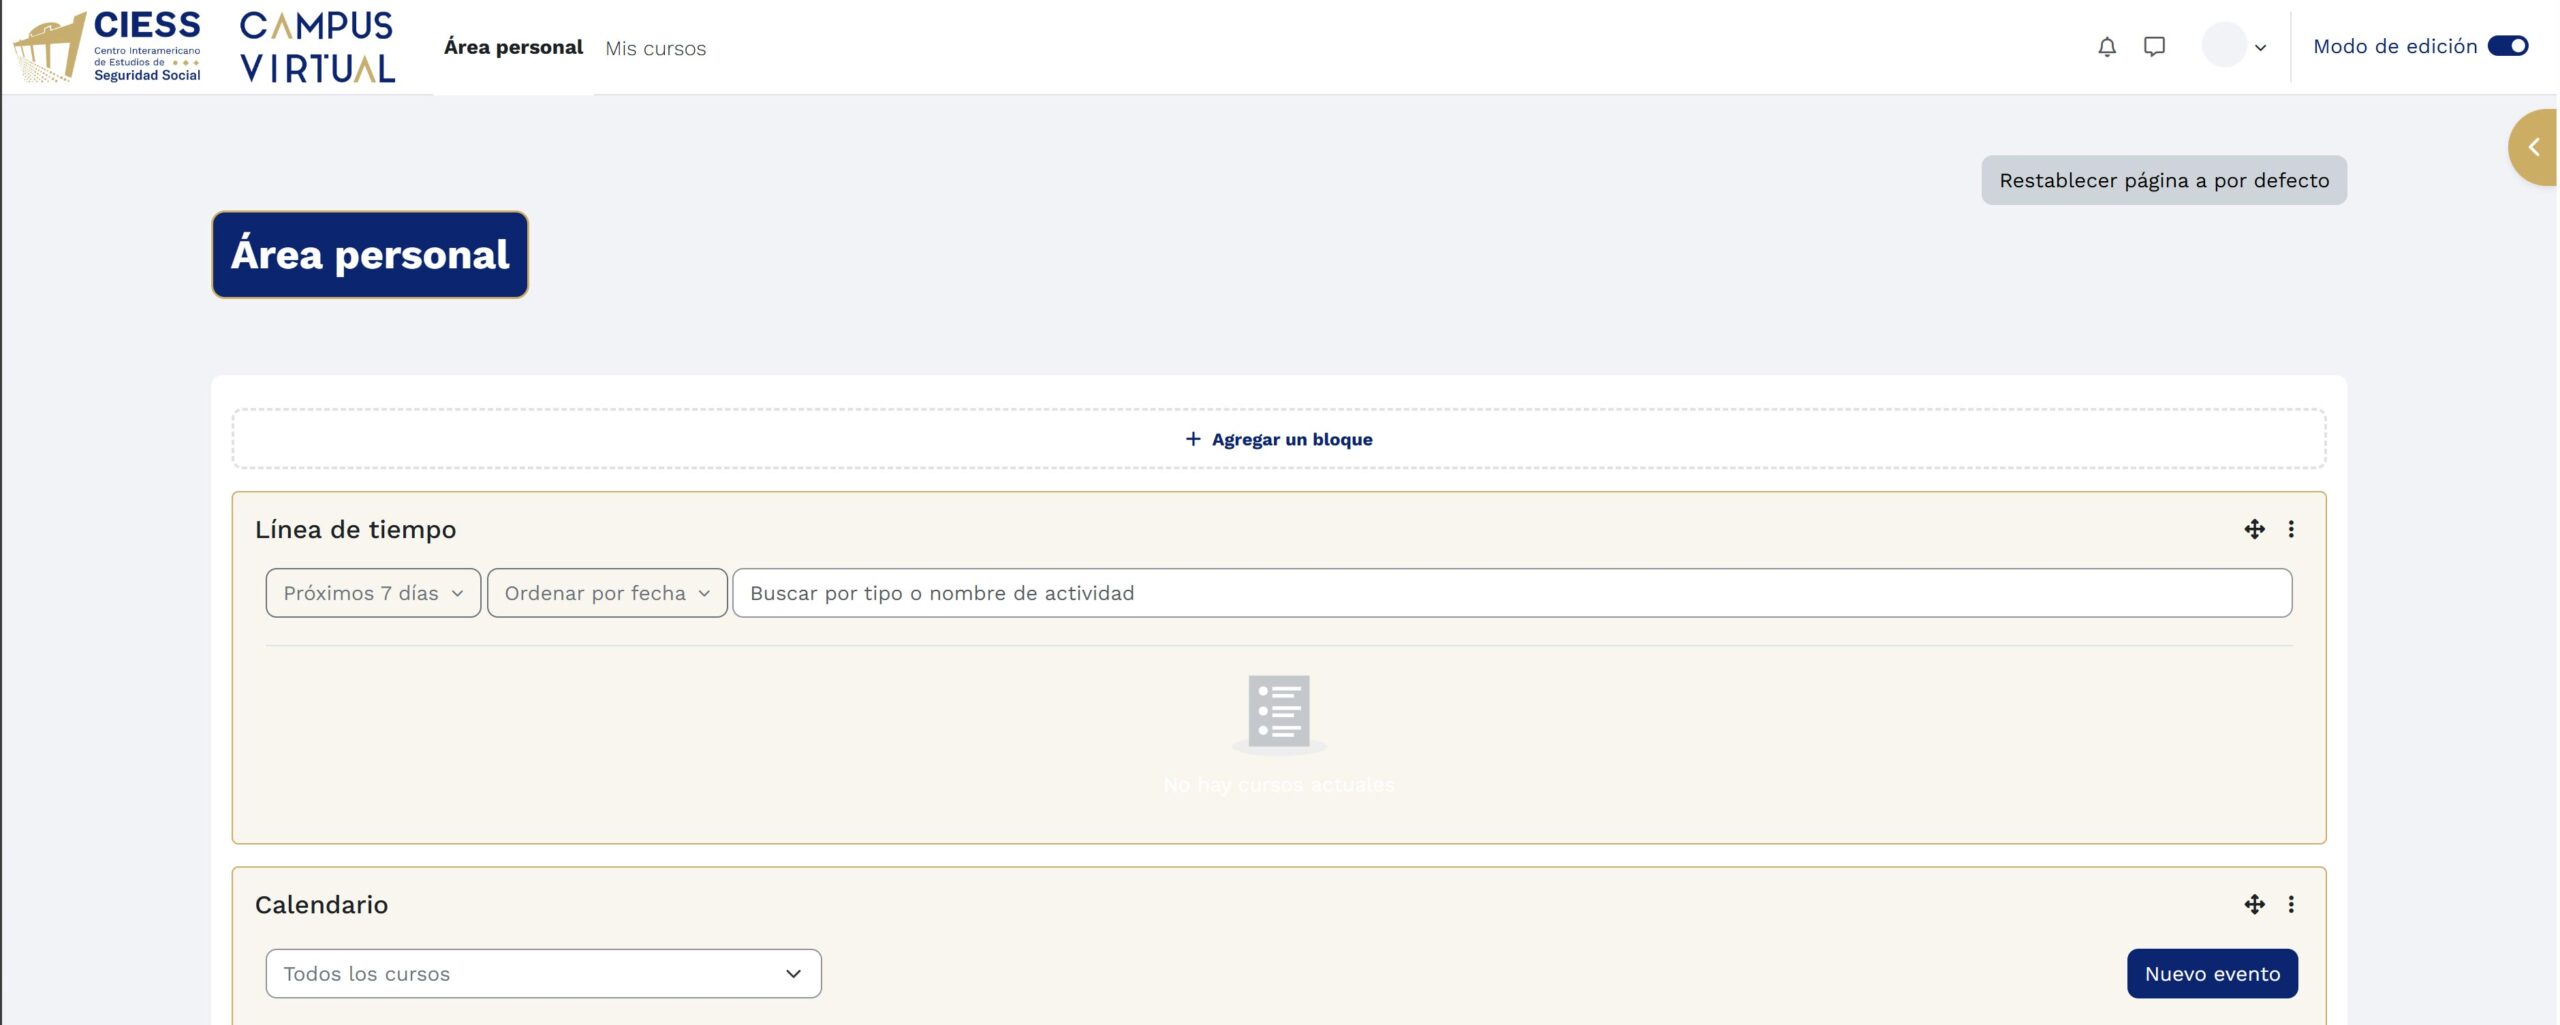
In the Personal area you will find two key tools for your organization:
- Timeline: Shows activities due soon (next 7 days). You can sort them by date or search by name.
- Calendar: View important events and a button to create a custom "New event".
3. User Profile Configuration
Access your user menu by clicking the dropdown arrow next to your name (top right corner). Here you will find shortcuts to:
Profile, Grades, Calendar, Preferences, and Log out.
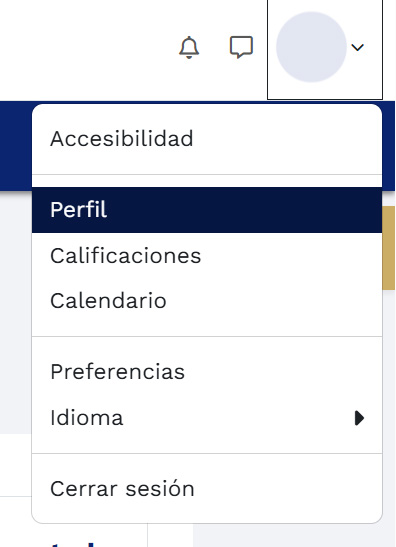
Select "Profile" and then click the "Edit profile" link or button. The Academic tracking form will open where you will see the main fields of your account ready to be modified.
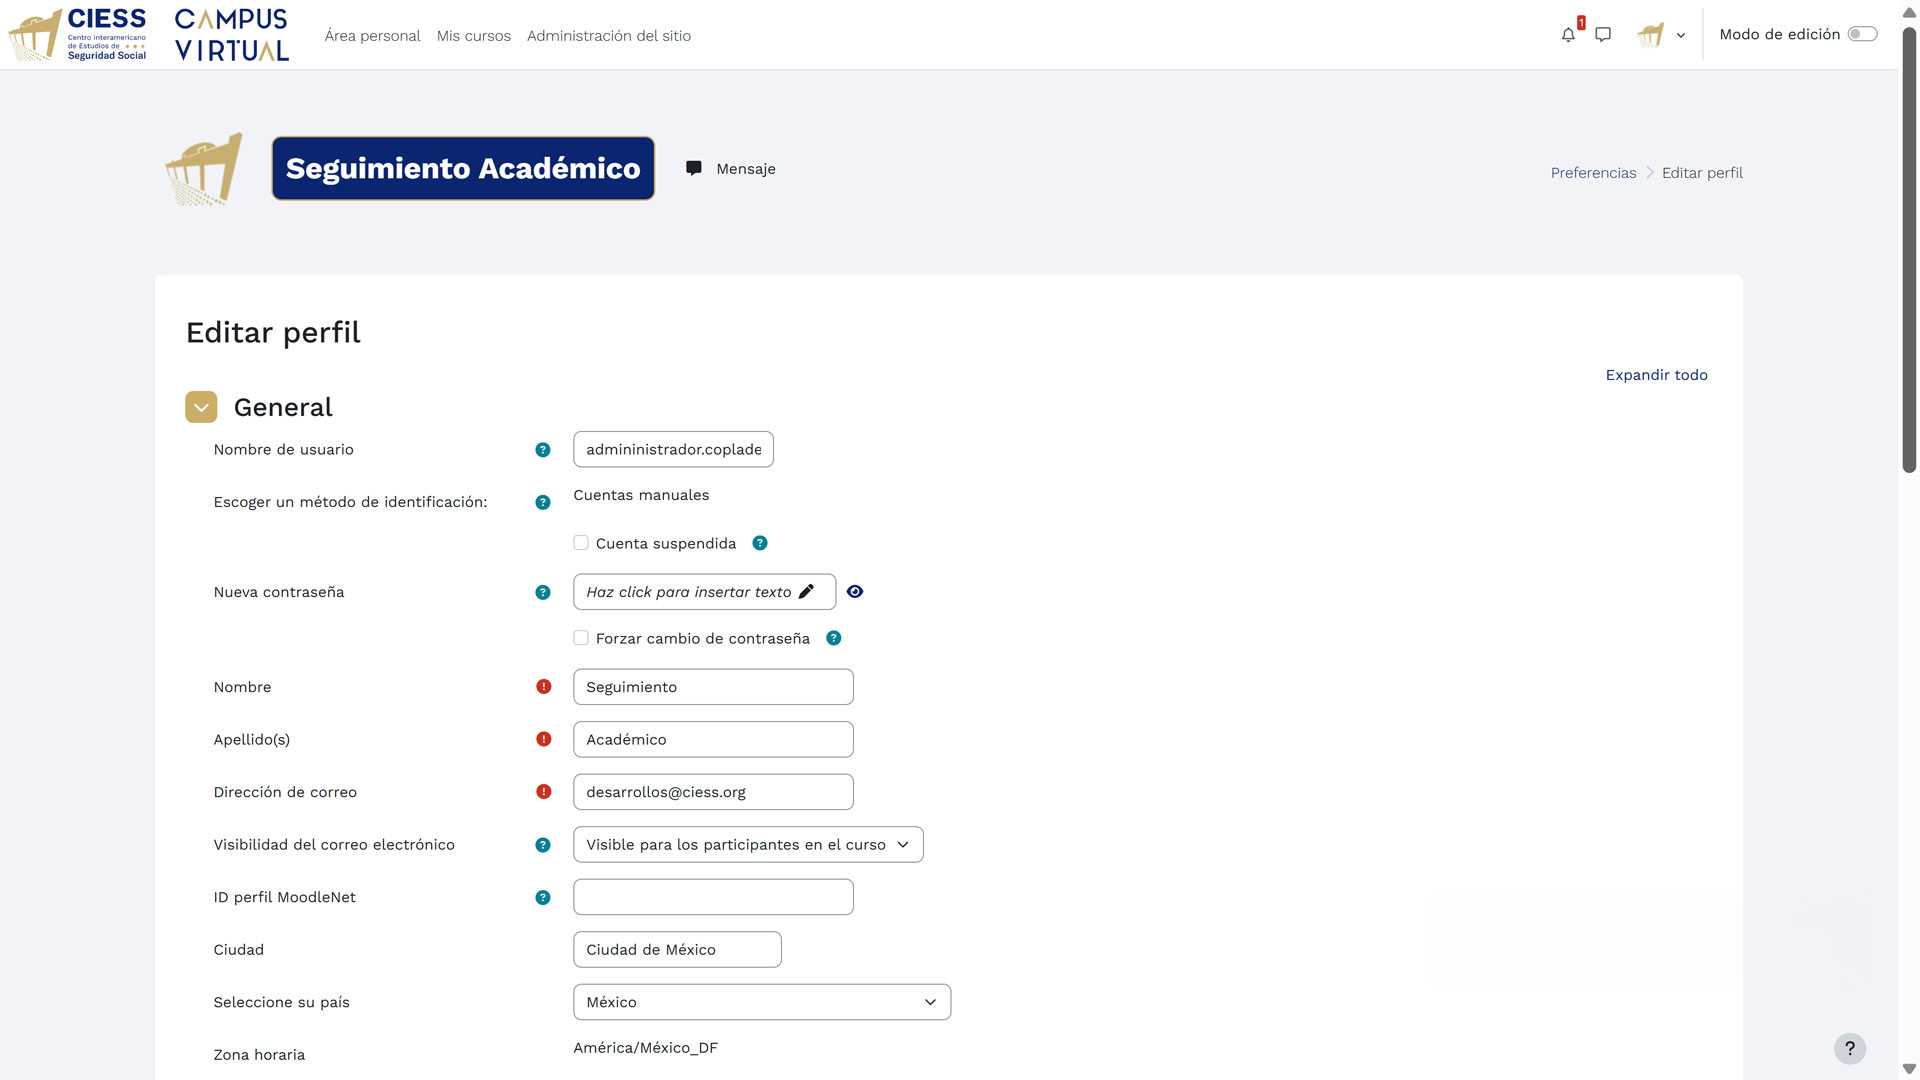
Important: Keeping your profile updated ensures better communication with your students and facilitates activity management.
Within the edit form (top section), you will find several sections. Configure the following options according to your needs:
- Username / New password: You can change your login credentials if necessary.
- First name(s) / Last name(s): Verify they are written correctly.
- Email address: Make sure it is an active account where you receive notifications.
- City / Country: Select your current location.
- Time zone: Very important. Select the time zone of your actual location so that due dates are displayed correctly in your local time.
Scroll down in the form to access the User images section and additional fields. Here you can:
- Manage your photo: View your Current image. To change it, use the New image area by dragging a file or selecting it from your device.
- Additional names: Complete this optional field if you have a middle name or prefer to be called differently.
- Other fields: Fill in any relevant optional information requested in the form.
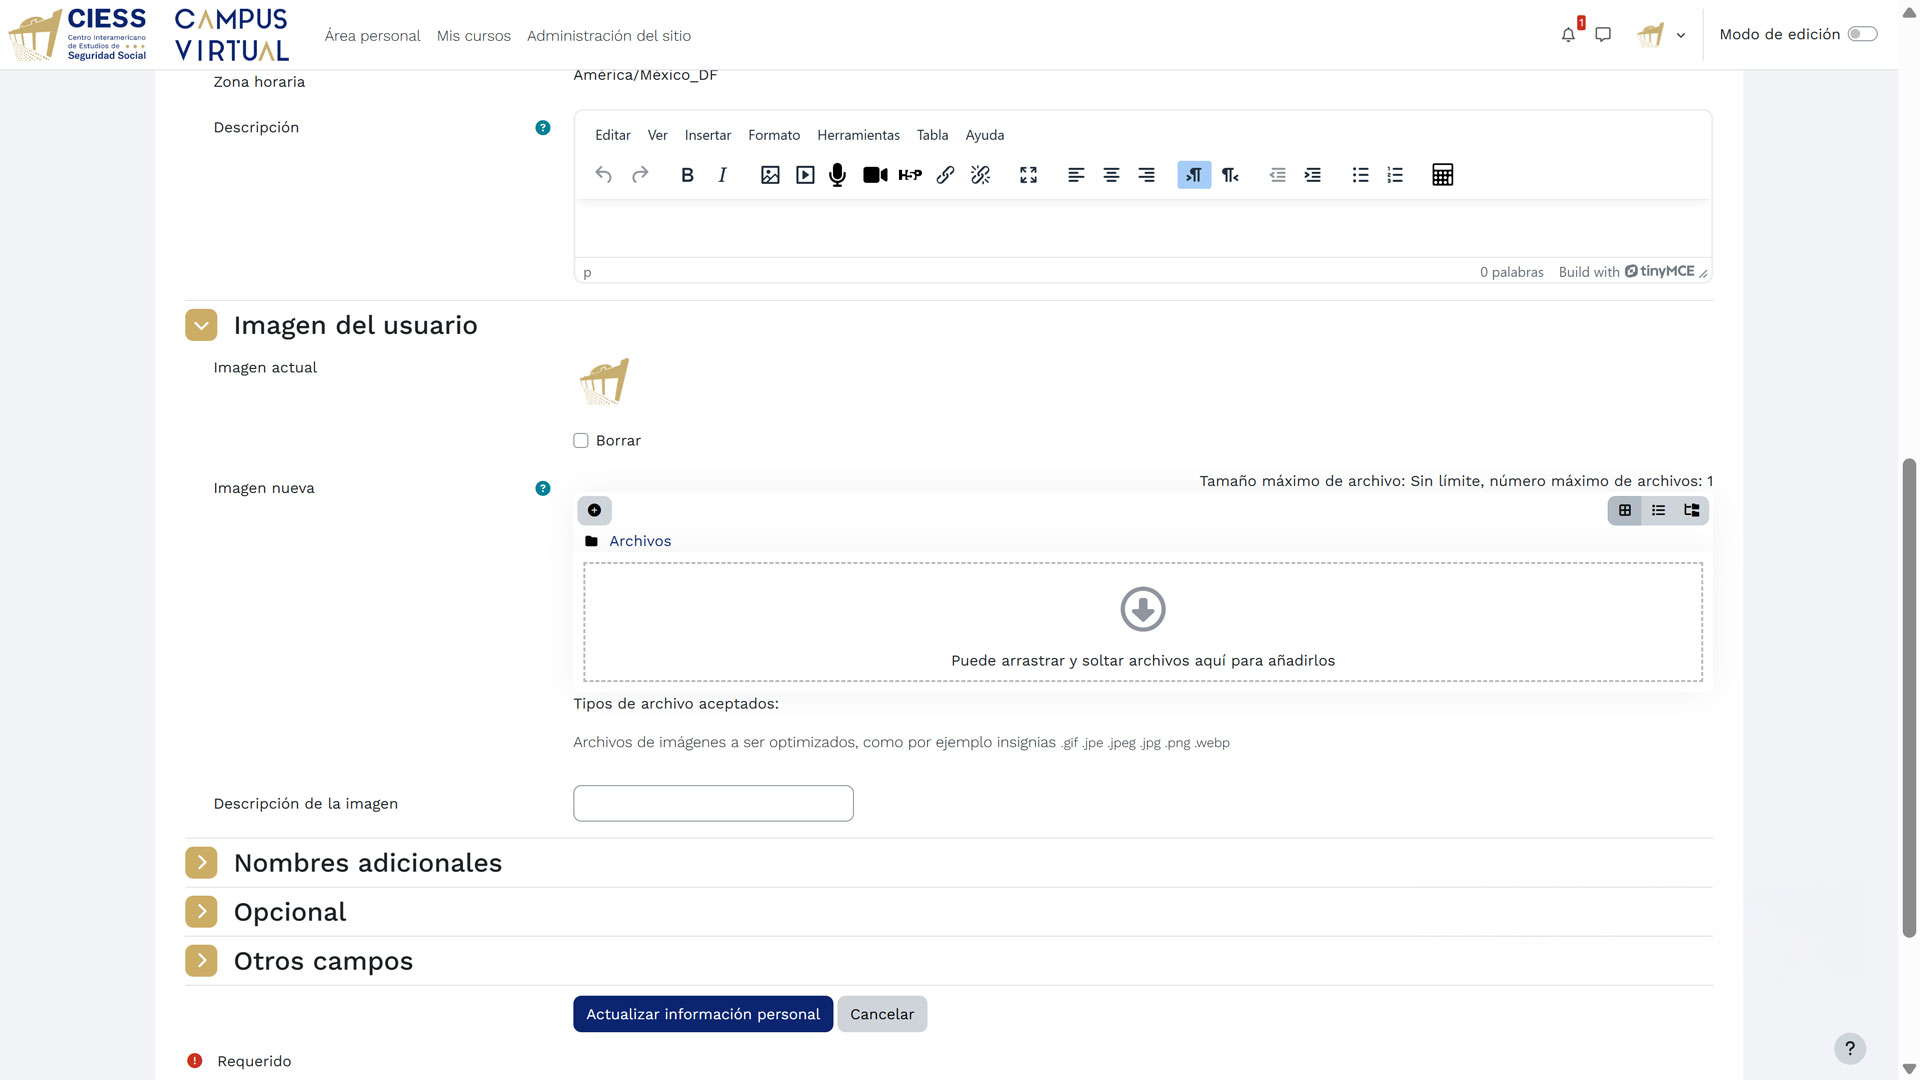
Privacy: Remember that you can configure who sees your email address or profile in the "Preferences" options within the user menu.
Finally, scroll to the bottom of the page and click the "Update profile" button to save all changes made.
4. Academic Activity Structure
When entering an activity as an instructor, you will see the main interface. In the central area, the Resources section stands out, where the main materials and modules of the academic activity are presented in an organized manner.

Navigation methods: To move through the activity content, you have two main methods:
- Vertical scrolling: You can navigate through the content by scrolling down to view resources sequentially and continuously on the main page.
- Side navigation menu: There is also a side navigation menu on the left, which allows direct access to specific sections (such as "Induction" or "Resources") without having to search the entire page.
In the Side menu, you will find expandable sections. For example, when clicking on "Induction", available sub-items such as "Get to know the virtual campus" are displayed. This area allows access to specific content and viewing of scheduled activity dates.
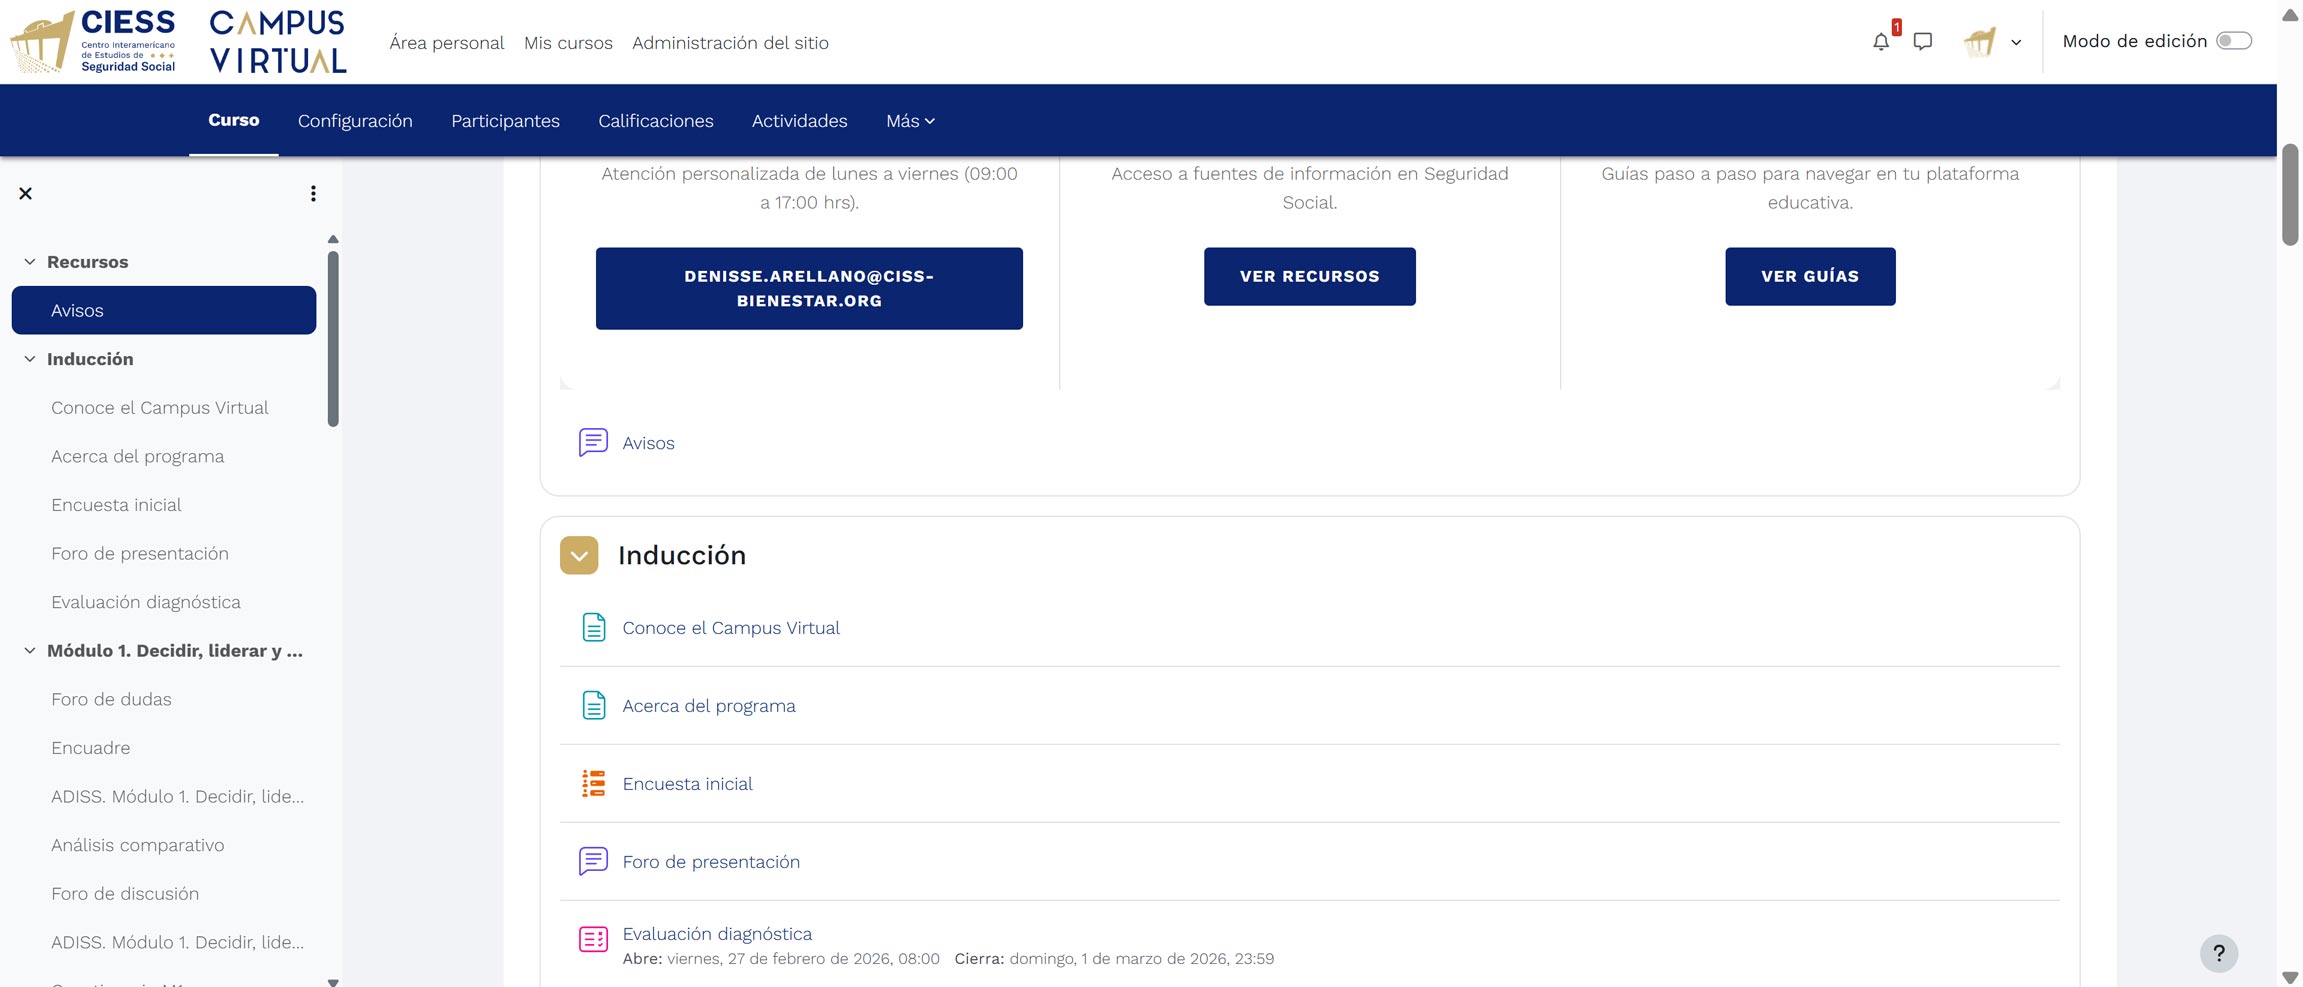
At the bottom of the interface, you will find quick access modules with icons, descriptions, and action buttons:
- Tracking: Information and direct contact for student follow-up.
- Library: Access to the digital repository and additional resources.
- Tutorials: Technical and support guides for using the platform.
Access the Get to know the virtual campus section within the Induction module. This offers an interactive guide to familiarize yourself with the environment's tools. You can view it directly at this link: View presentation.
Click the "Start" button to begin the exploration.

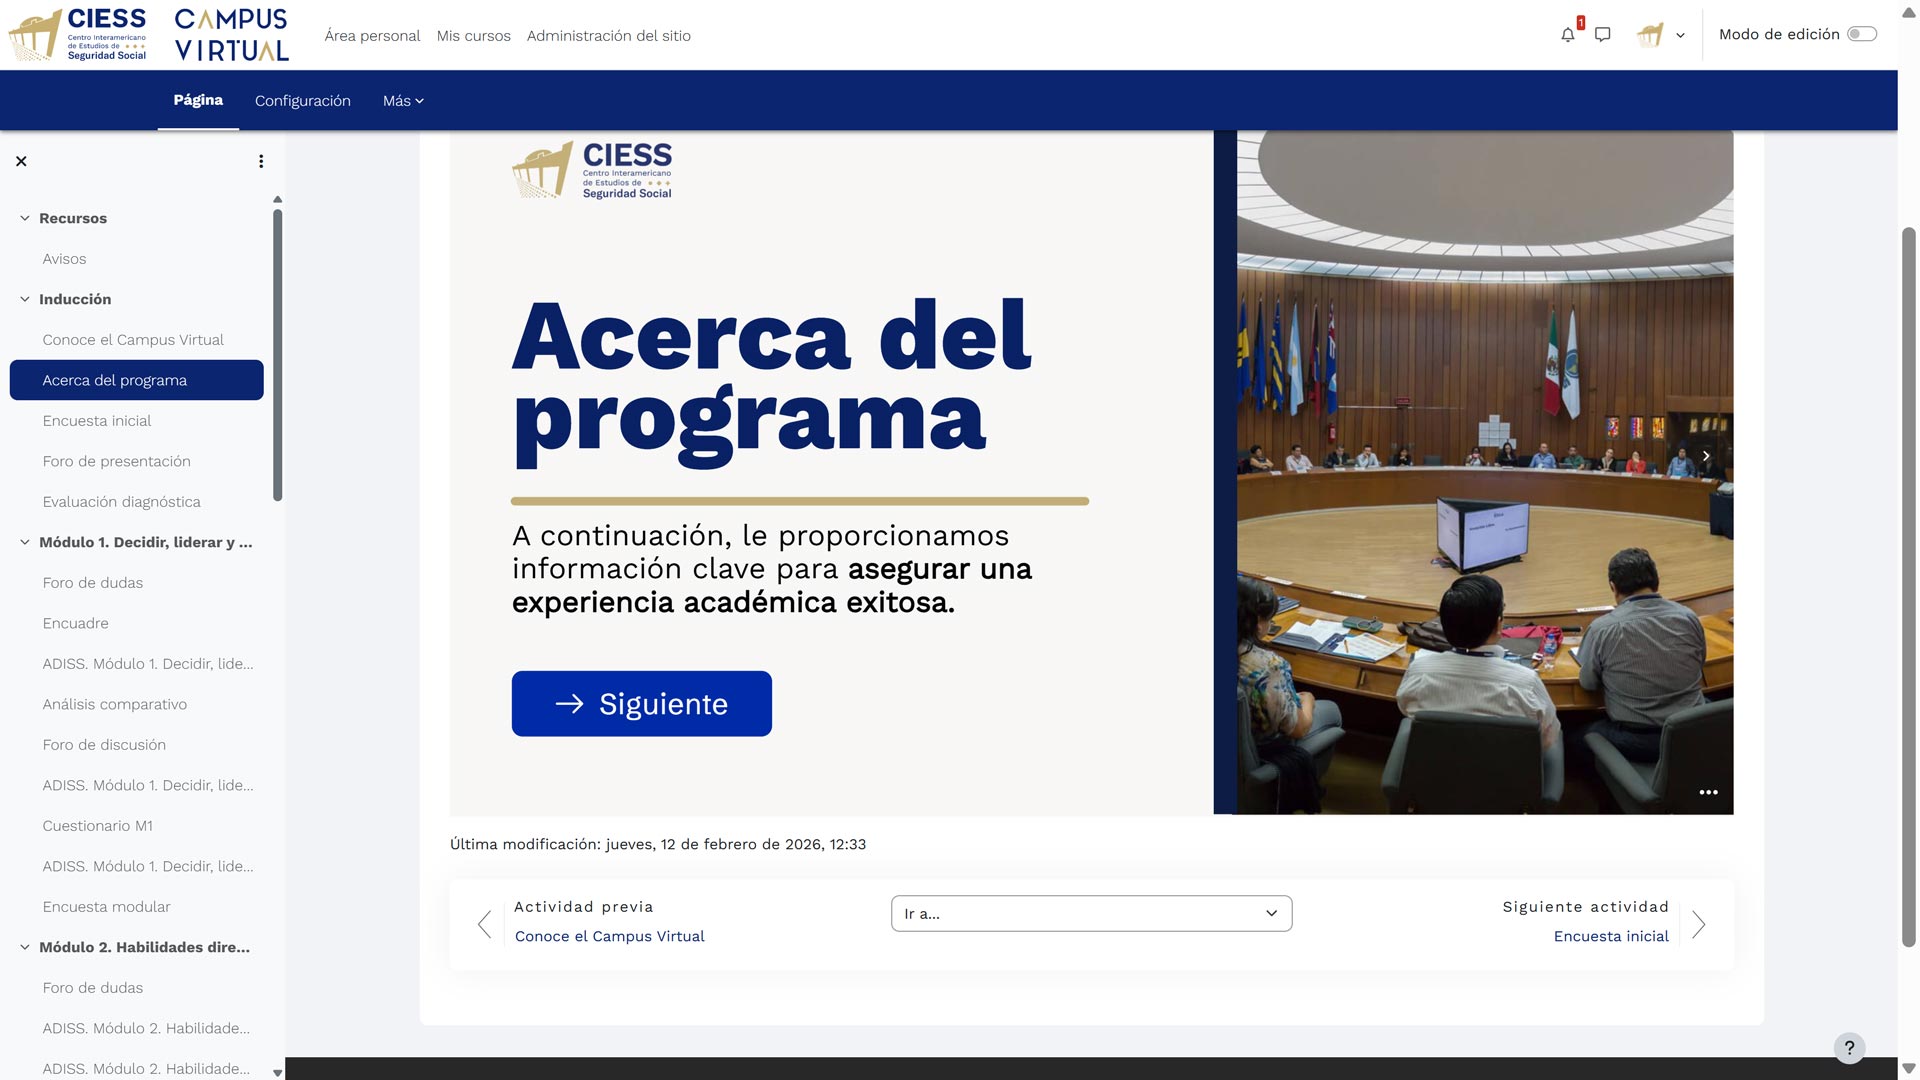
Continue with the About the program section. Here you will find key information to ensure a successful academic experience. Use the blue "Next" button located at the bottom to advance through the informational presentation.
Review the Initial survey section. All participants must answer this survey. The purpose of this tool is to identify knowledge levels to plan instruction.
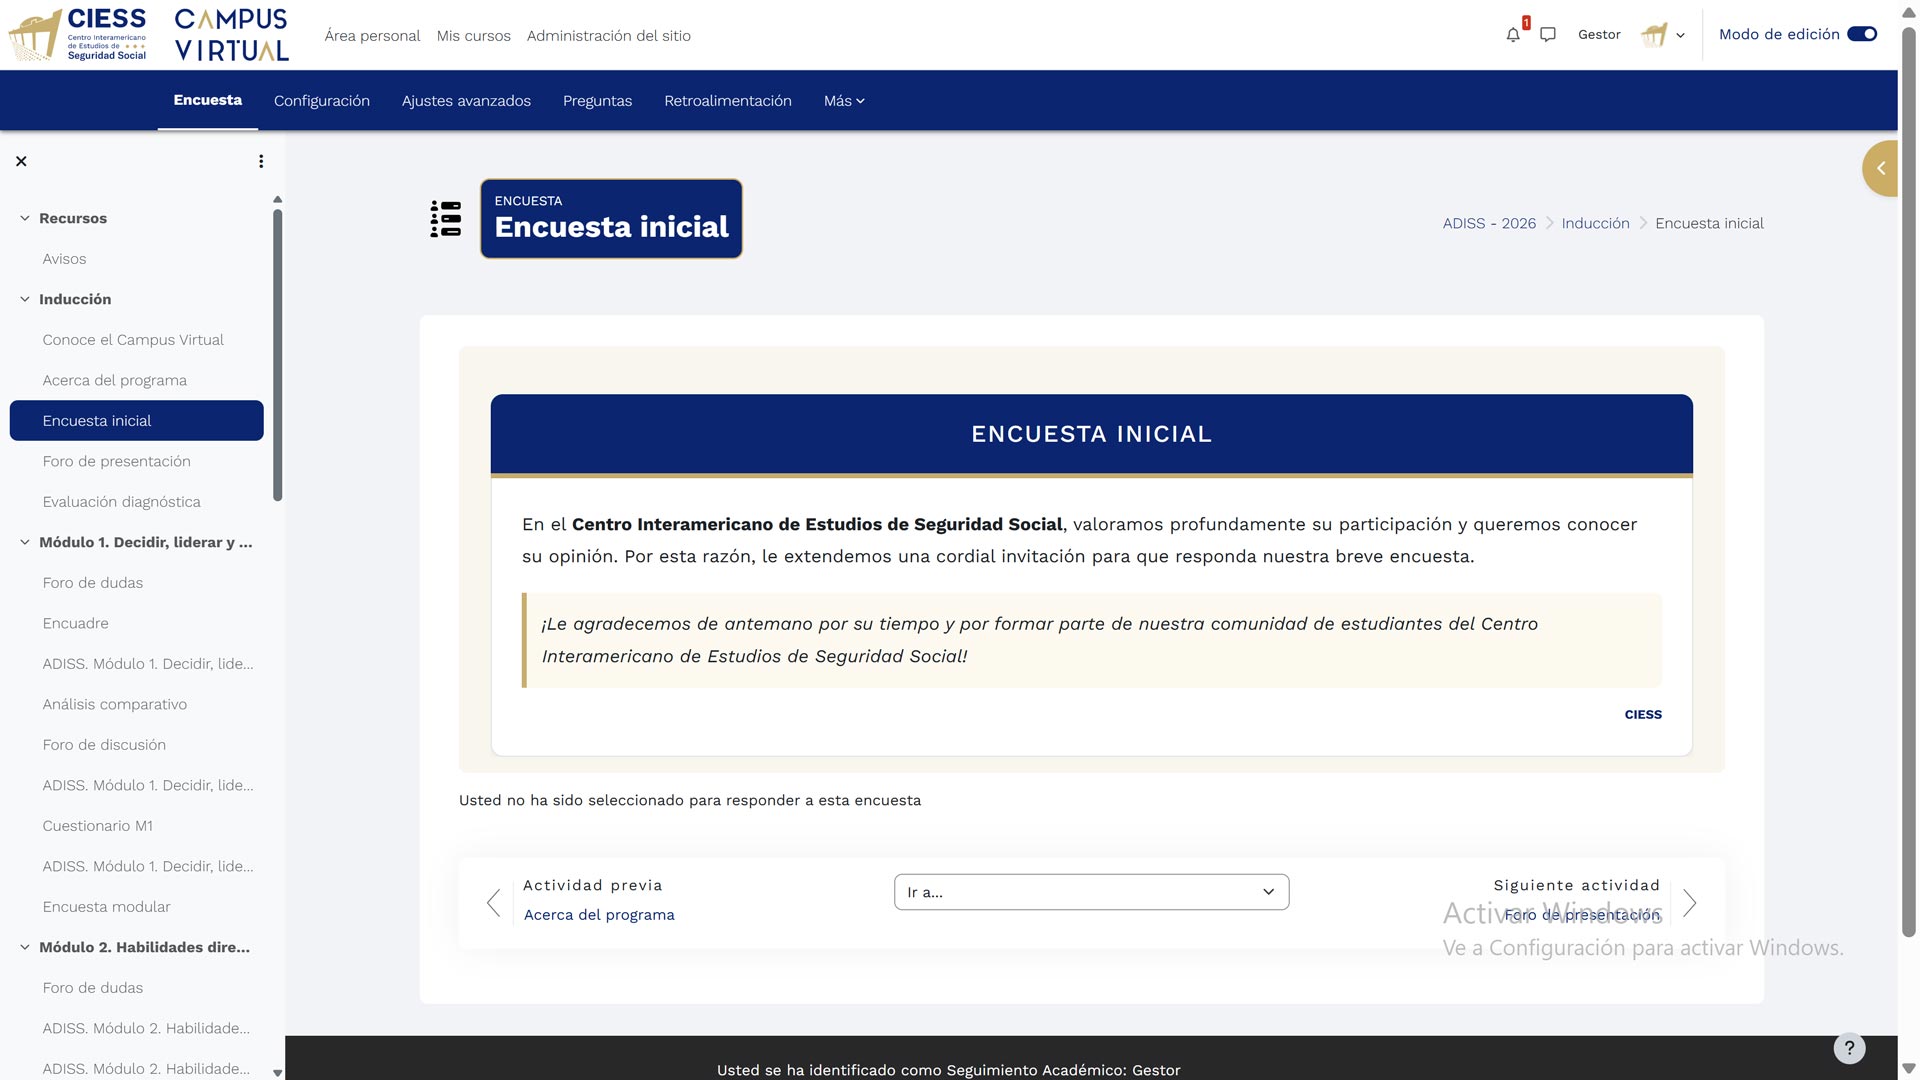
Participate in or supervise the Introduction forum. This space is essential for interaction, where questions are listed to complete the profile, express expectations about the activity, mention online learning challenges, and suggest additional resources.
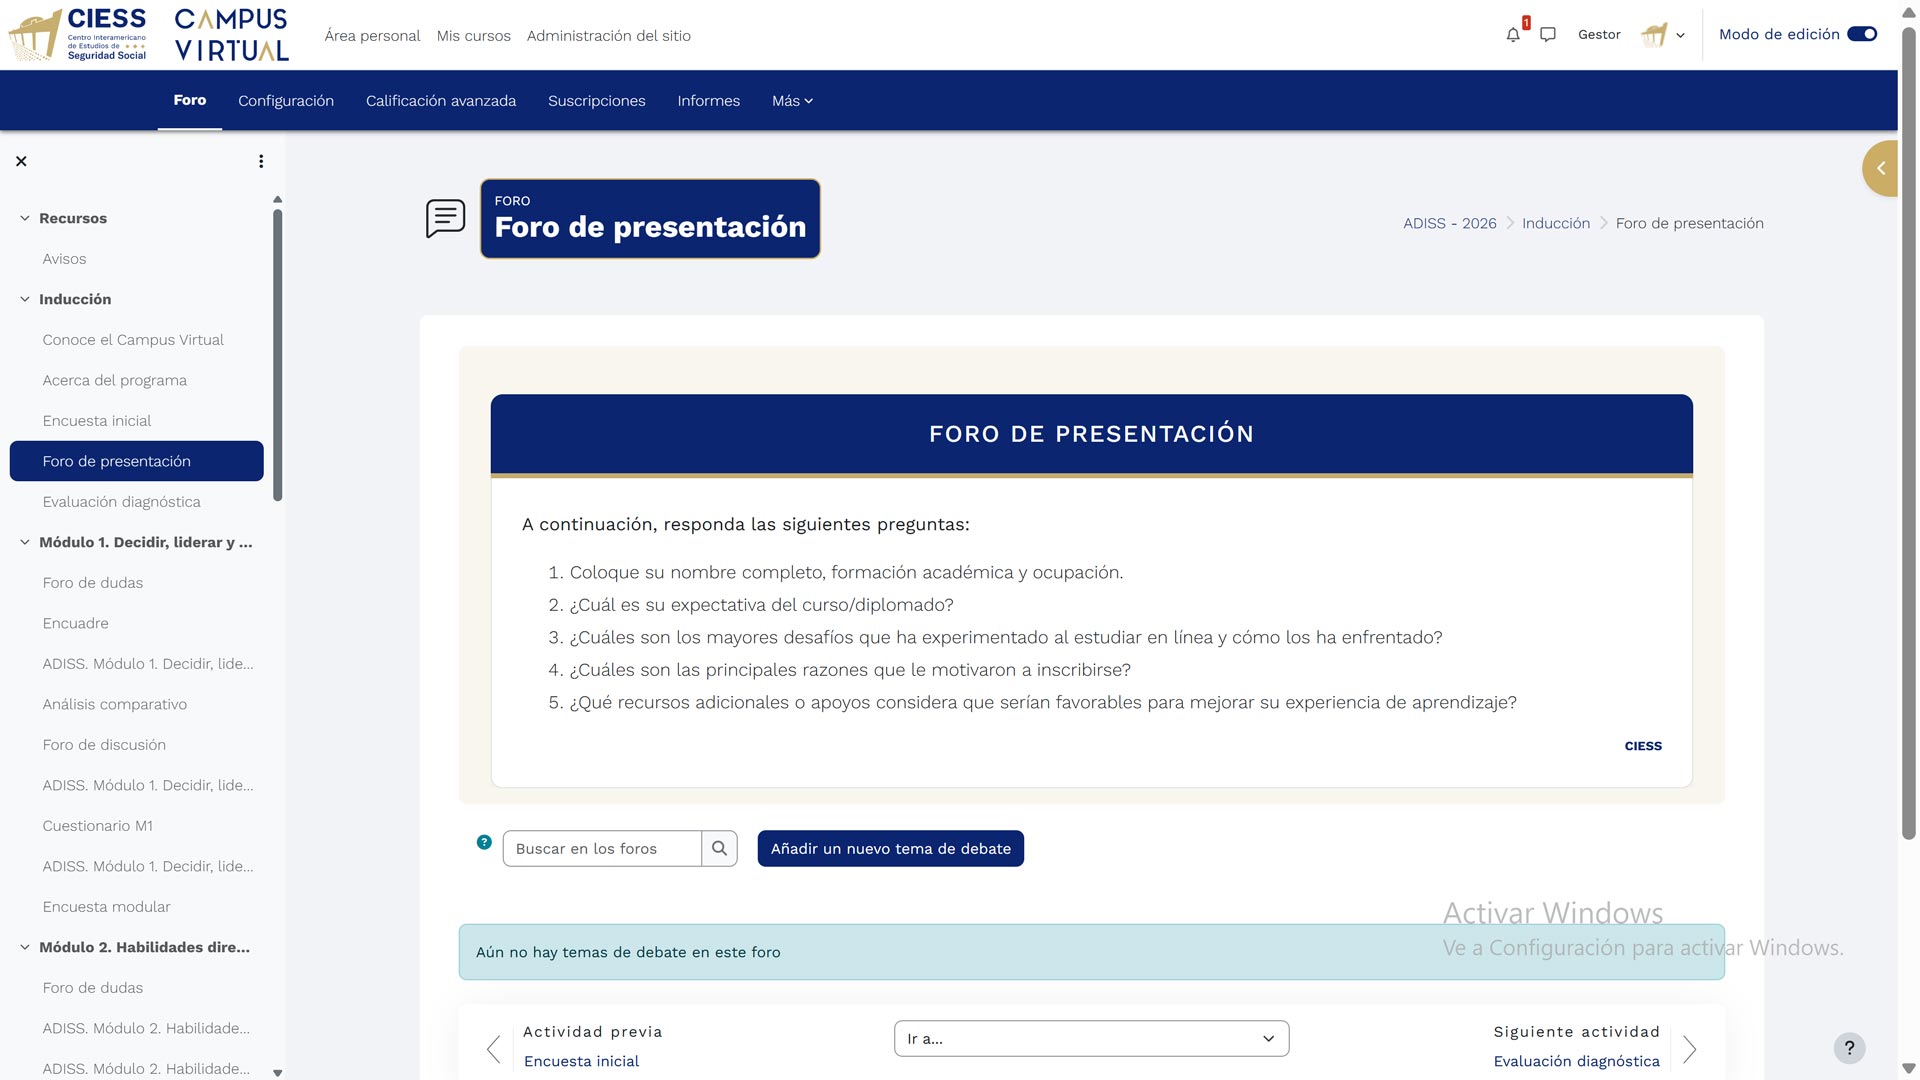
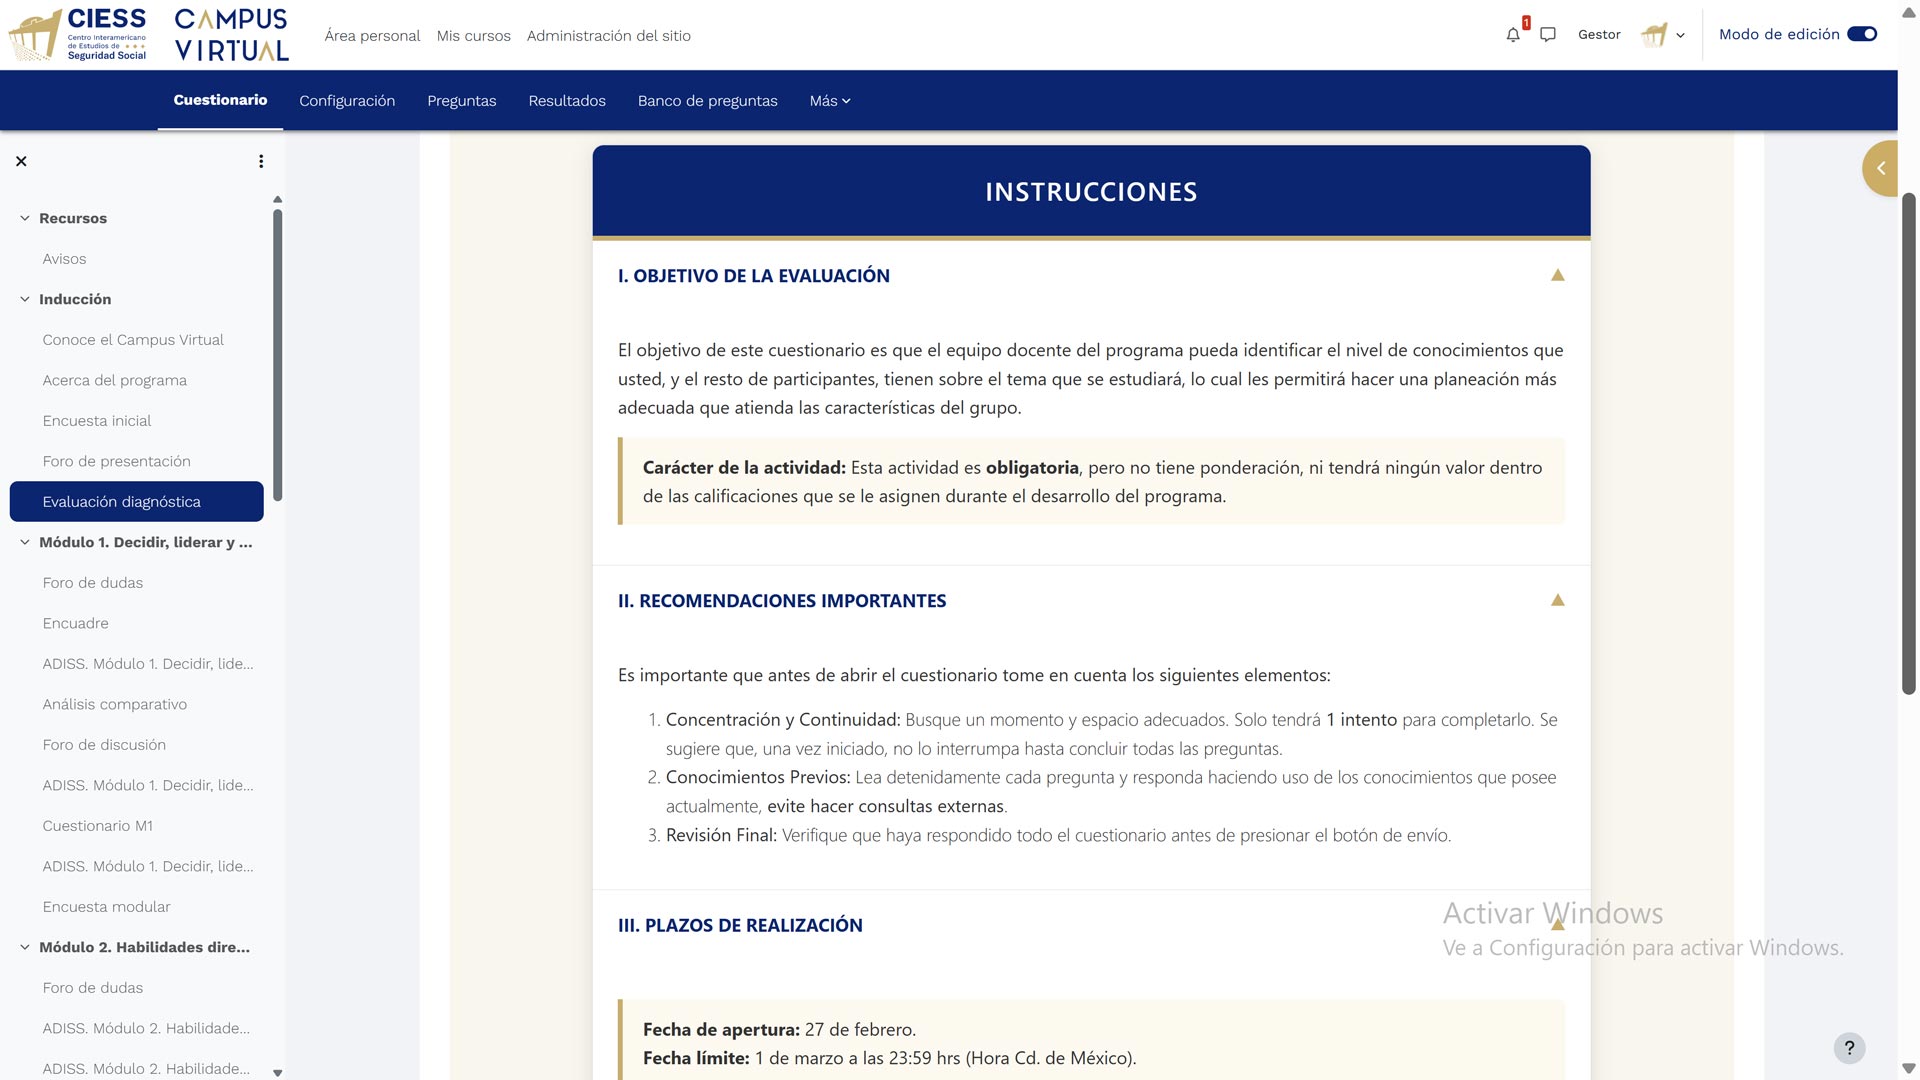
Before completing any assessment, carefully read the Instructions section. Here you will find the assessment objective, important recommendations (such as maintaining focus and using prior knowledge), and the completion deadlines (opening and closing dates).
5. Grade Activities
Select the academic activity: From the main "My courses" screen, identify and select the academic activity corresponding to the course you want to grade. Click on the name or image of the activity to access the virtual classroom.
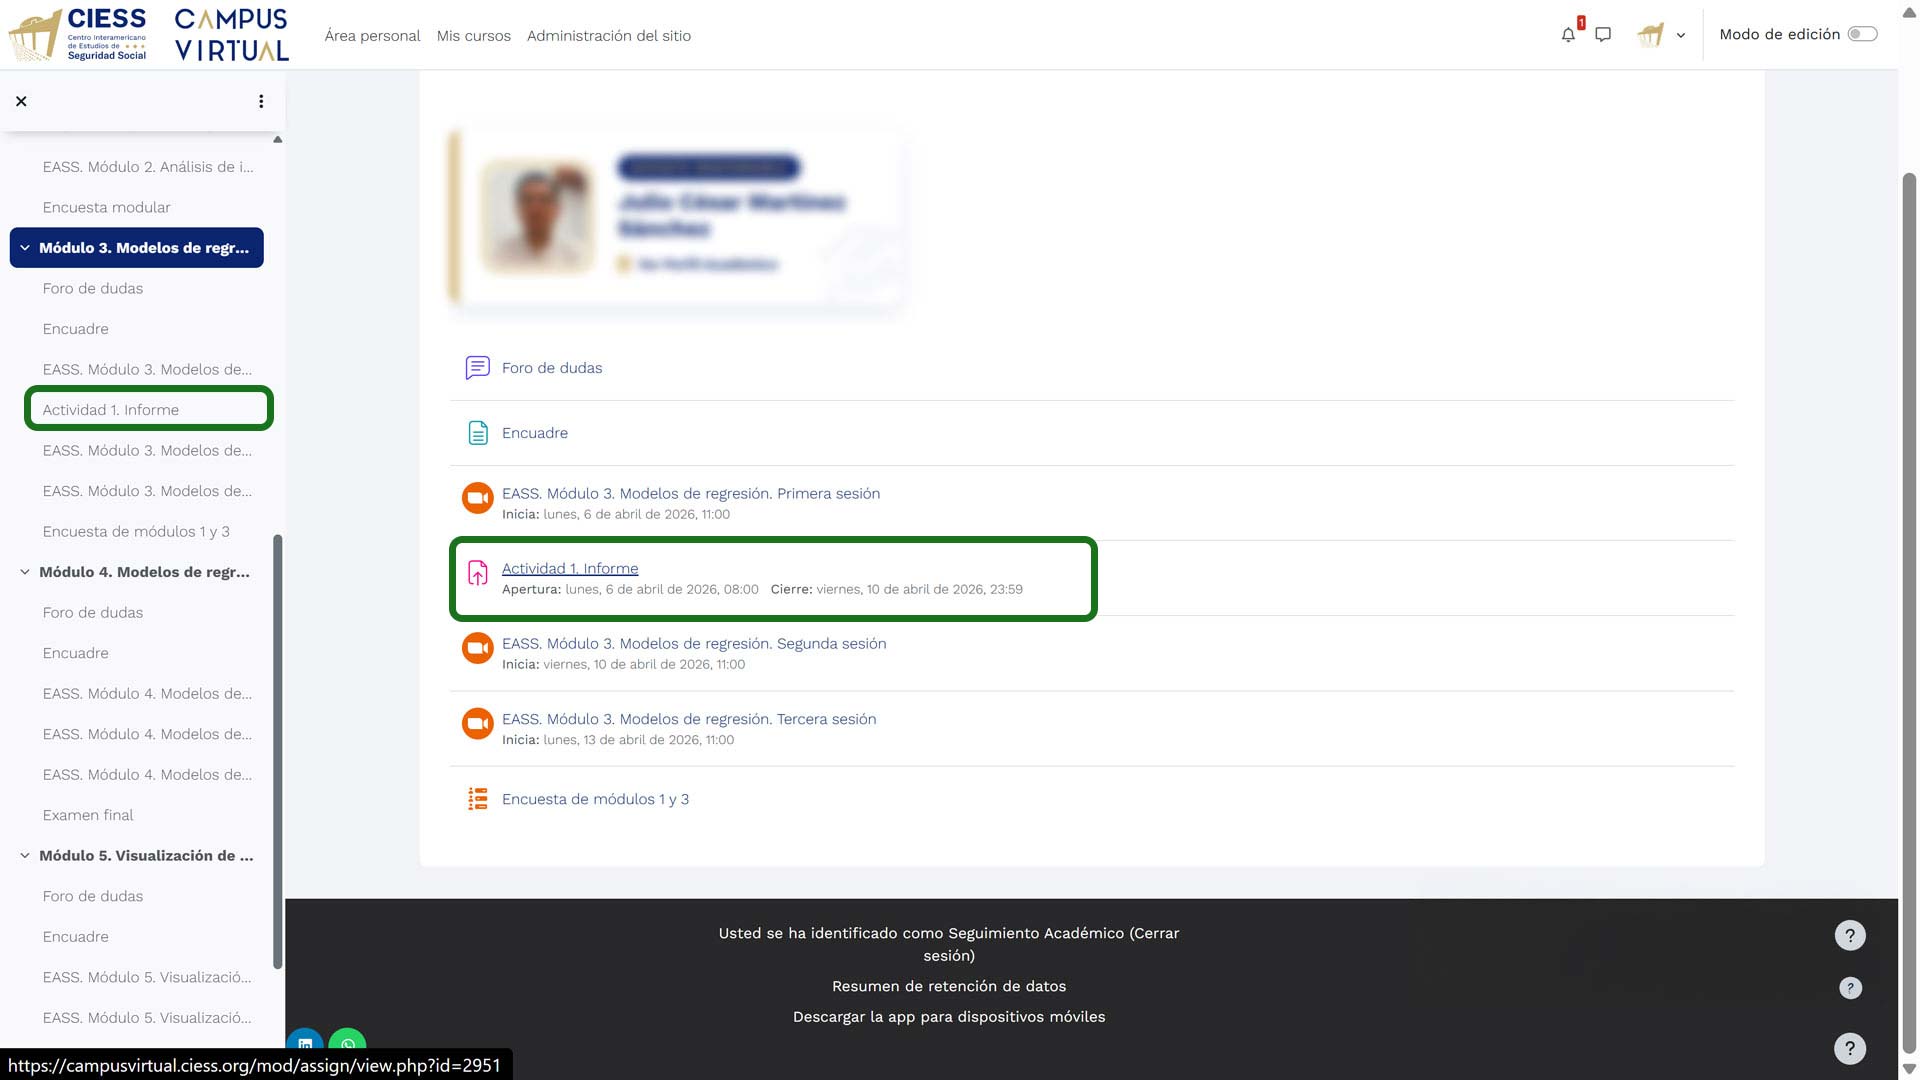
Locate the activity in the module: Once inside the course, navigate using the left side menu to the corresponding module (e.g., Module 3). In the central area of the platform, you will see the list of available sessions and activities. Identify the specific activity you need to grade (e.g., "Activity 1. Report") and click on it to access the details.
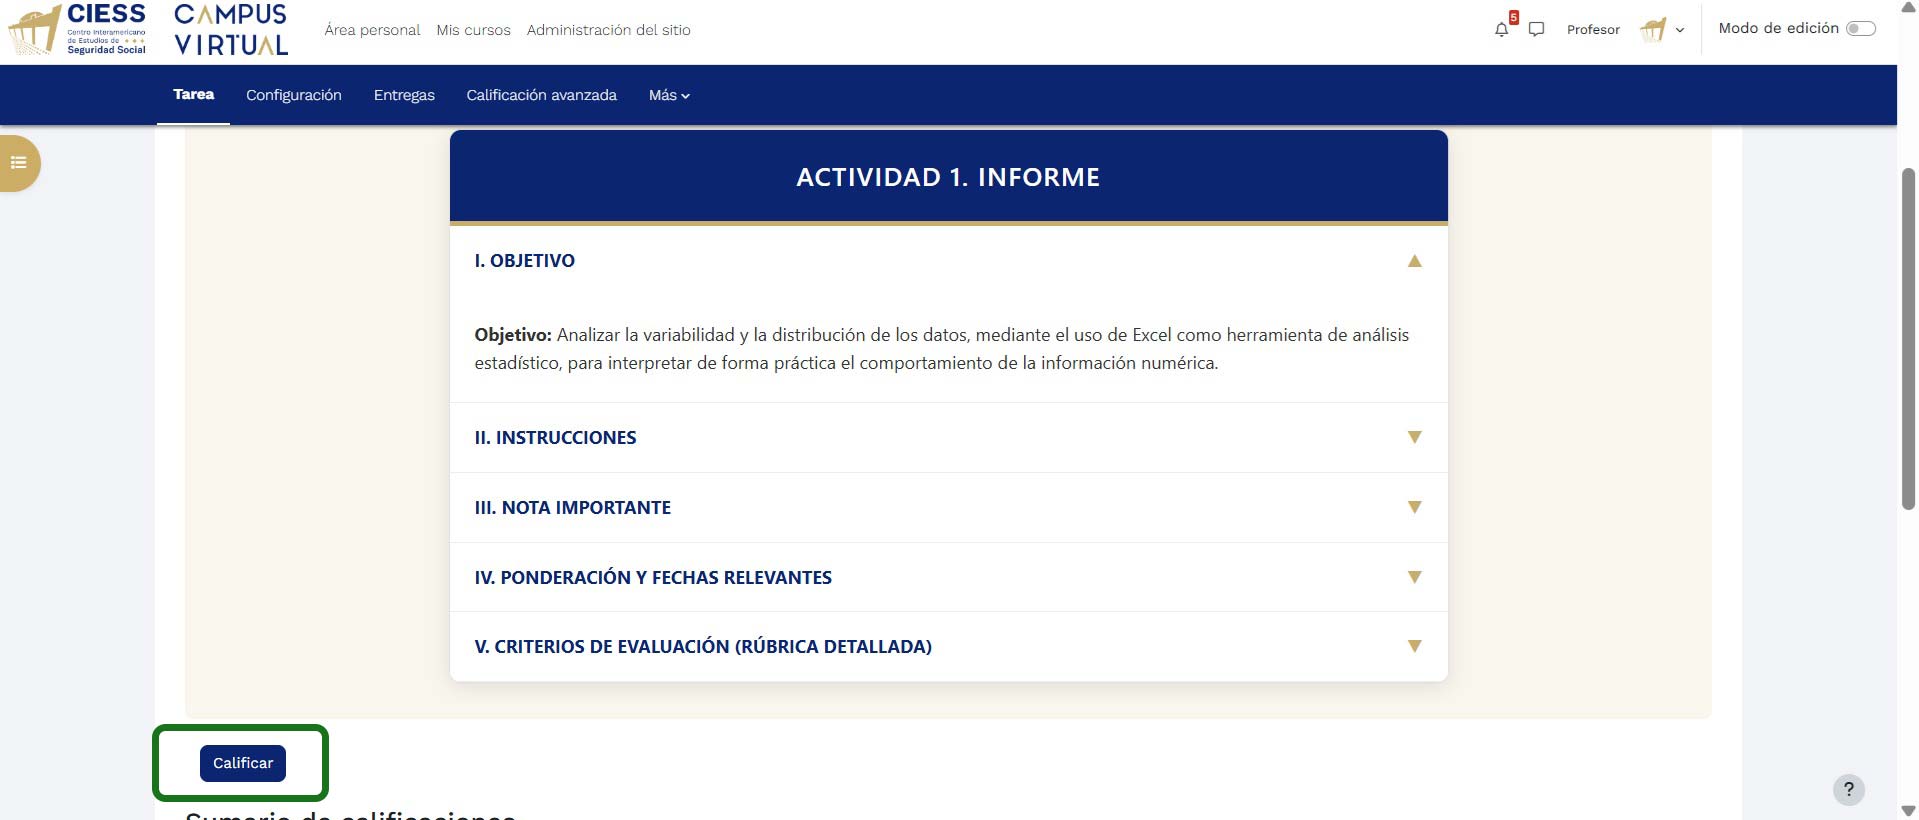
Review the activity information: When accessing the activity, the description screen will be displayed where you can view detailed information. Click on each expandable element to review:
- Objective: Learning purpose of the activity.
- Instructions: Specific guidelines for completing the assignment.
- Important notes: Relevant considerations for the assessment.
- Weighting: Percentage value of the activity within the course.
- Assessment criteria: Rubric or grading parameters.
To access the grading interface, locate and click the "Grade" button.
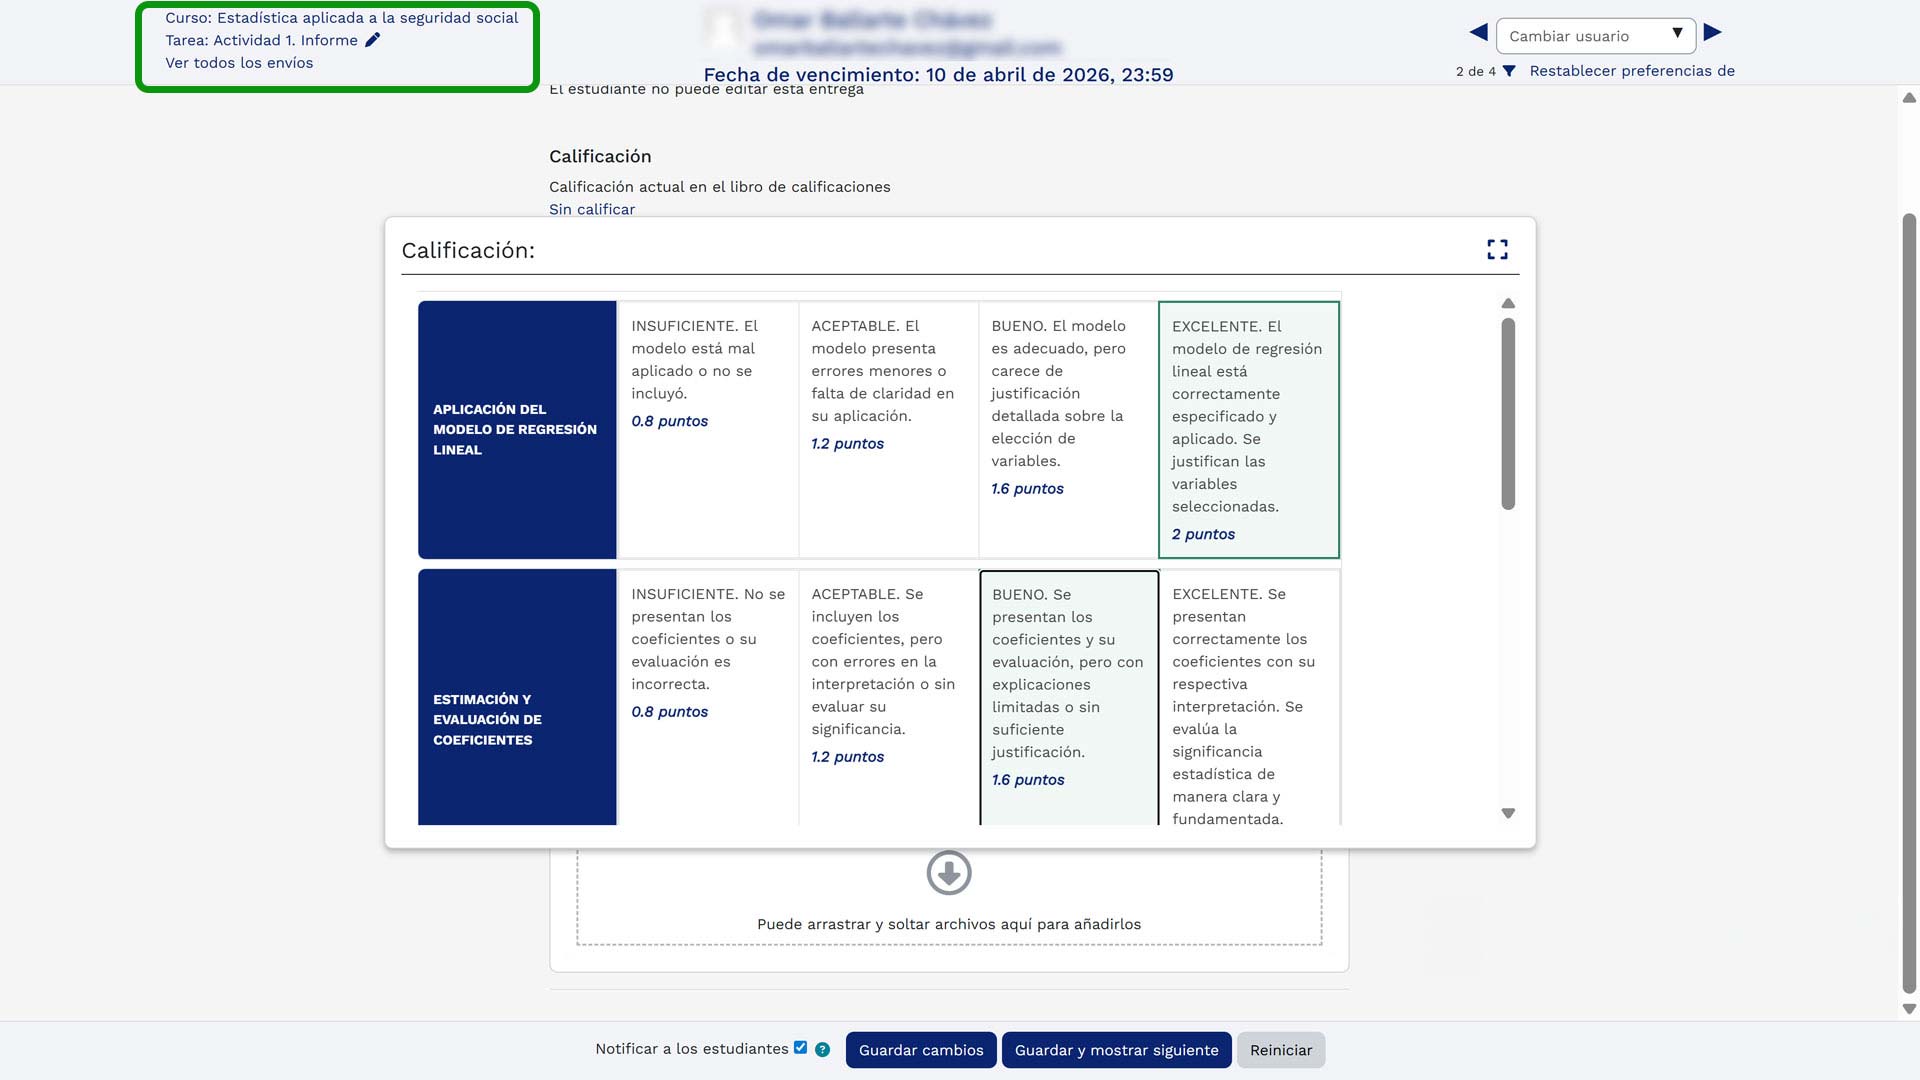
Navigation in the grading interface: Once inside the Moodle grading tool, note that in the top left of the screen you will find key navigation elements that will allow you to easily move between different options:
- Academic activity: Shows the name of the current course and allows you to return to its main view.
- Assignment to grade: Indicates the specific name of the activity you are evaluating at that moment.
- View all submissions: Option that allows you to view the complete list of students with their respective submitted work, submission statuses, and dates.
This navigation structure helps you maintain the assessment context and quickly access submission management for the entire activity.
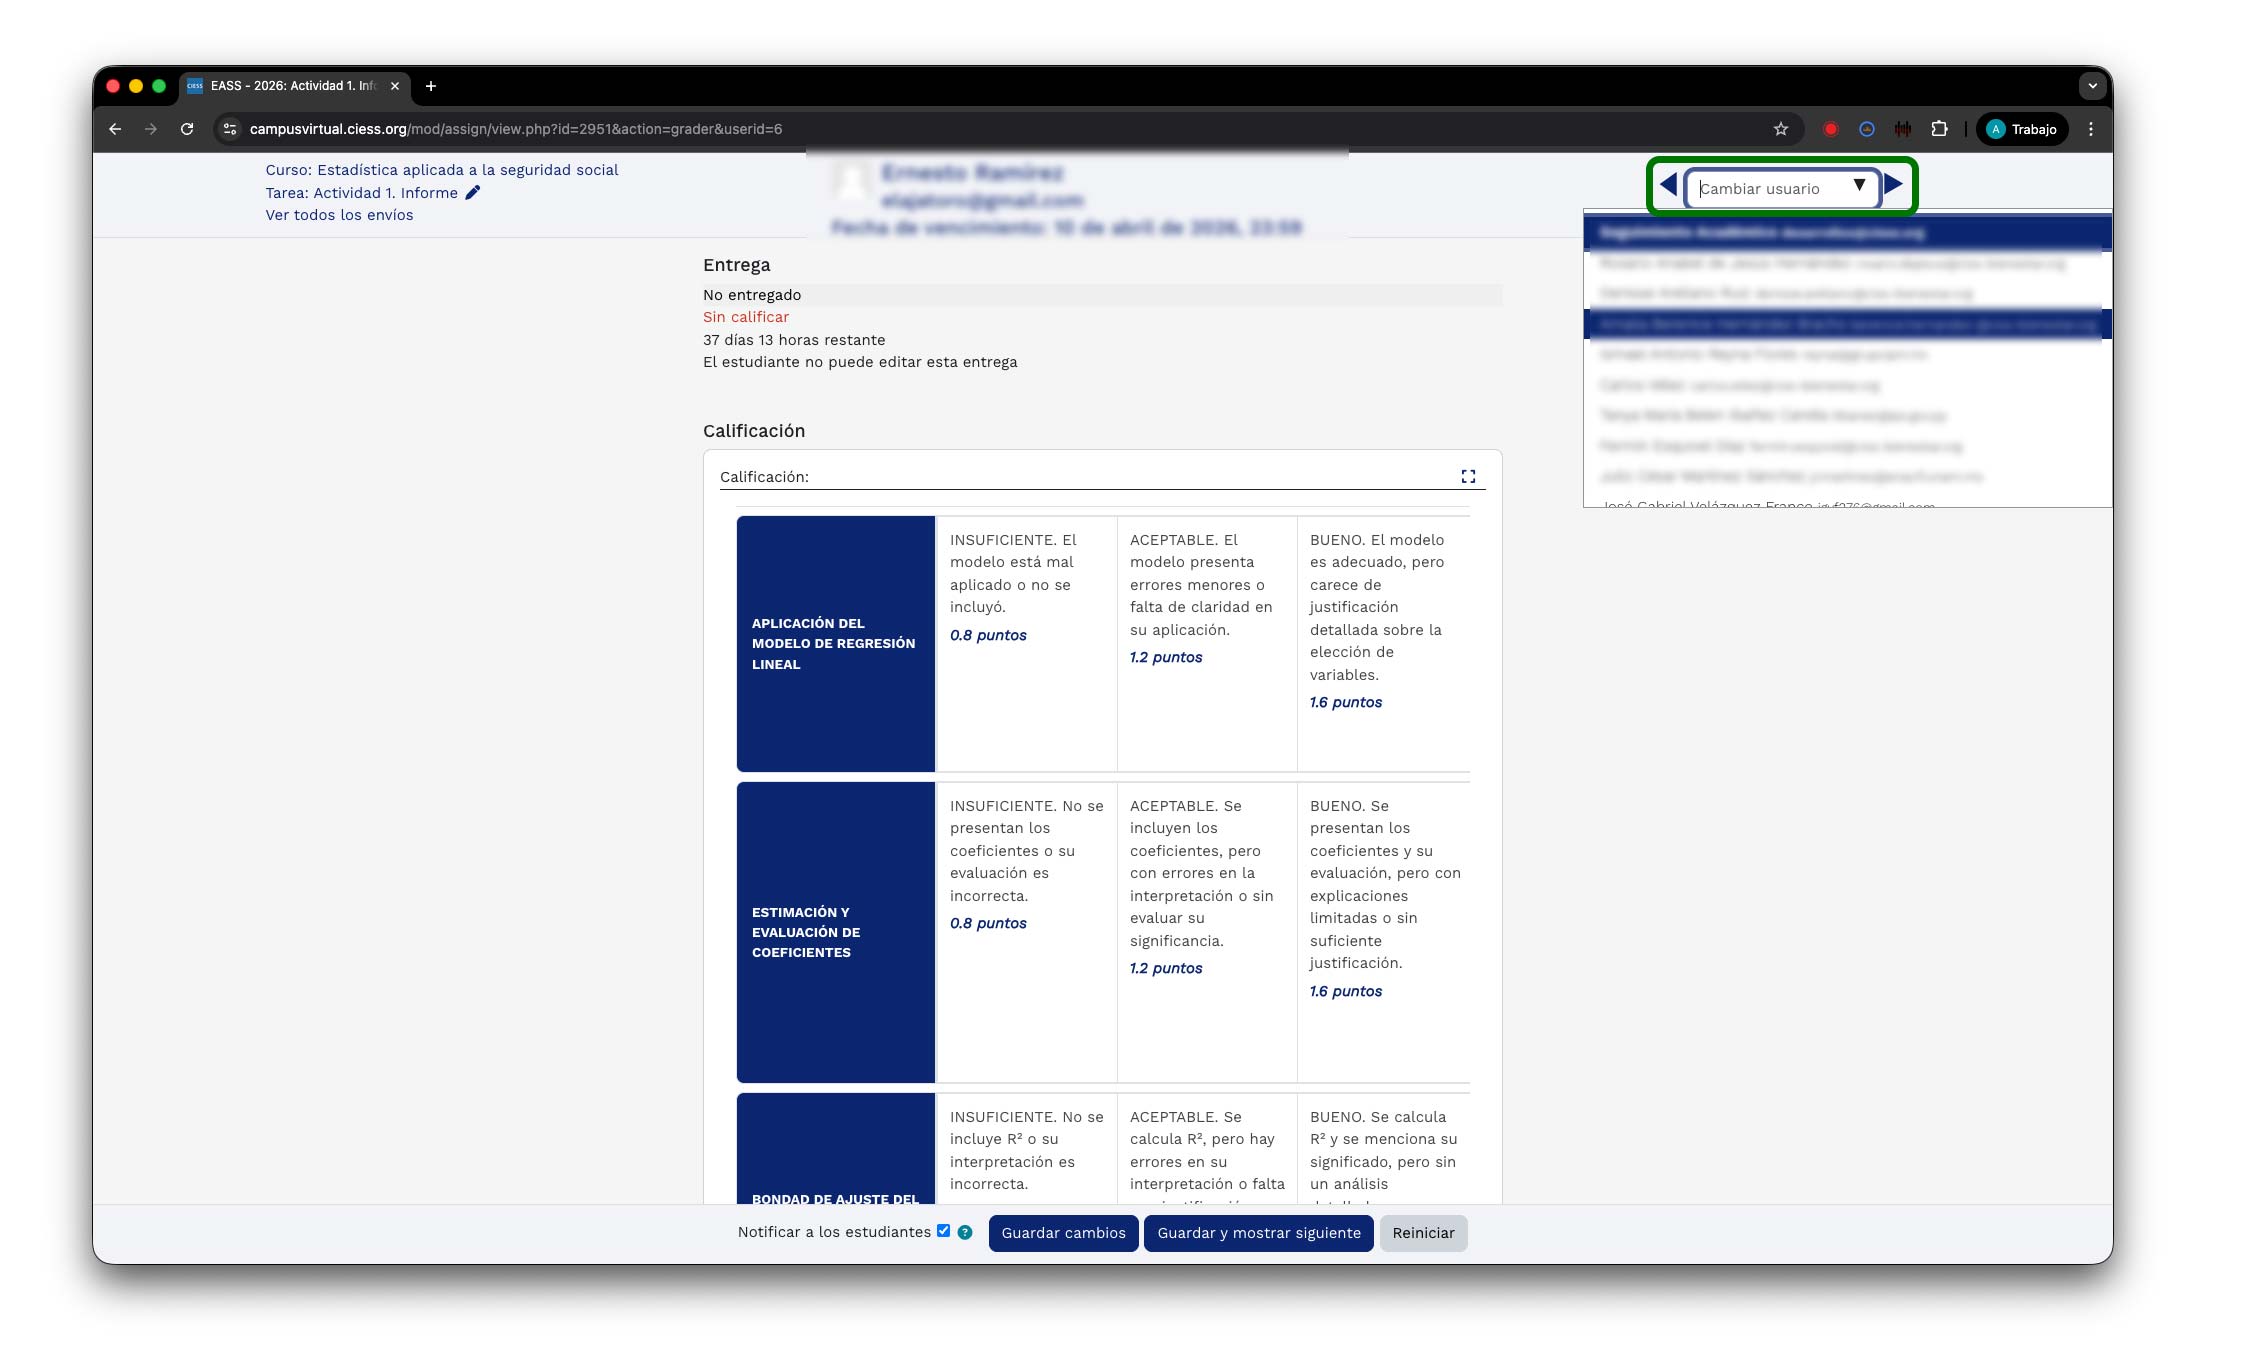
Evaluate the student: Select the student from the list to access their submitted work. You can directly select the desired student from the dropdown list or navigate one by one using the navigation arrows to move forward or backward between students sequentially.
Once on the assessment screen, you will see a table with the specific assessment criteria for the activity (defined in the rubric). Proceed as follows:
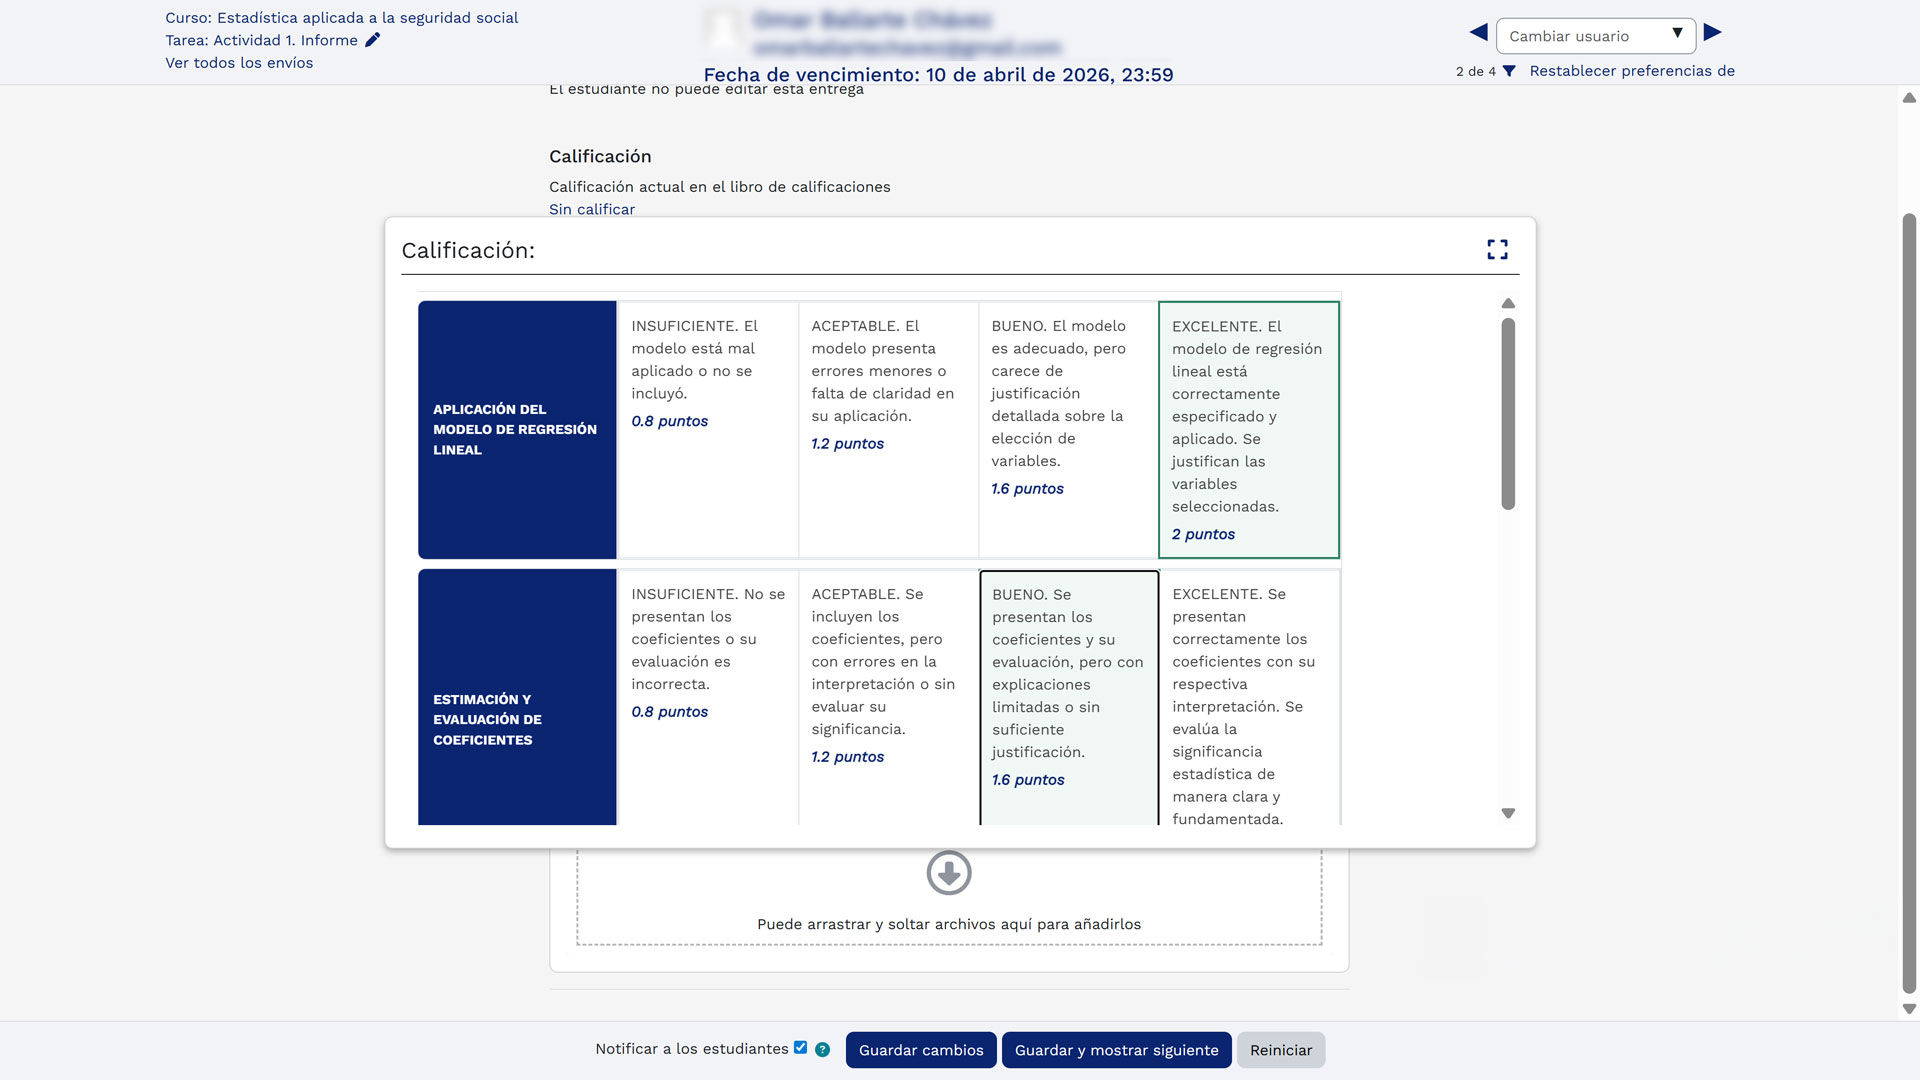
Expand the grading region: Before starting to grade, make sure to click the "Expand the grading region" option to fully visualize the rubric, criteria, and student work without space restrictions.
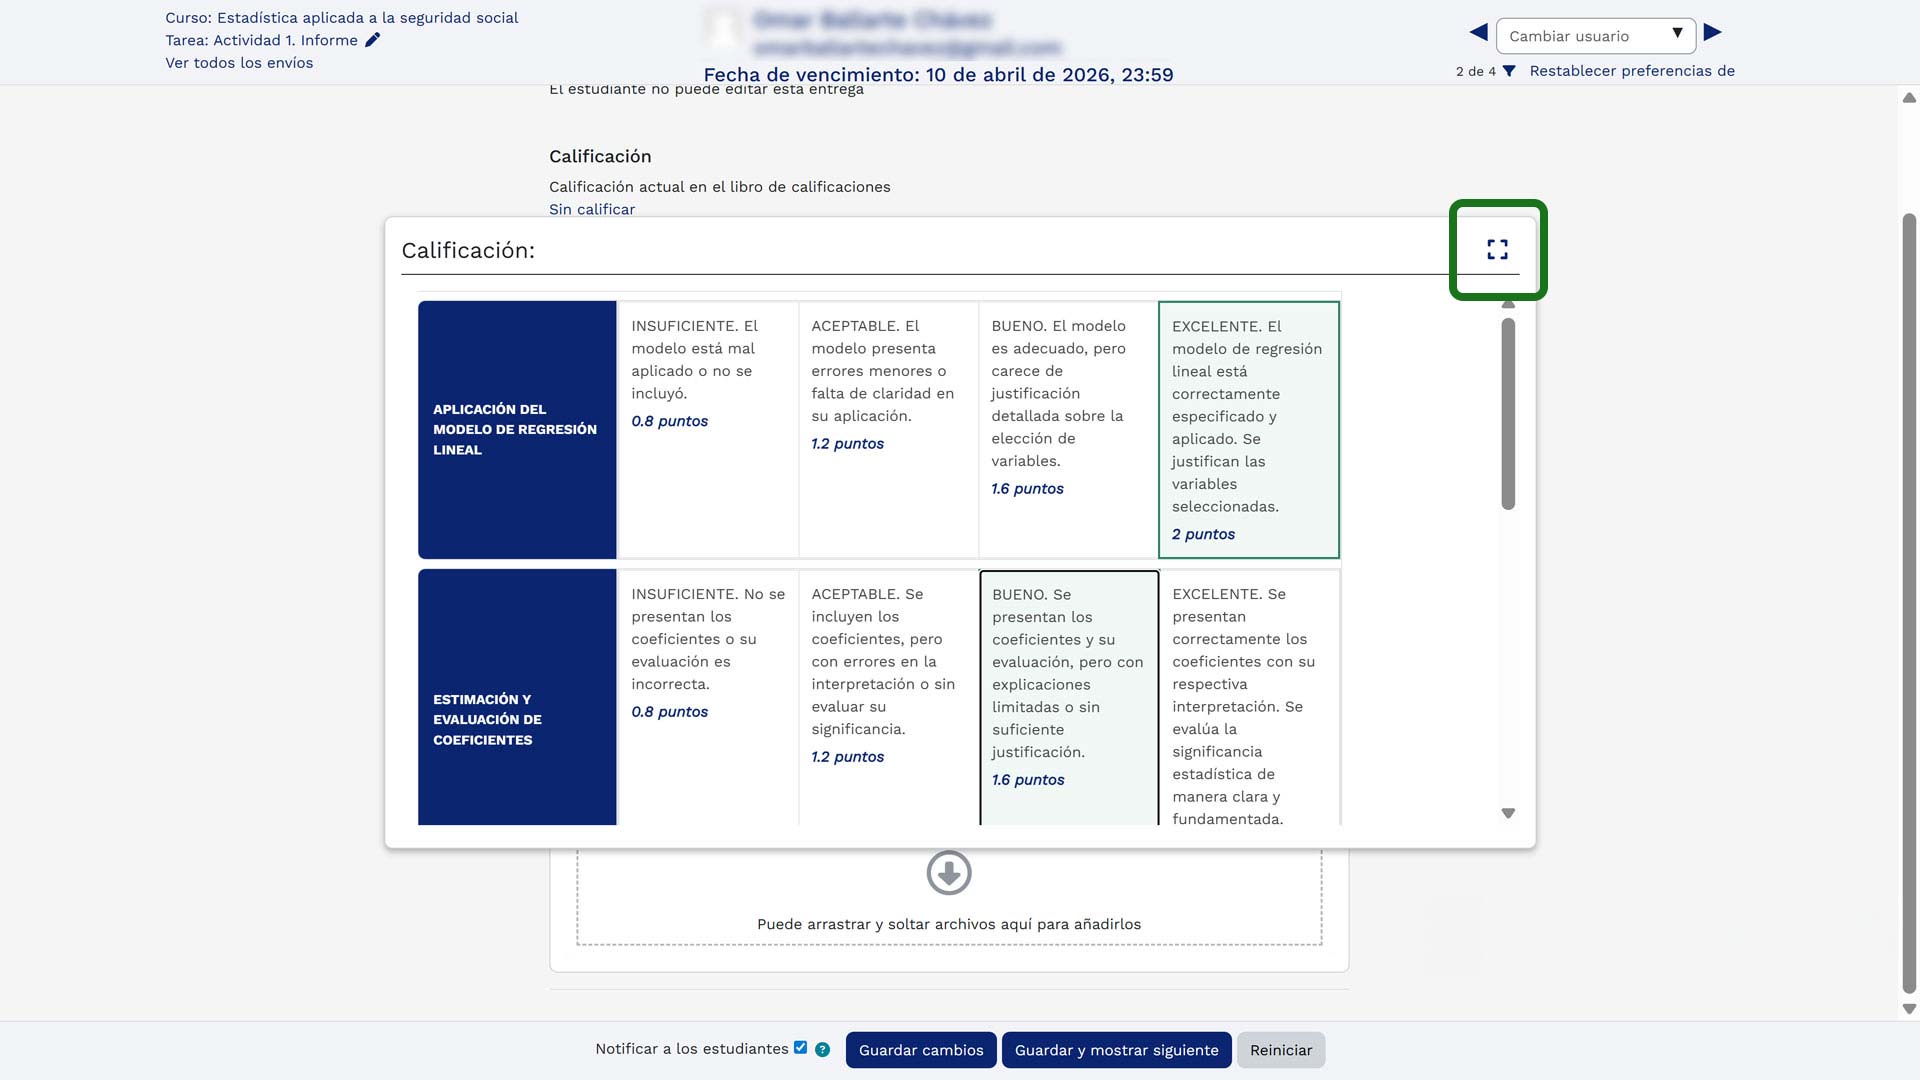
For each rubric criterion:
- Click to select the corresponding performance level (e.g.: INSUFFICIENT, ACCEPTABLE, GOOD, EXCELLENT).
- The Moodle system will automatically assign the corresponding points based on the selection made.
- Repeat this process for each criterion until the complete assessment is finished.
Note: The weighting and criteria shown are specific to each activity. The criteria and points will change depending on the assignment you are evaluating at that time.
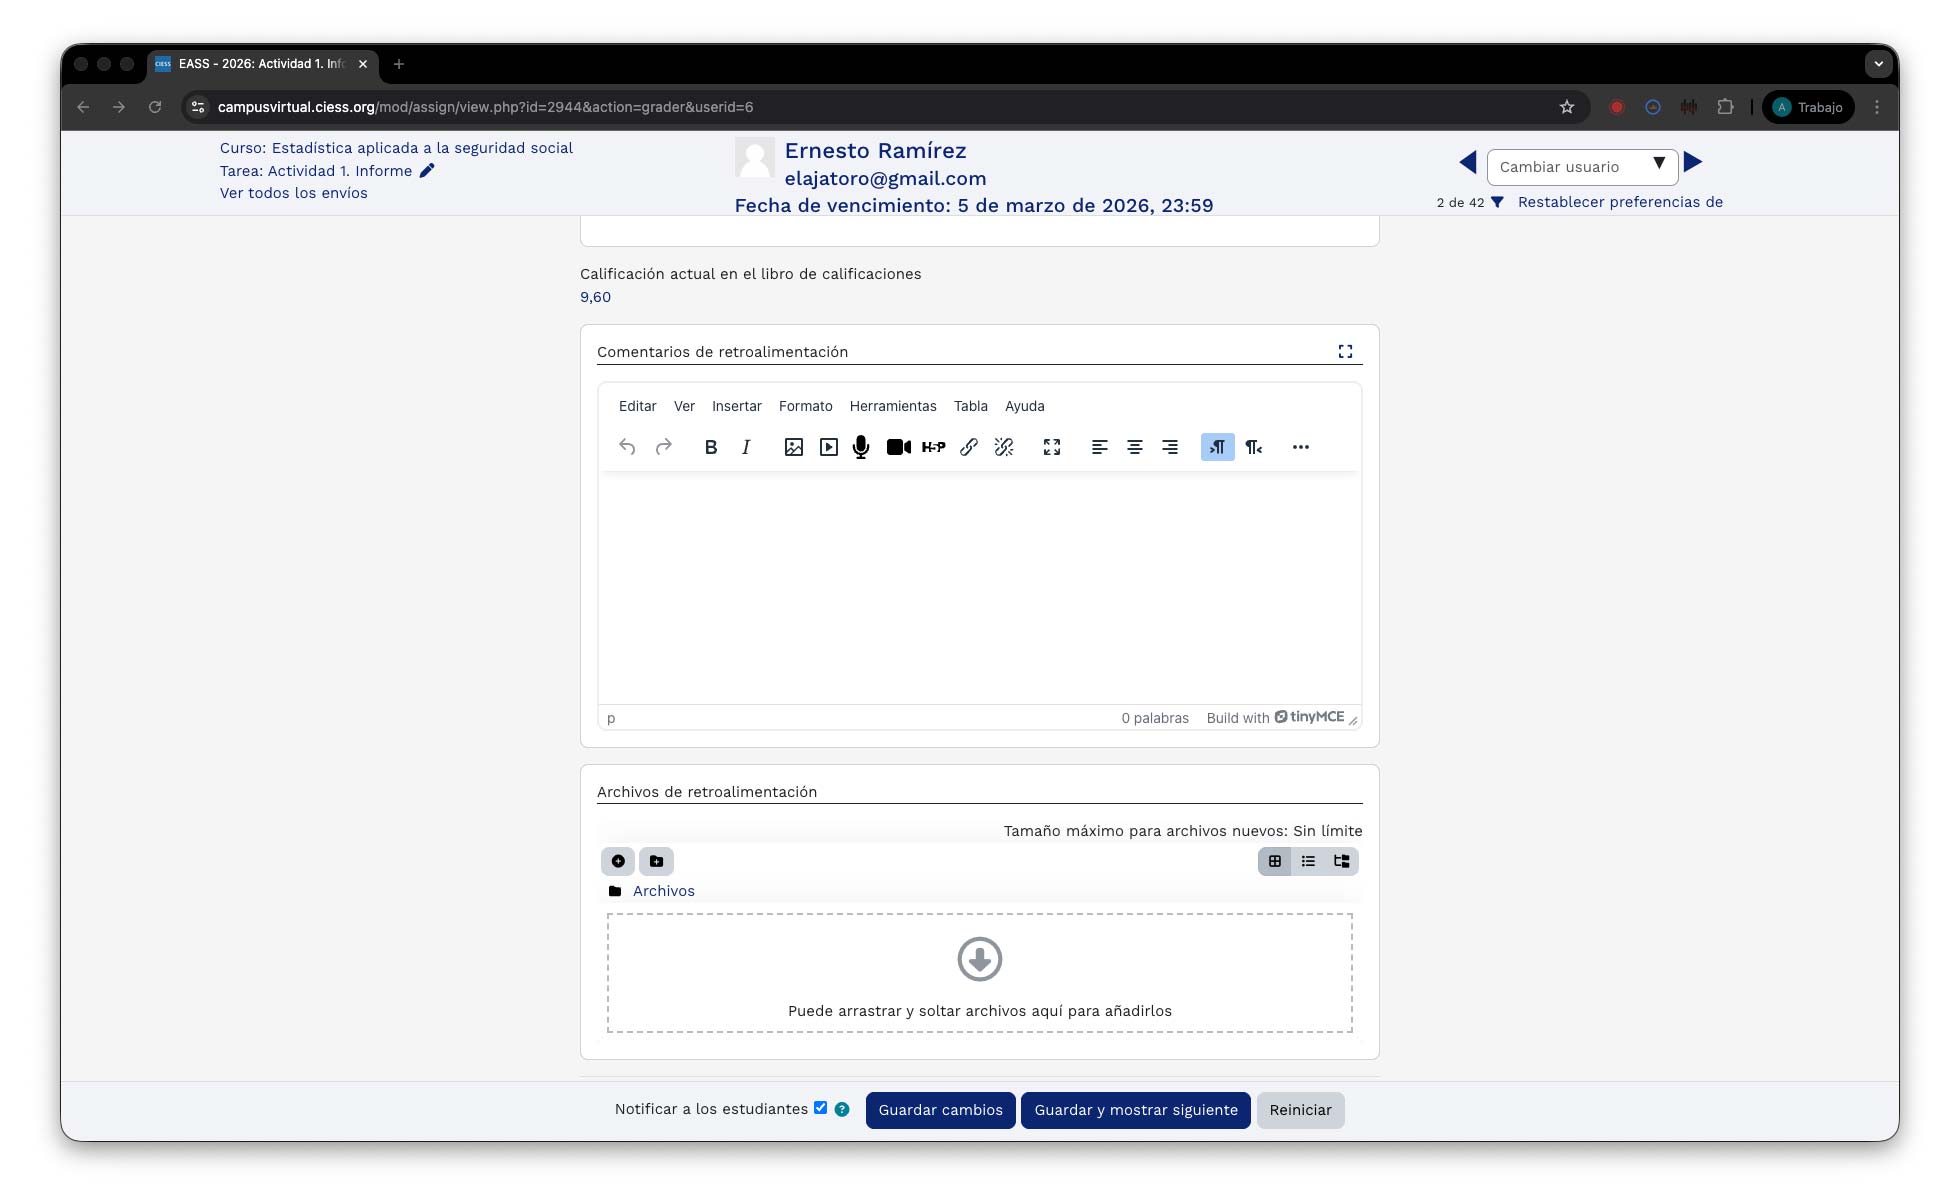
Review grade and add feedback: Once you have evaluated all rubric criteria, note that below the weighting table the current grade in the gradebook is displayed, which reflects the total score obtained by the student based on the selections made.
In this section you can also provide feedback to the student through the following options:
- Textual feedback comments: Write observations, suggestions, or recommendations directly in the enabled text field. This feedback is visible to the student.
- Feedback files: You can attach additional documents (in PDF or Word format) to complement your comments, such as detailed rubrics, improvement guides, or support documents.
Providing detailed feedback helps the student understand their performance and identify areas for improvement for future activities.
Save the grade: Once you have completed the assessment of all criteria and added the desired feedback, proceed to save the changes:
- Save changes: Records the grade and stays on the current student's screen to make additional adjustments if necessary.
- Save and show next: Records the current student's grade and automatically advances to the next student pending evaluation, optimizing the workflow when you have multiple submissions to review.
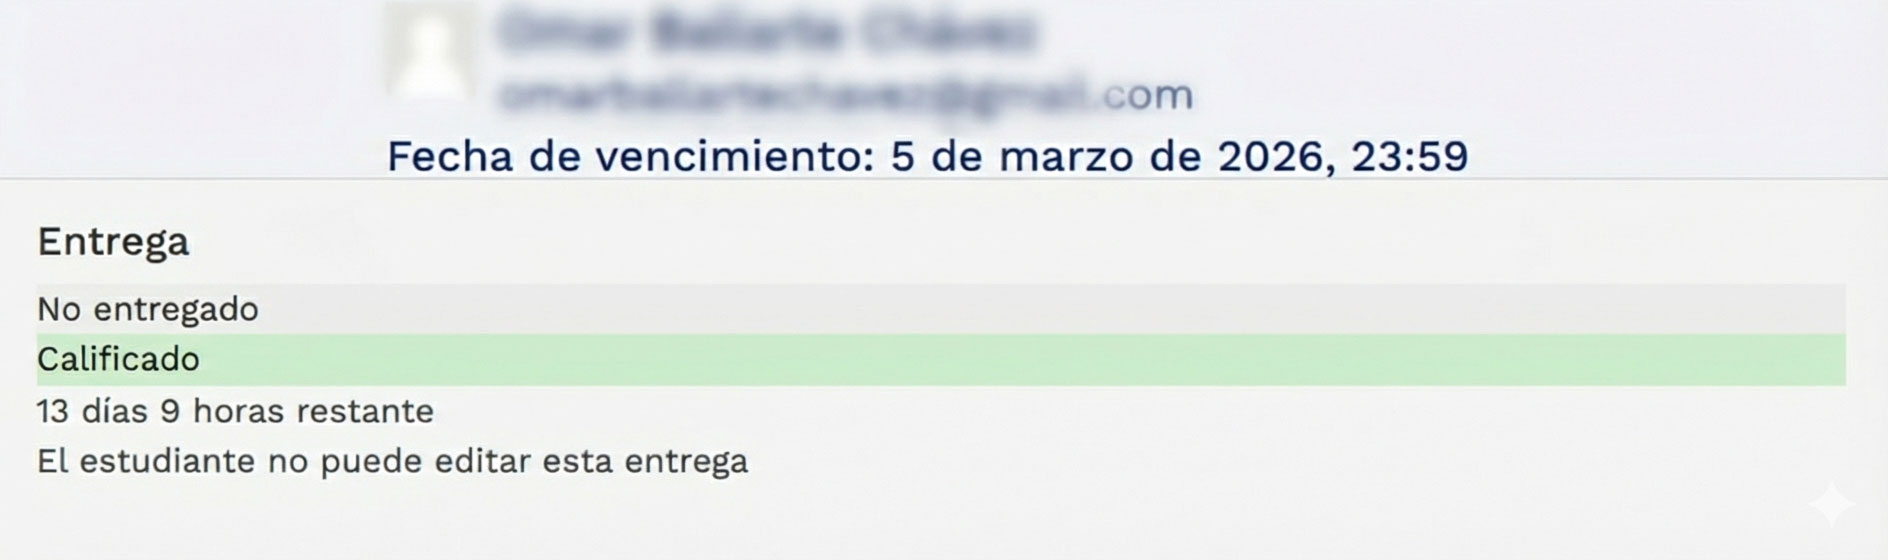
Confirmation: Verify on the following screen that the grade has been correctly reflected in the gradebook. The student will receive an automatic notification once the grade is available on the platform.
6. Grade Forums
Grading forums allows you to evaluate student participation in course discussions. The instructor can assign grades based on predefined assessment criteria, such as the quality of contributions, frequency of participation, and relevance of interventions.
Locate the forum: Enter the corresponding academic activity and navigate to the module where the forum you want to grade is located. You can use the left side menu to access the desired section directly or scroll vertically through the page until you find the forum. Click on the forum name to access its content.
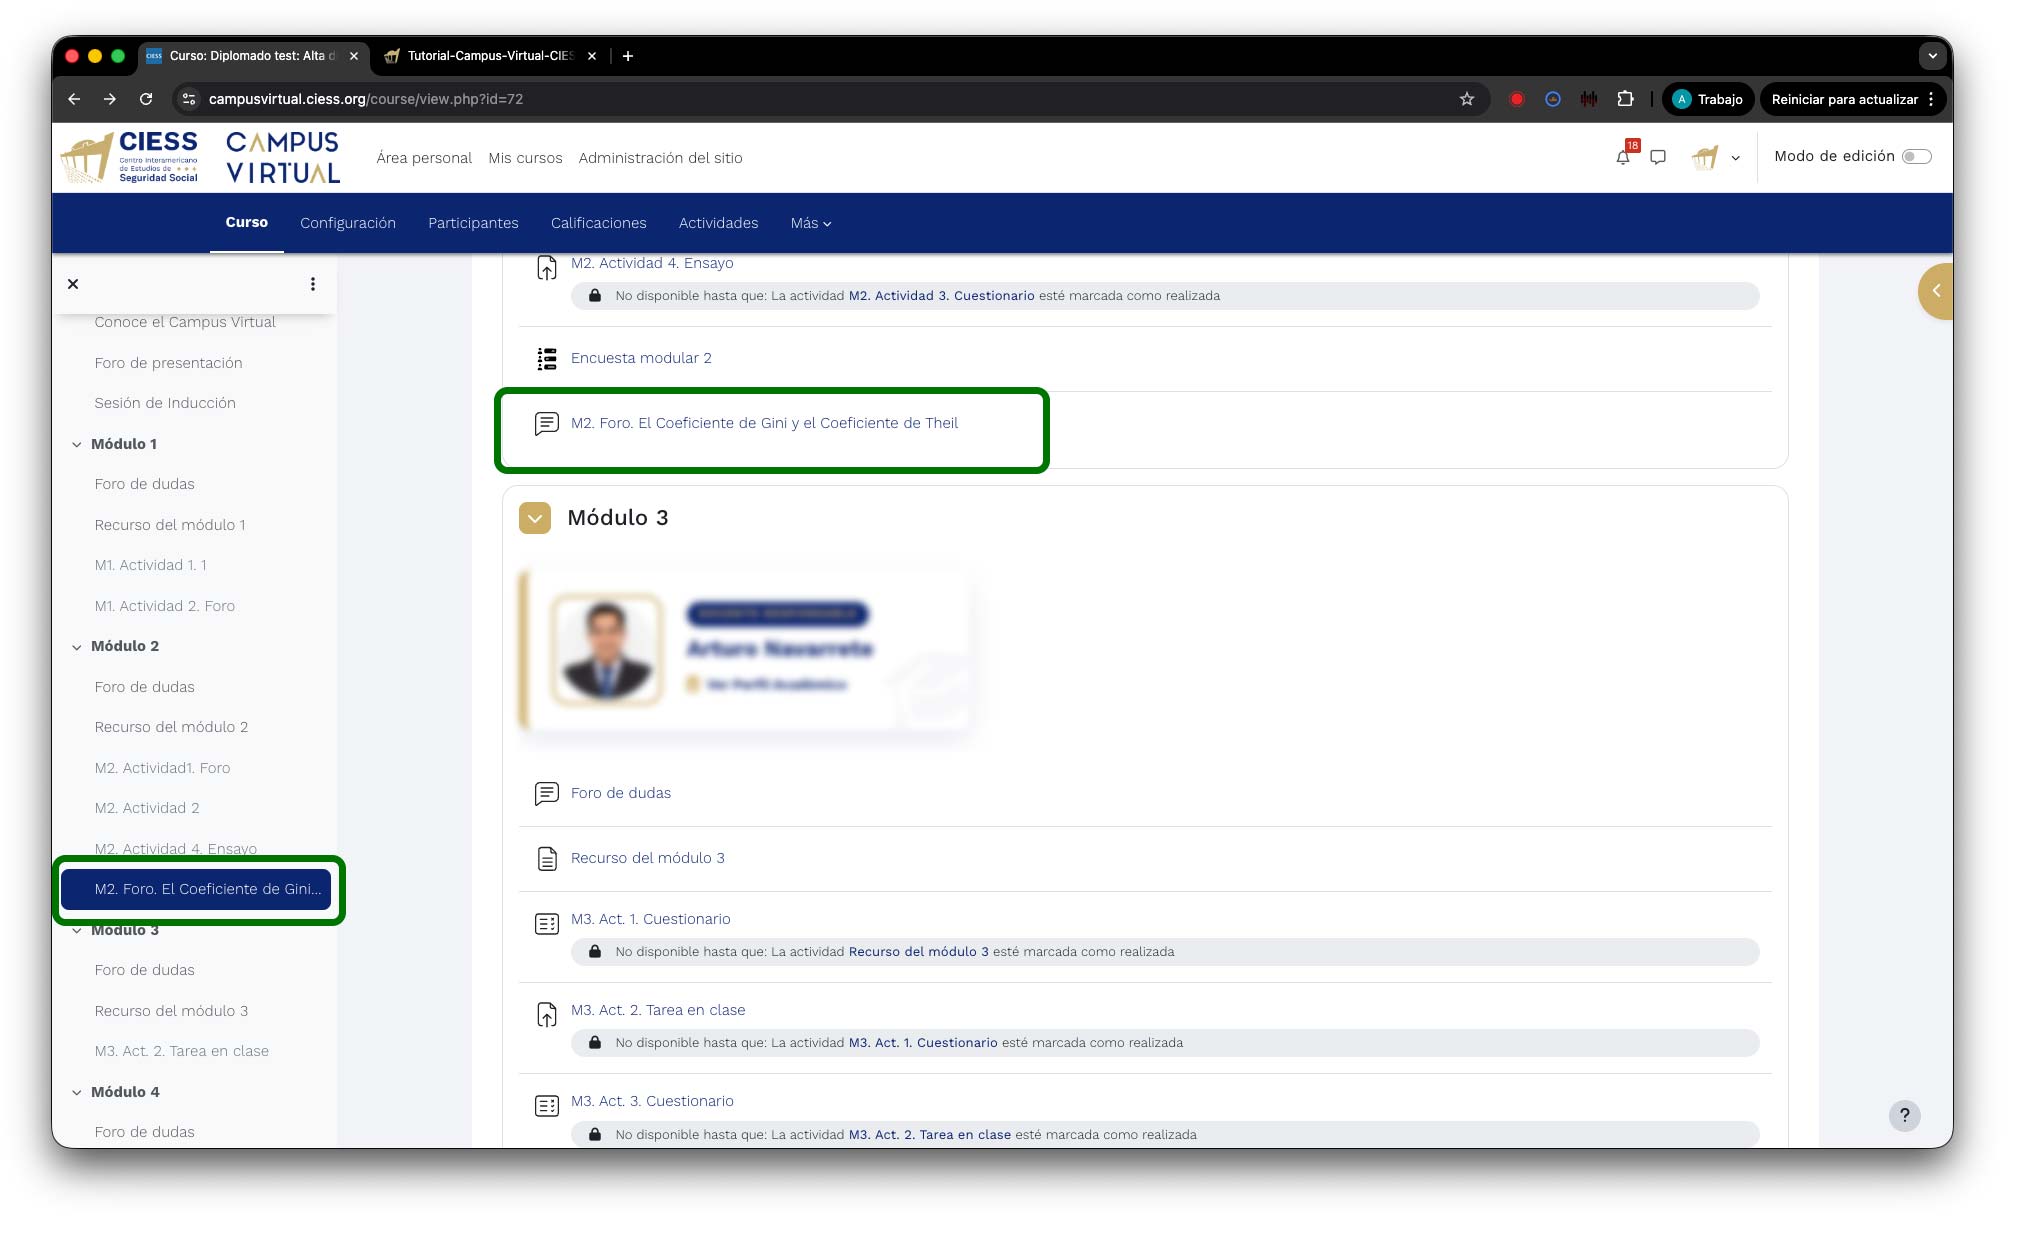
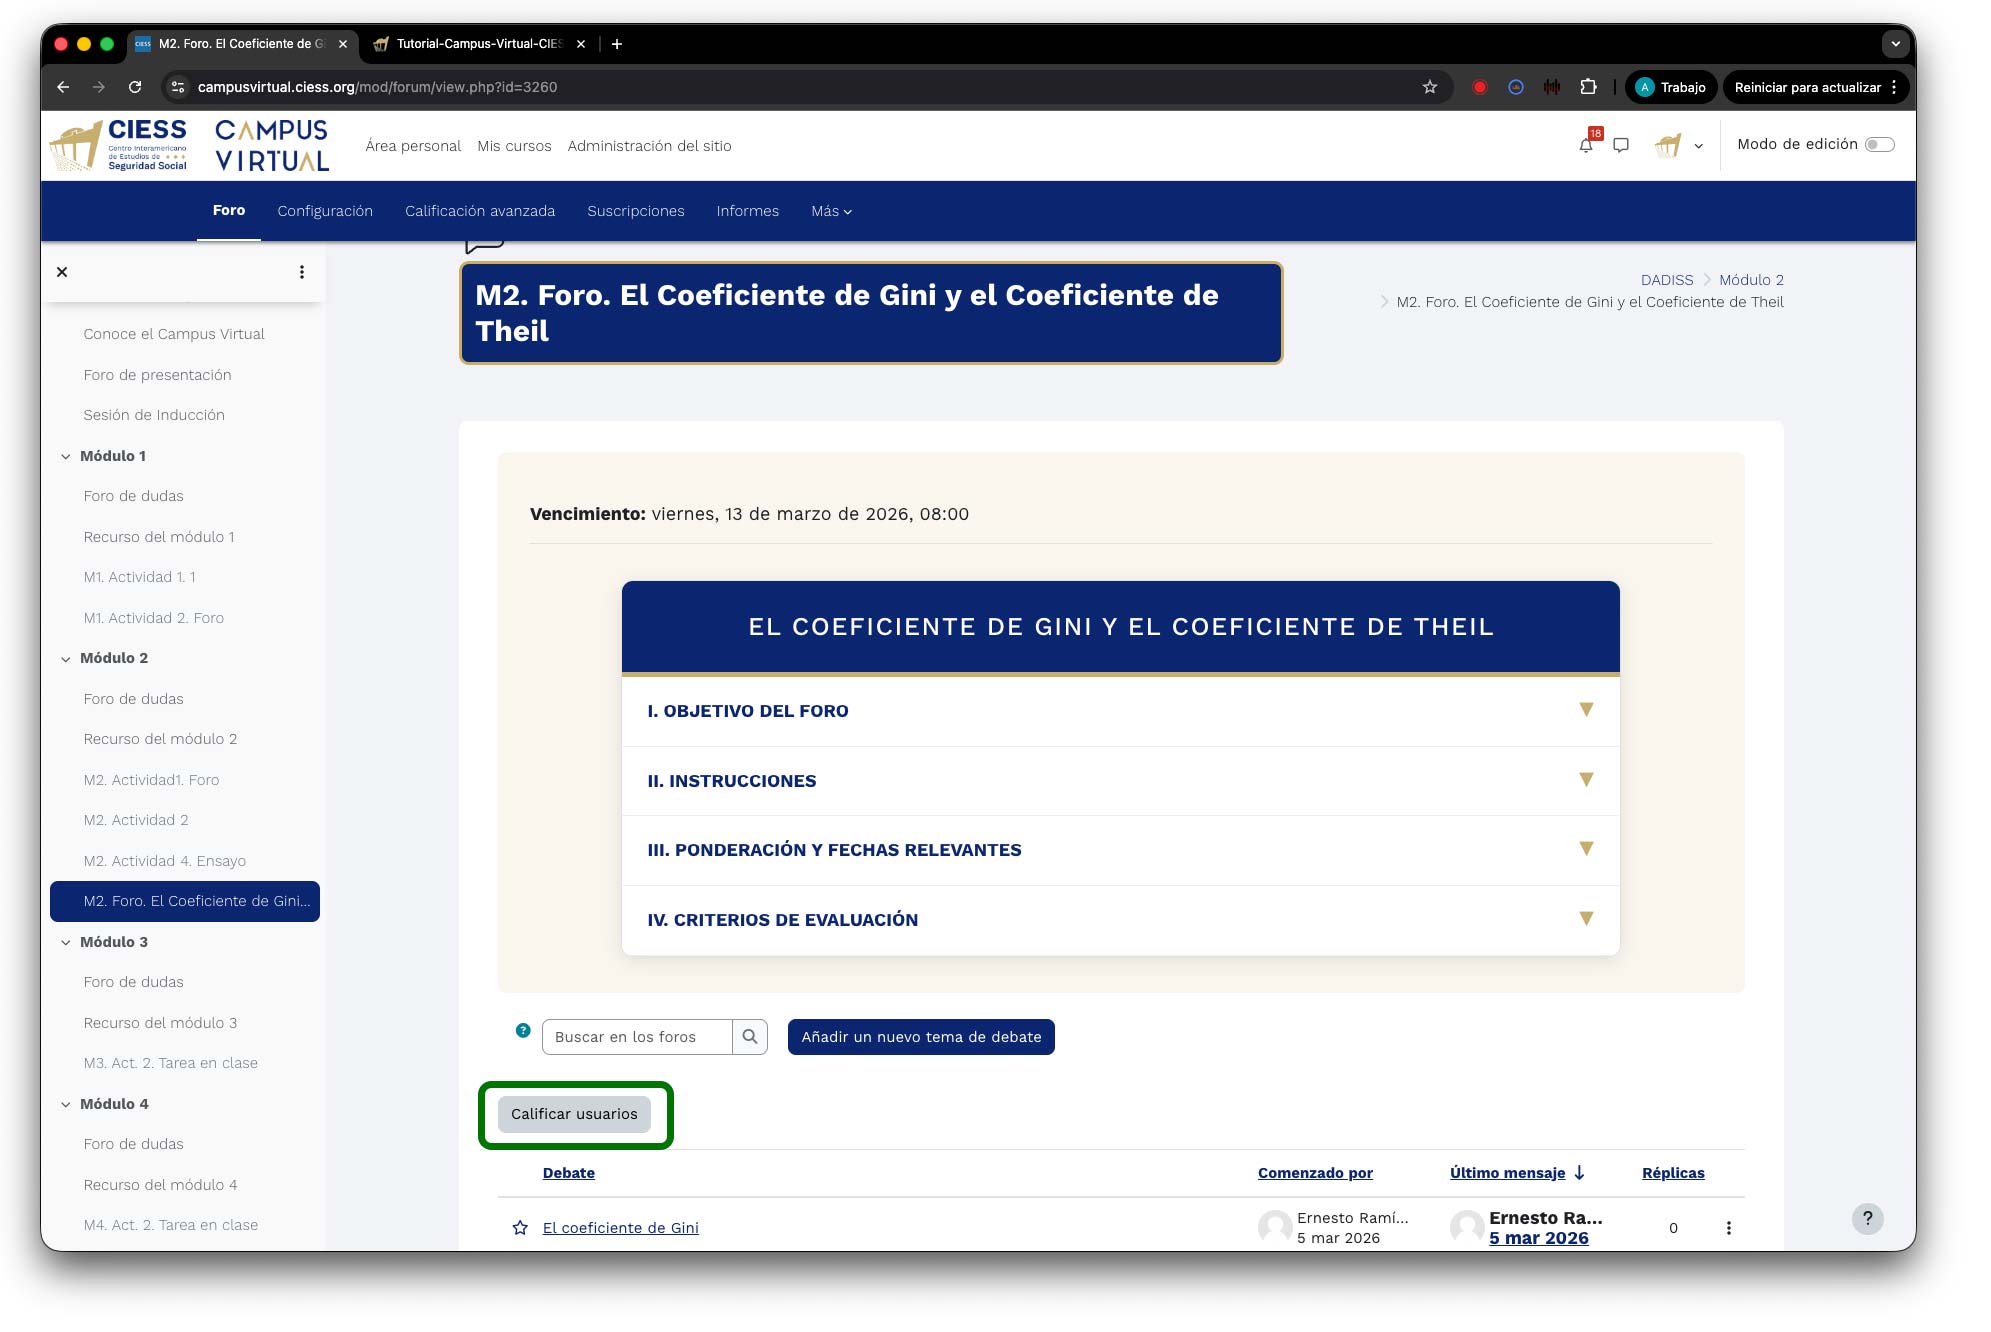
Access the grading tool: Once inside the forum, locate the settings gear (gear icon) in the top right of the screen. When clicked, a menu of options will appear. Select the "Grade users" option to access the participation assessment interface.
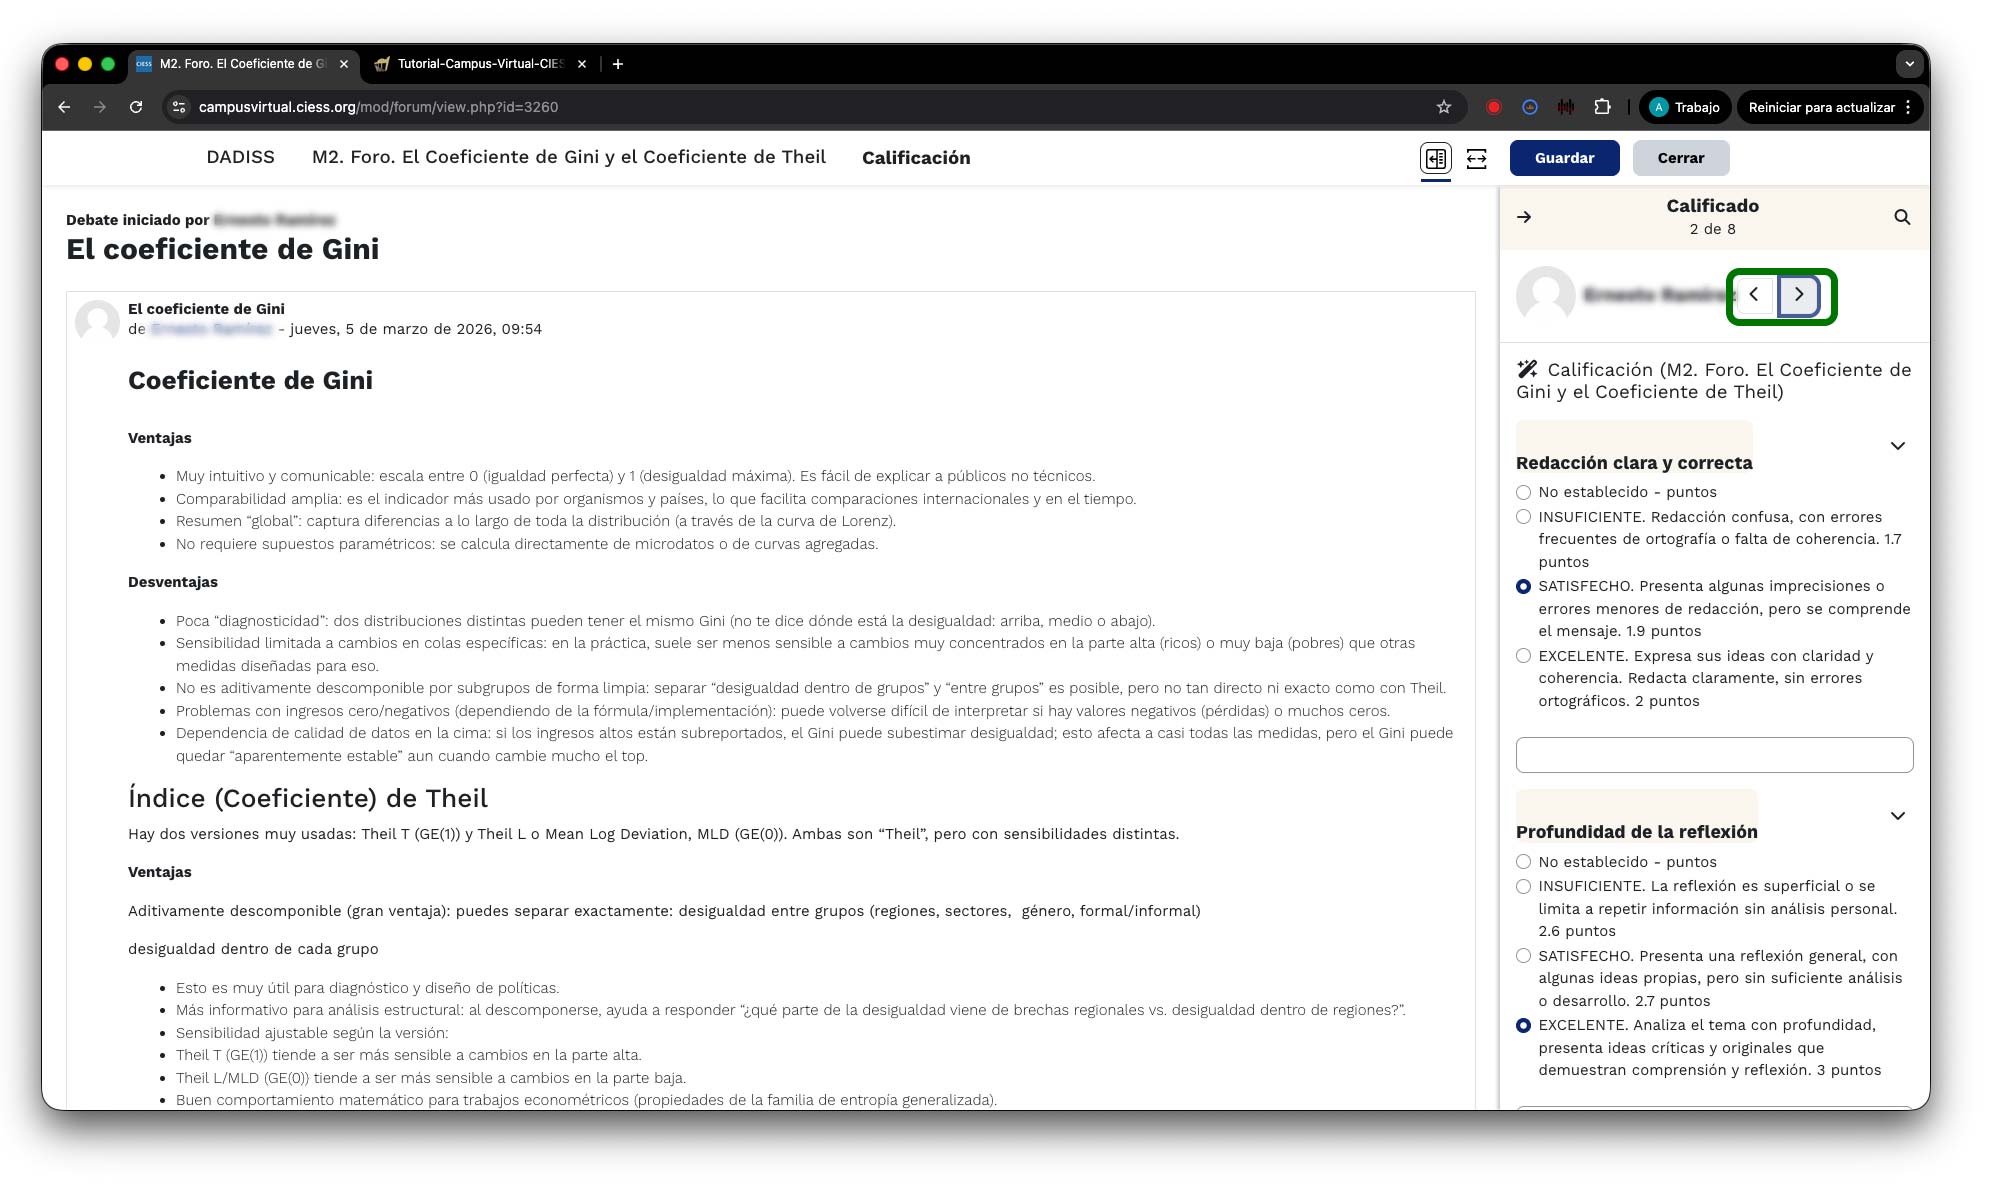
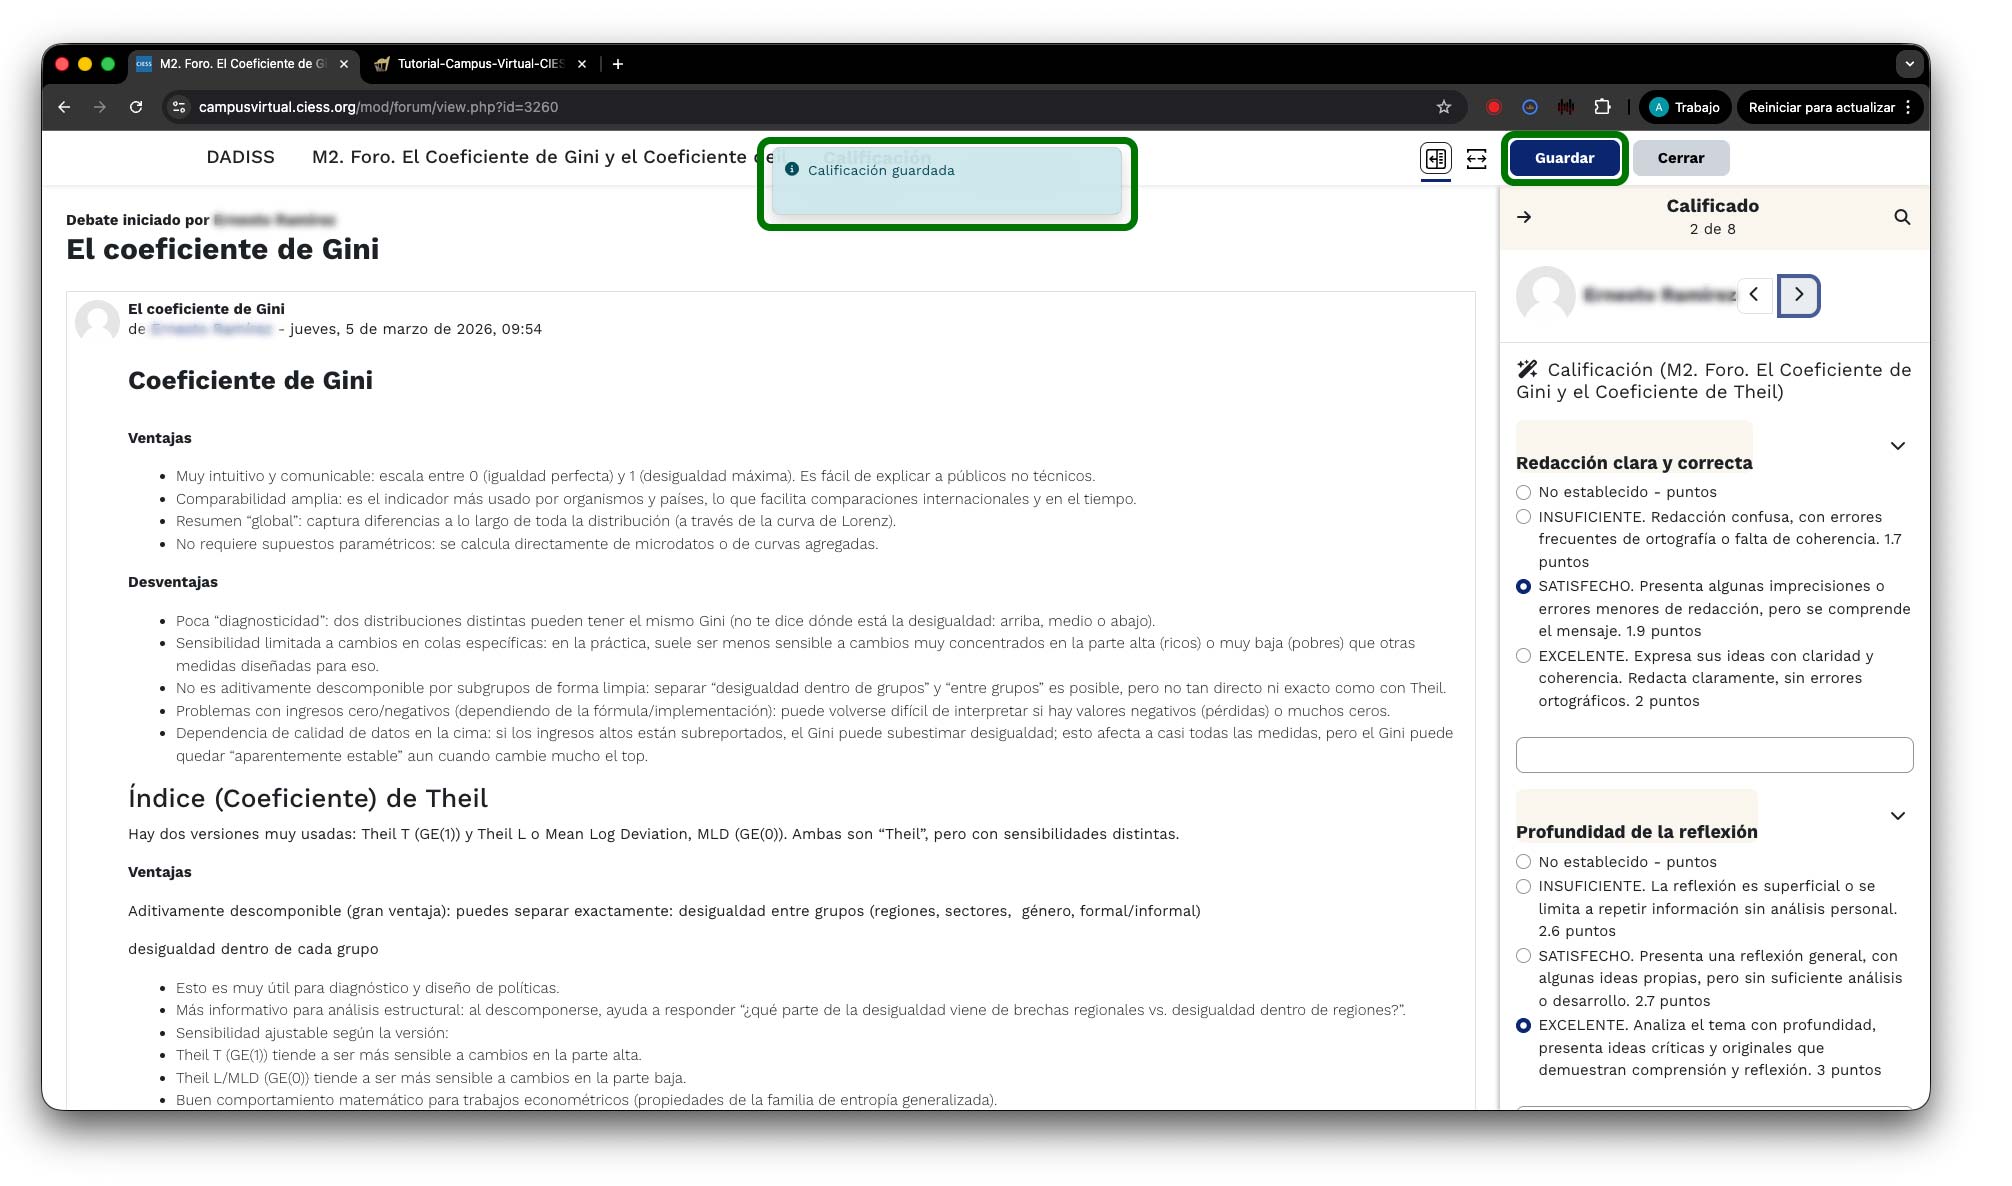
Select the student to evaluate: The grading interface will open where you can view the student's participations and the assessment criteria. To navigate between students in the course, use the navigation arrows located at the top of the screen:
- Previous arrow: Allows you to go back to the previous student in the list.
- Next arrow: Allows you to advance to the next student pending grading.
You can also see the current student's name and the total number of students to grade in the navigation bar.
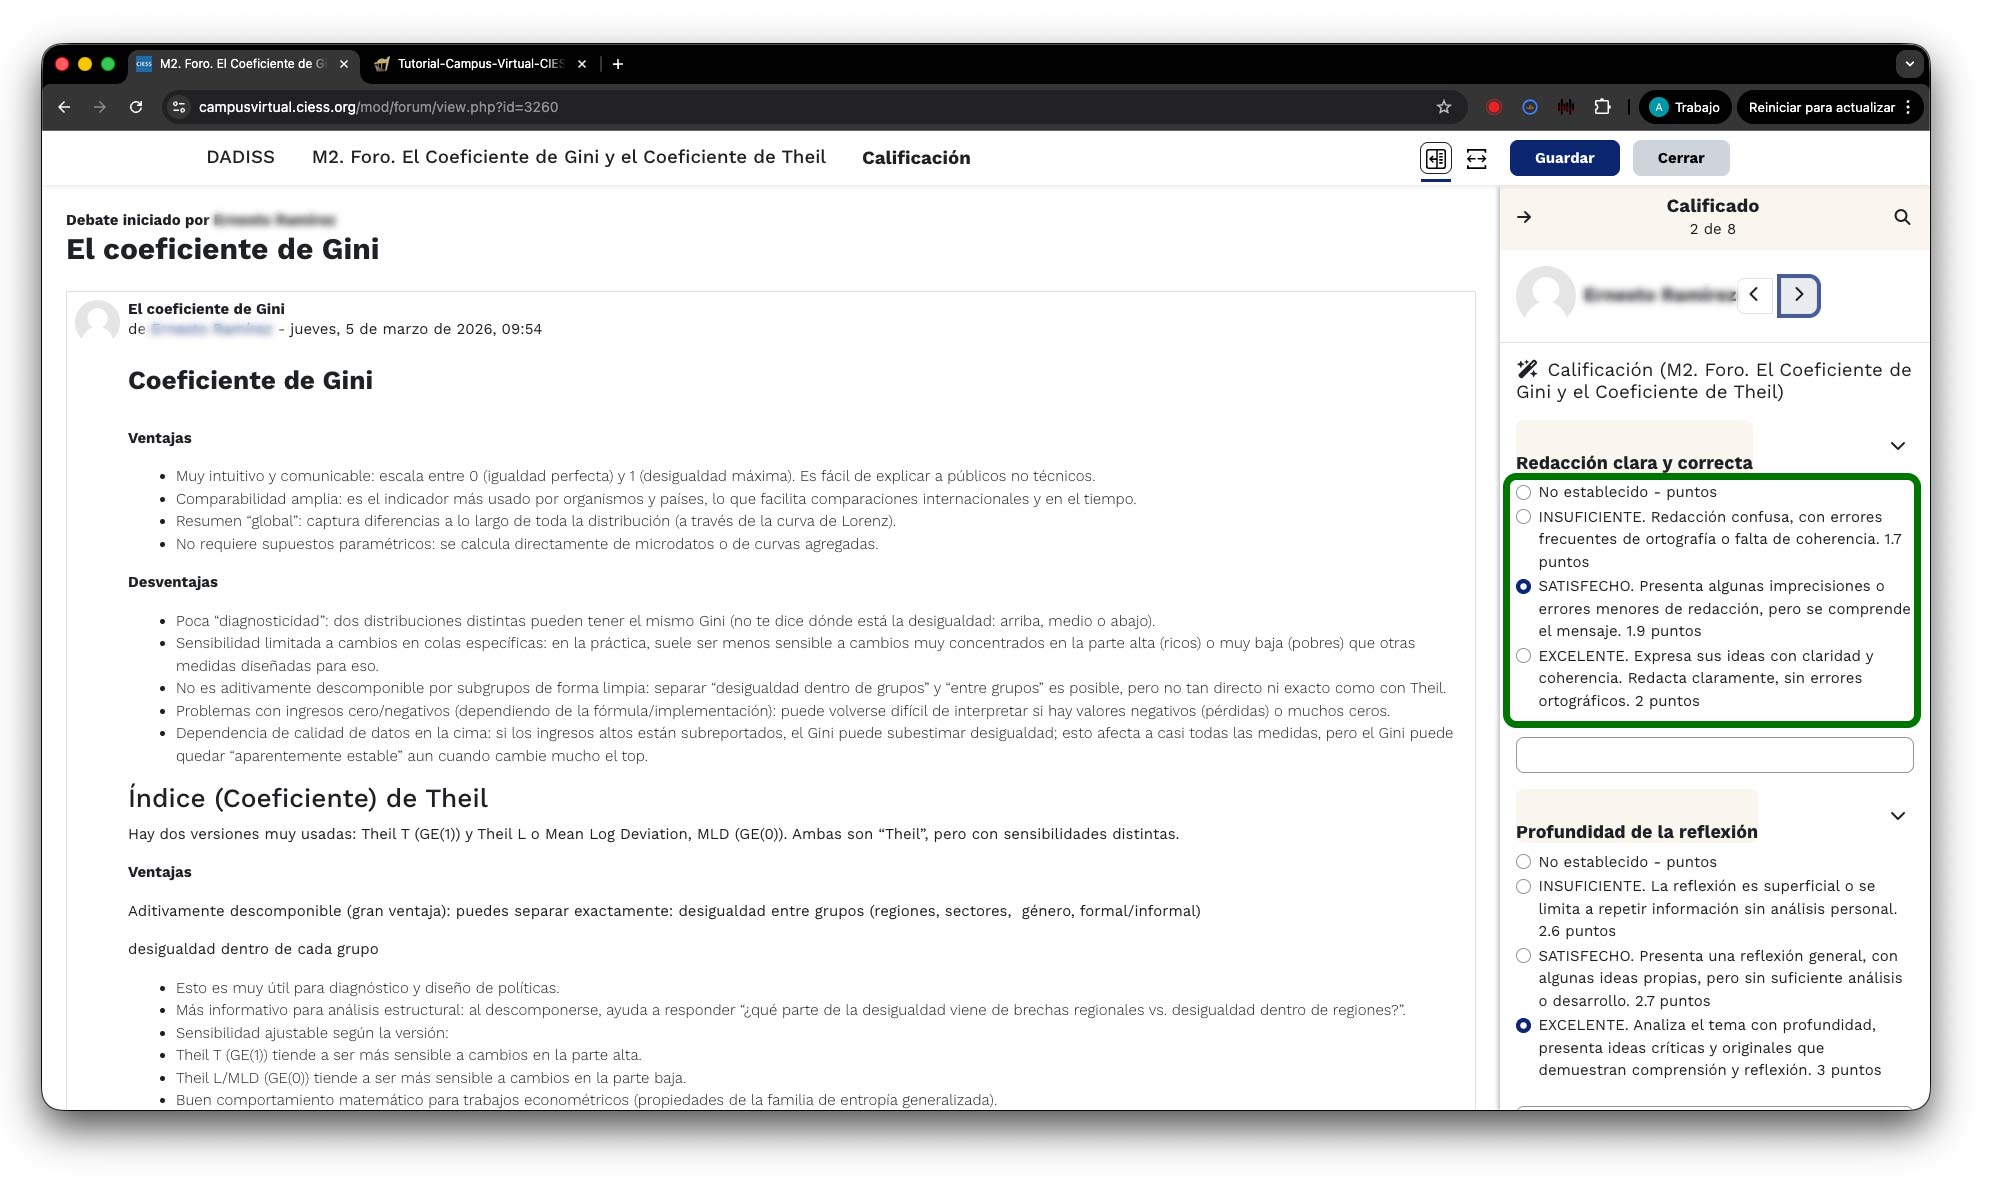
Evaluate according to the assessment criteria: In the grading interface you will find the assessment criteria defined for the forum. For each criterion:
- Click on the performance level that corresponds to the student's participation (e.g.: Insufficient, Acceptable, Good, Excellent).
- The system will automatically assign the corresponding points based on the selected level.
- Repeat this process for each criterion until the assessment is complete.
You will be able to visualize the total accumulated points in real time as you grade.
Save the grade: Once you have evaluated all criteria, click the "Save" button located at the bottom of the screen. The system will record the grade and display a confirmation notification indicating that the grade has been saved correctly. The student will be able to view their grade in the course gradebook.
Recommendation: Before grading, review all of the student's participations in the forum to get a complete picture of their performance. Consider both the quality of arguments and interaction with their peers.
7. Grade Quizzes
Quizzes in Moodle can contain different types of questions. Multiple choice, true/false, or matching questions are graded automatically. However, open-ended response questions require manual grading by the instructor. This section will guide you through the process of reviewing and grading open responses.
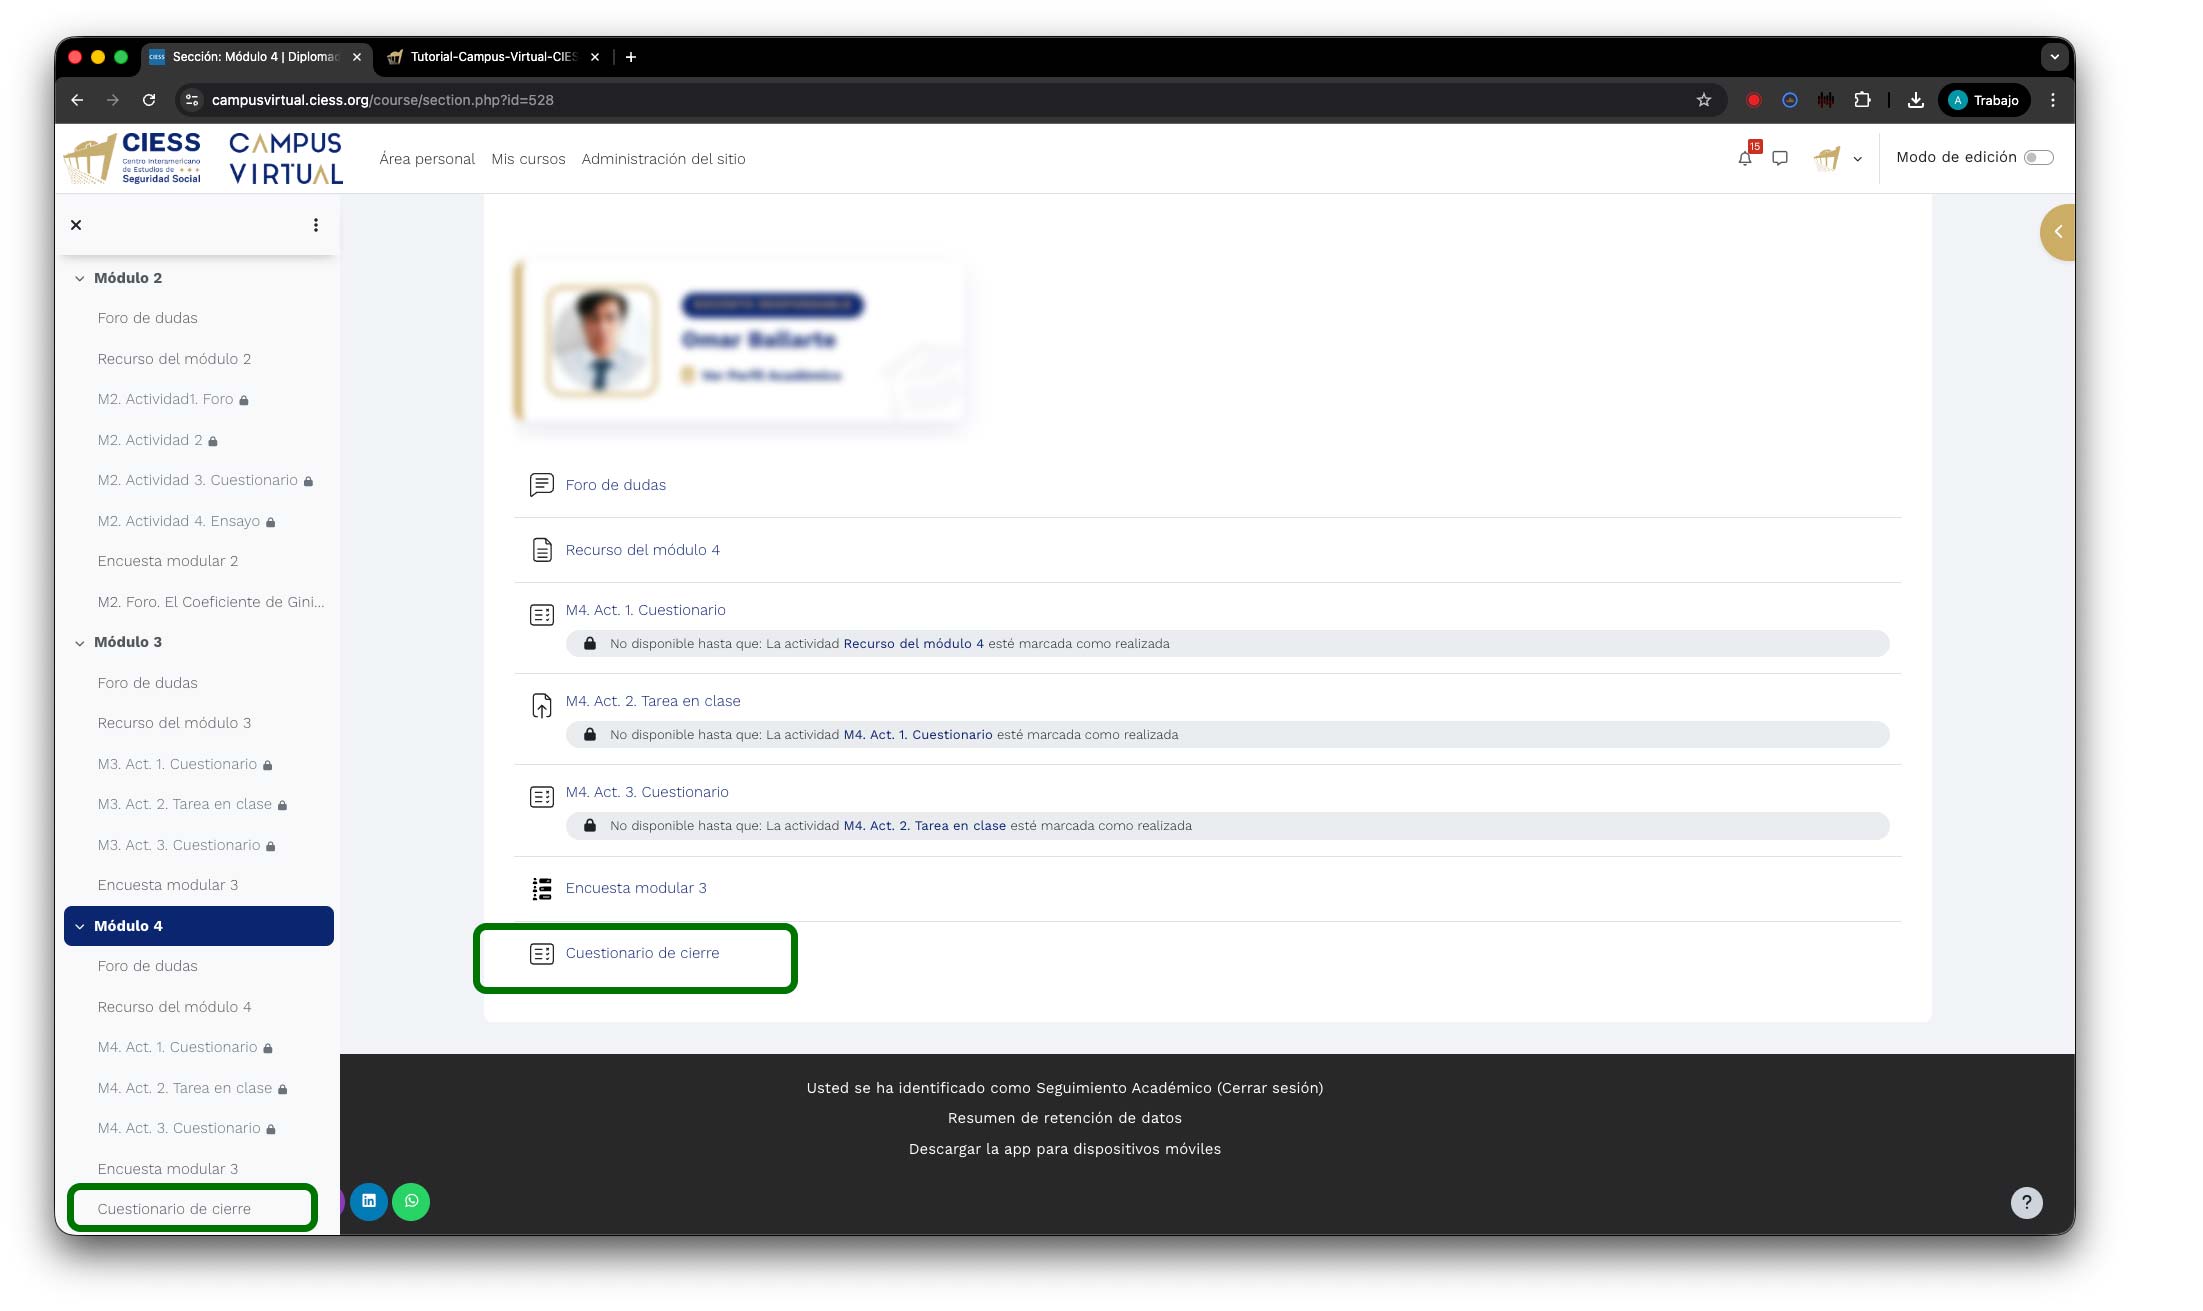
Locate the quiz: Enter the corresponding academic activity and navigate to the module where the quiz you want to grade is located. You can use the left side menu to access the desired section directly or scroll vertically through the page until you find the required quiz.
Access the quiz administration: Once inside the quiz, locate the settings gear (gear icon) in the top right of the screen. When clicked, a dropdown menu will appear with various administration options. Select the "Manual grading" option to access the questions that require manual review.
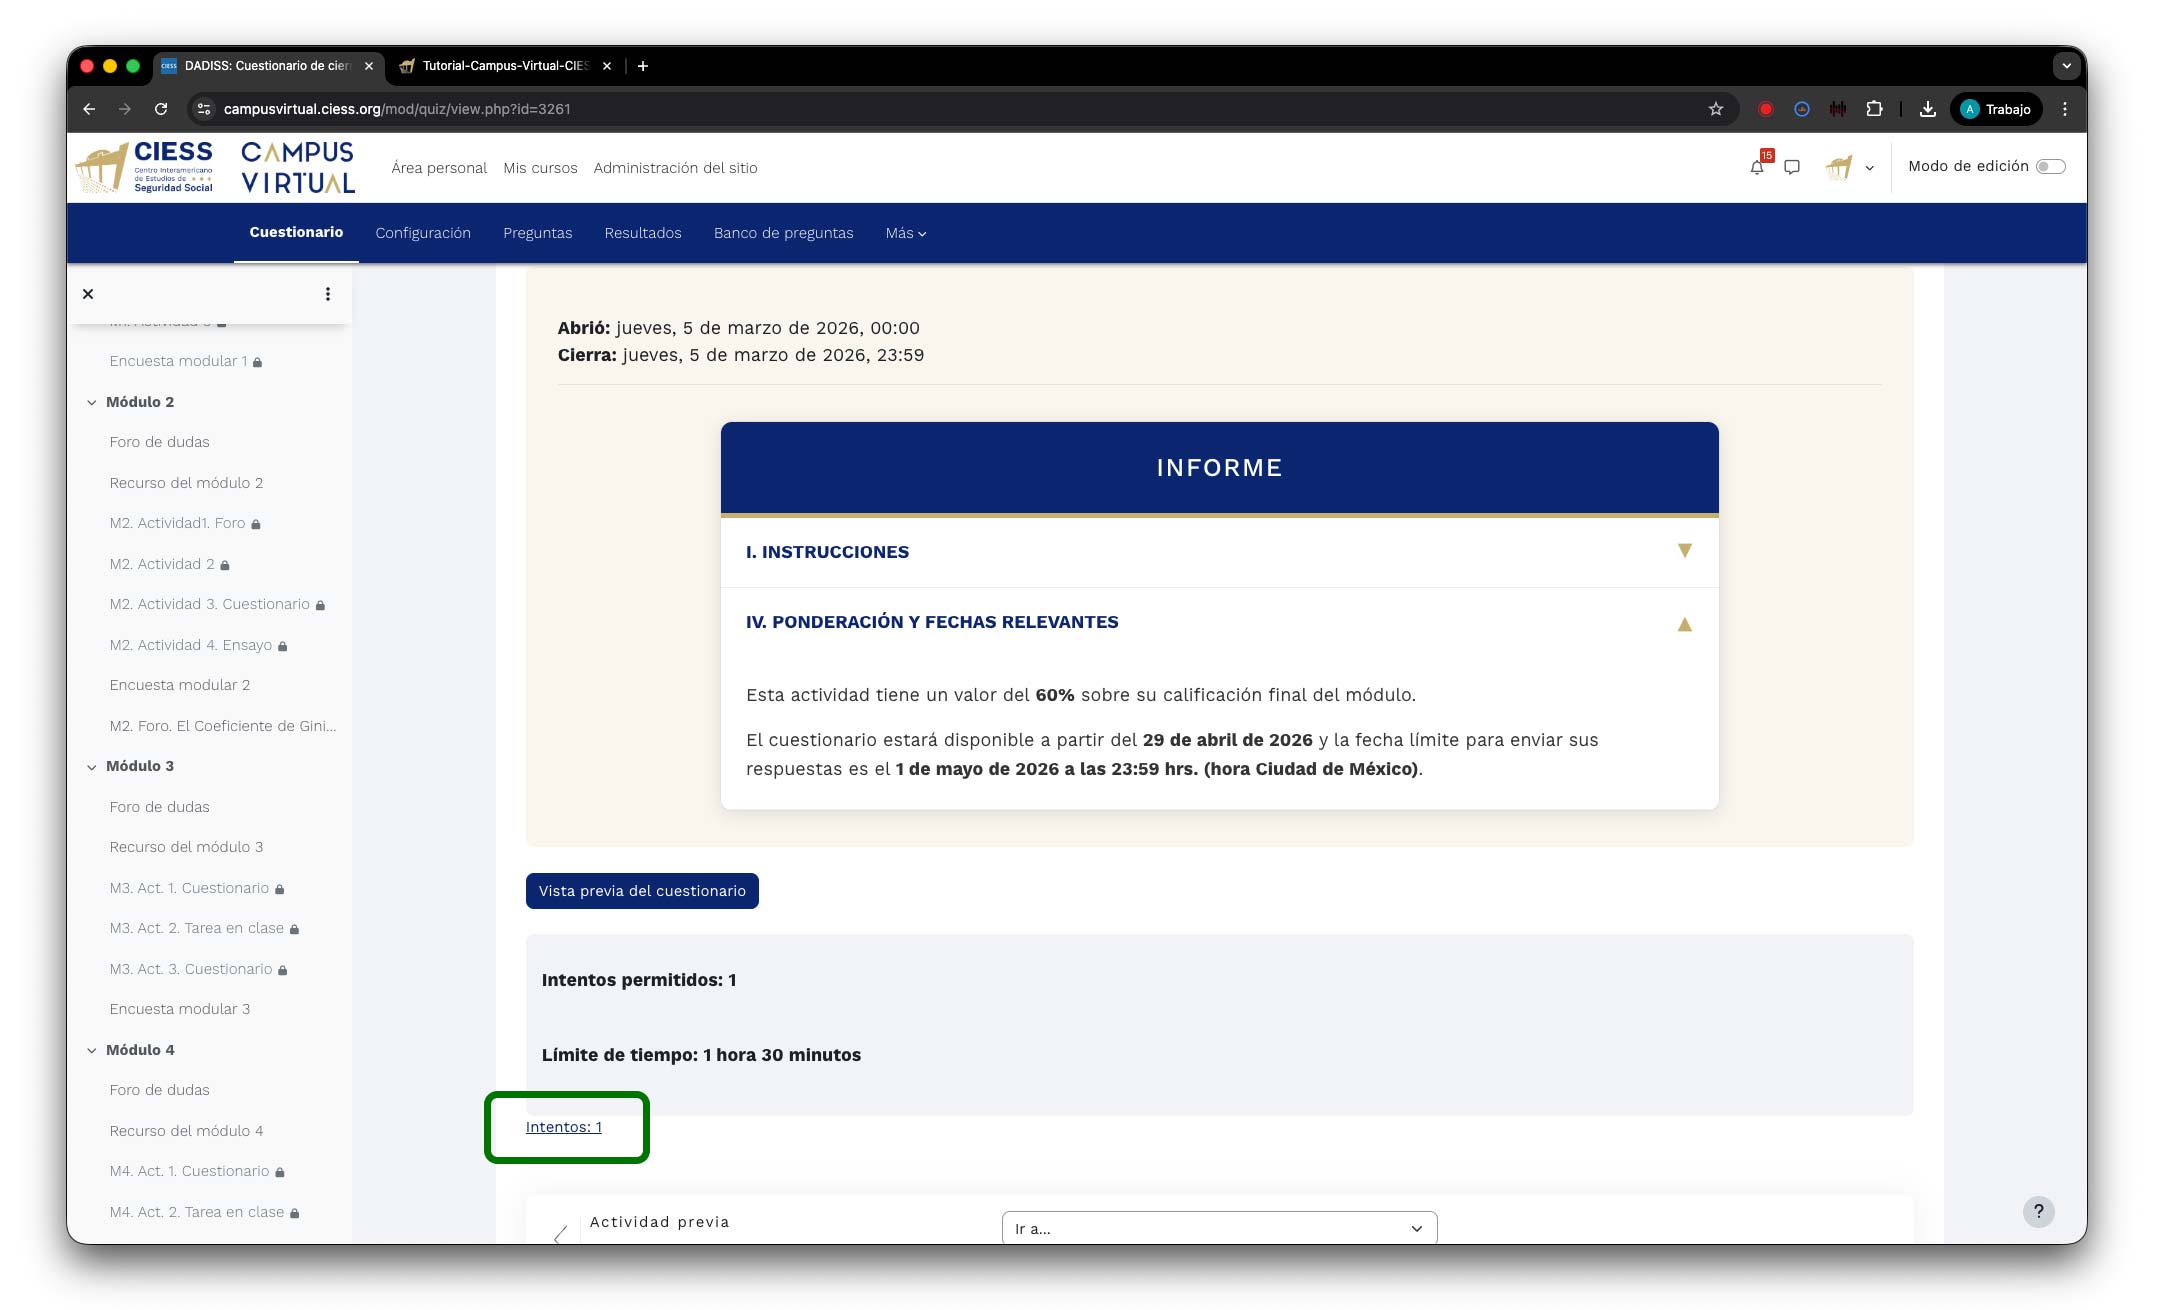
Identify questions pending grading: The manual grading screen will display a table listing all the questions in the quiz that require manual evaluation. For each question you will see:
- Question name: The title or number identifying the question.
- Attempts to grade: The number of student responses that have not yet been reviewed.
- Already graded: The number of responses that have already been evaluated.
Click on the question name to begin grading the student responses.
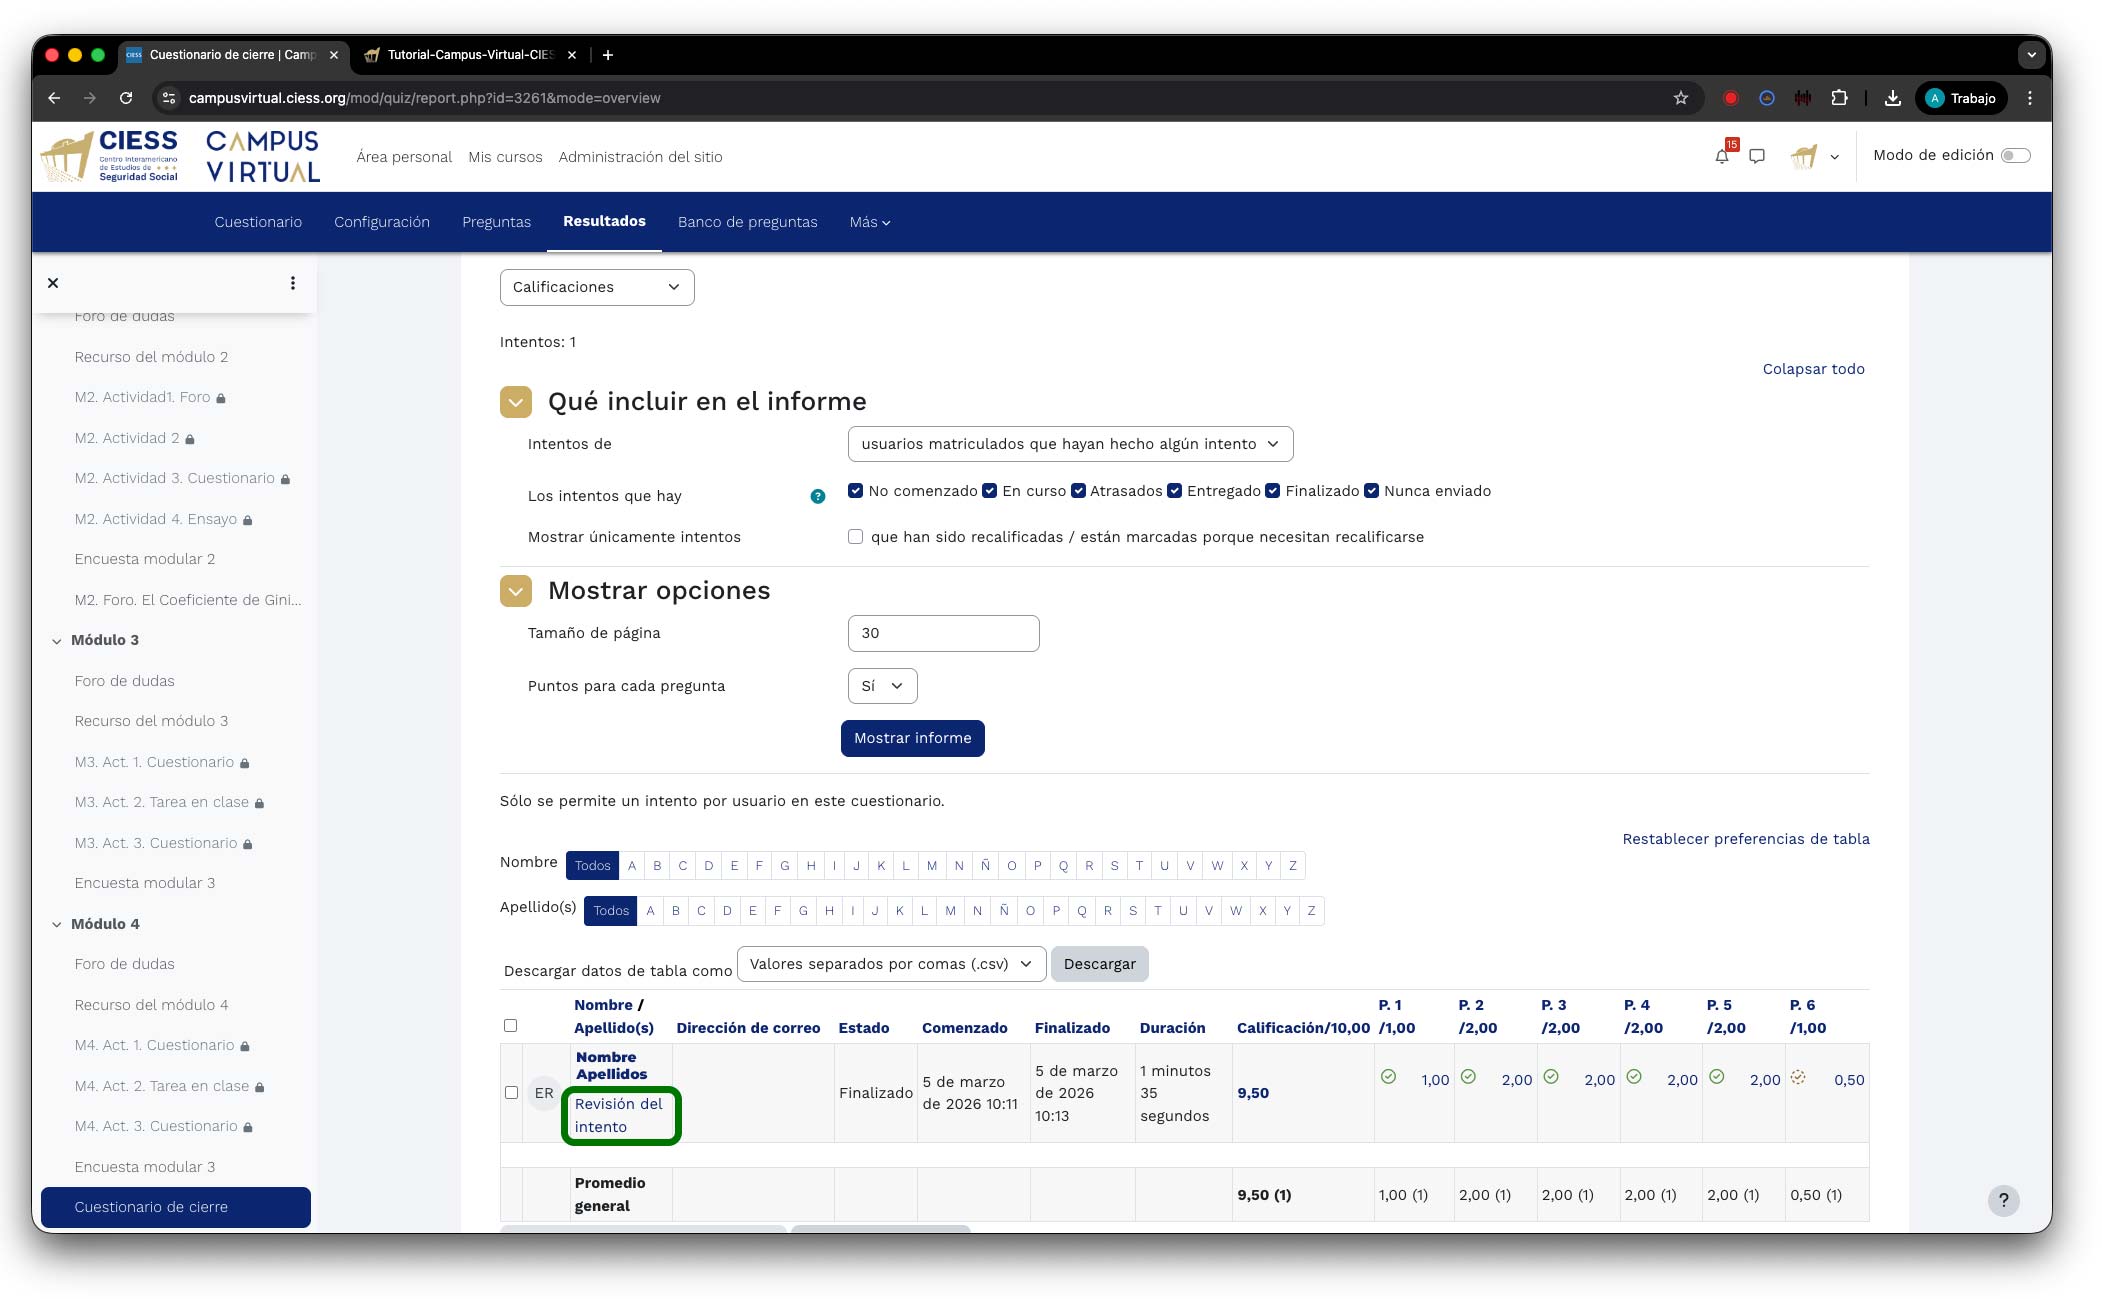
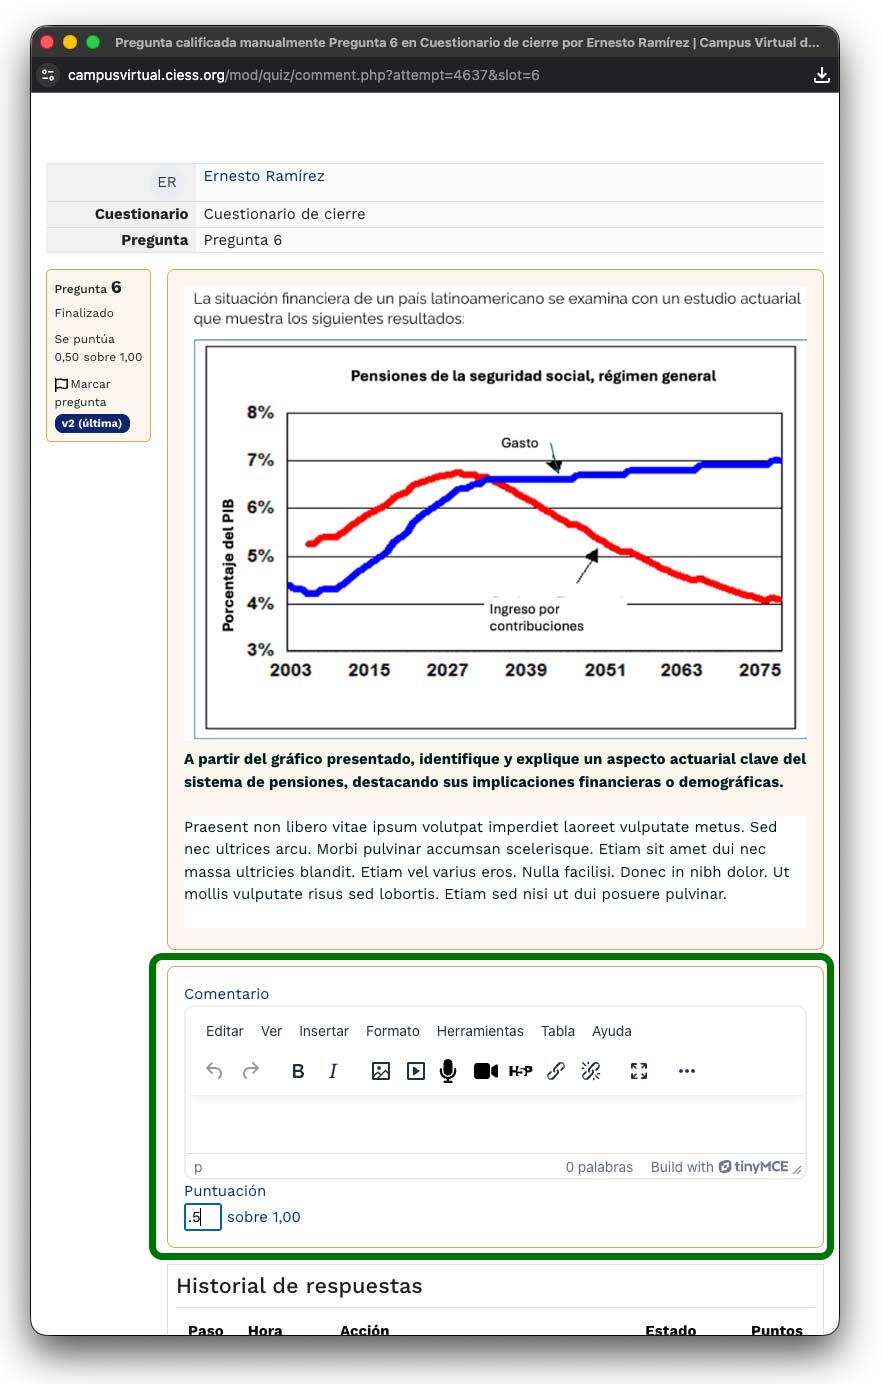
Review and grade each response: The grading screen will display the student responses one by one. For each response you will see:
- Student name: Identified at the top of each response.
- Student response: The full text of the student's answer to the open-ended question.
- Comment field: A text area where you can write feedback or observations about the response.
- Points field: Where you enter the score corresponding to the response quality.
Read the response carefully, assign the appropriate score, and optionally add a comment to provide feedback to the student.
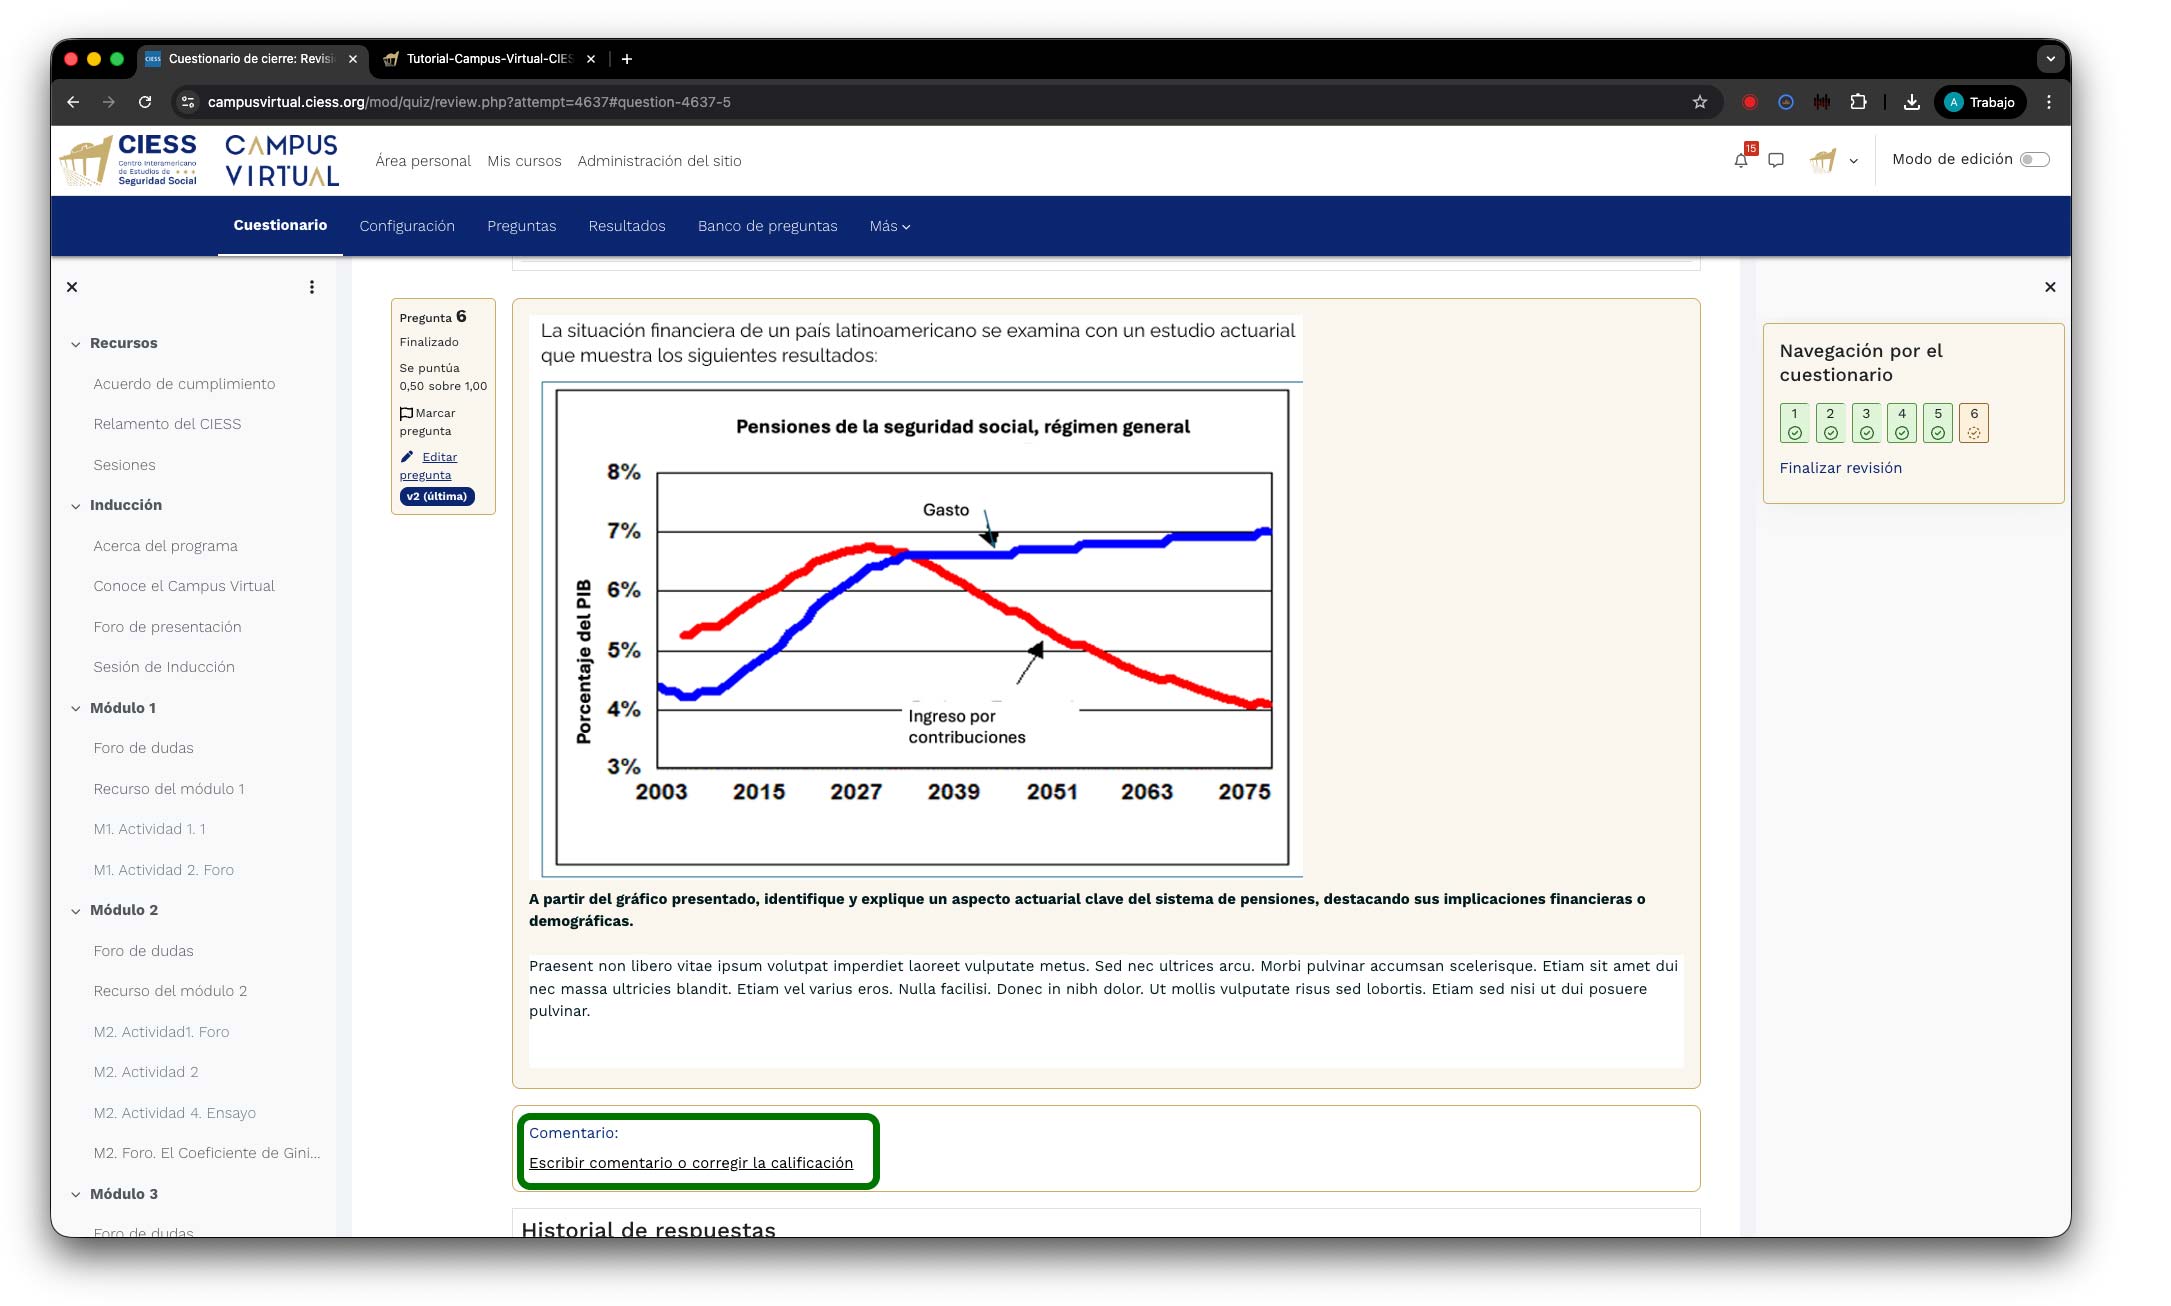
Save and continue: After assigning the grade and adding comments, click the "Save and go to next" button to record the grade and automatically advance to the next student's response. If you prefer, you can also use "Save" to stay on the same response for further review.
Tip: If a quiz contains only automatically graded questions, the "Manual grading" option will indicate that there are no questions to review. In that case, grades will already be reflected in the gradebook.
Important: Remember that quiz grades will not be fully reflected in the gradebook until all open-ended questions have been manually graded. Students will see a "Grading pending" notice for those questions until you complete the review.
8. View Grades
The gradebook allows you to view a complete overview of all student grades in the activity. You can check individual scores, identify pending grades, and monitor overall group performance.
Access the gradebook: Enter the academic activity and locate the settings gear (gear icon) in the top right area of the course. In the dropdown menu, under the "Gradebook setup" section, click on "Grader report" to view the main grades overview.
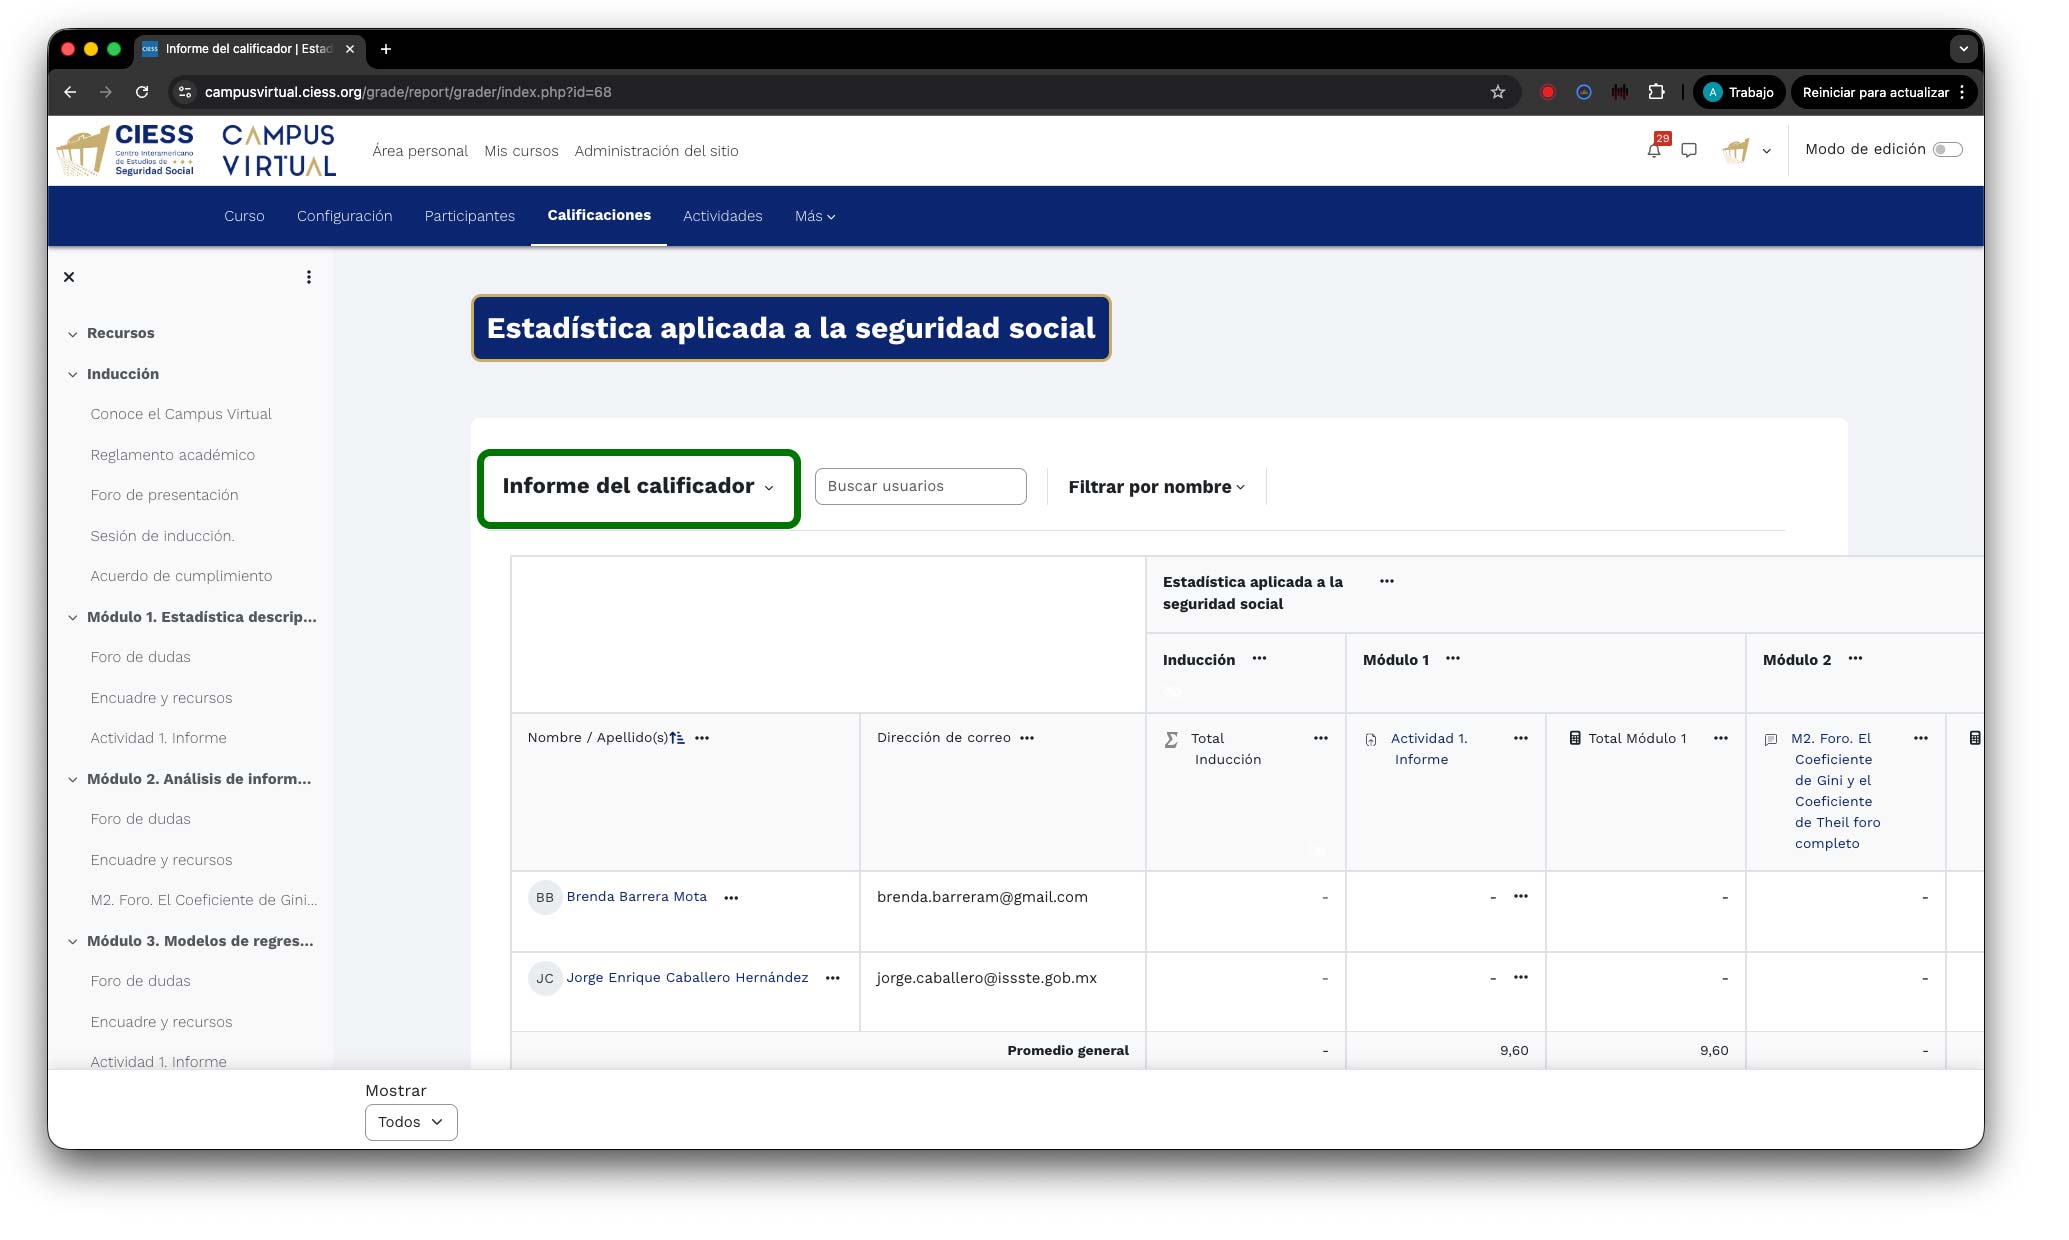
Understand the grader report: The grader report displays a table with the following structure:
- First column: Lists the names of all enrolled students.
- Subsequent columns: Each column represents a graded activity (assignments, forums, quizzes), showing the score obtained and the maximum possible score.
- Course total column: Shows the accumulated final grade for each student, calculated based on the weighting of all activities.
Filter and sort students: Use the filtering and sorting options located above the table to organize the information:
- Search by name: Use the search field to find a specific student quickly.
- Sort by column: Click on any column header to sort students ascending or descending by that grade.
- Filter by group: If groups are configured, you can filter the view to show only students from a specific group.
- Items per page: Adjust the number of students displayed per page if the group is large.
Turn editing on: If you need to make quick adjustments to a grade directly from the grader report, click the "Turn editing on" button located in the top right of the gradebook. This will make the grade cells editable, allowing you to type a new score directly into the table without accessing each activity individually.
Recommendation: Use the "Turn editing on" option only for minor corrections. For a complete evaluation with rubric and feedback, it is always preferable to grade from within each activity as described in previous sections.
View individual student grades: To see a detailed breakdown of a single student's grades, click on their name in the grader report. A "User report" will open showing all graded activities, scores obtained, feedback from the instructor, and the final course grade for that specific student.
Important: Grades shown with a dash (-) indicate that the student has not yet submitted the activity or that the grade is pending. Grades highlighted in a different color may indicate that they were manually overridden.
9. Download Grades
The gradebook export feature allows you to download a file with all student grades for the activity. This is especially useful for keeping offline records, performing additional analysis in a spreadsheet, or submitting grade reports.
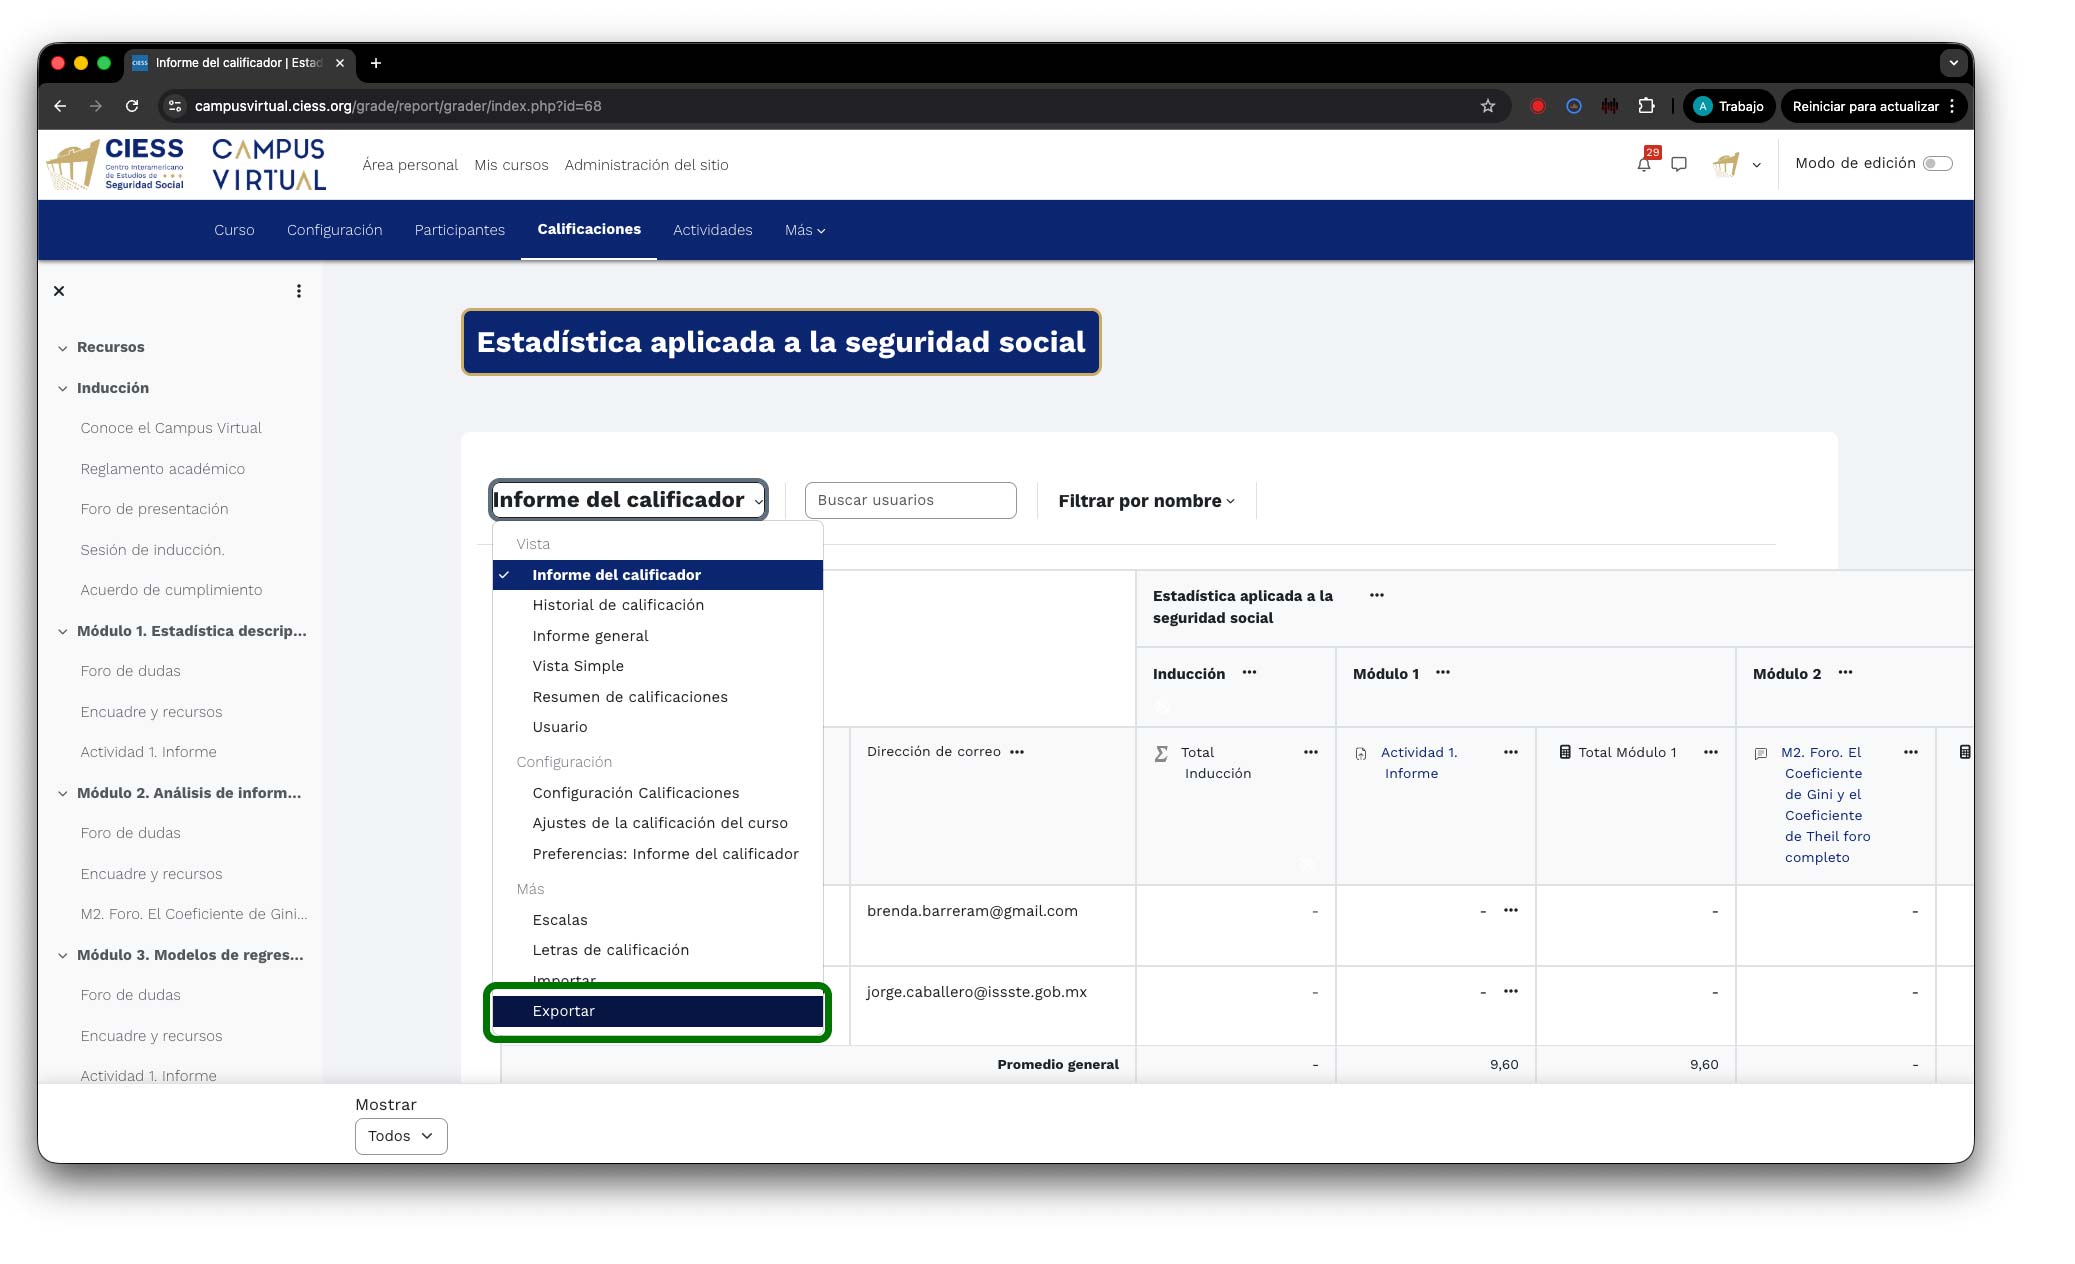
Access the export options: Enter the academic activity and click on the settings gear (gear icon) in the top right area. In the dropdown menu, under the "Gradebook setup" section, locate and click on "Export". A submenu will appear with the available export formats.
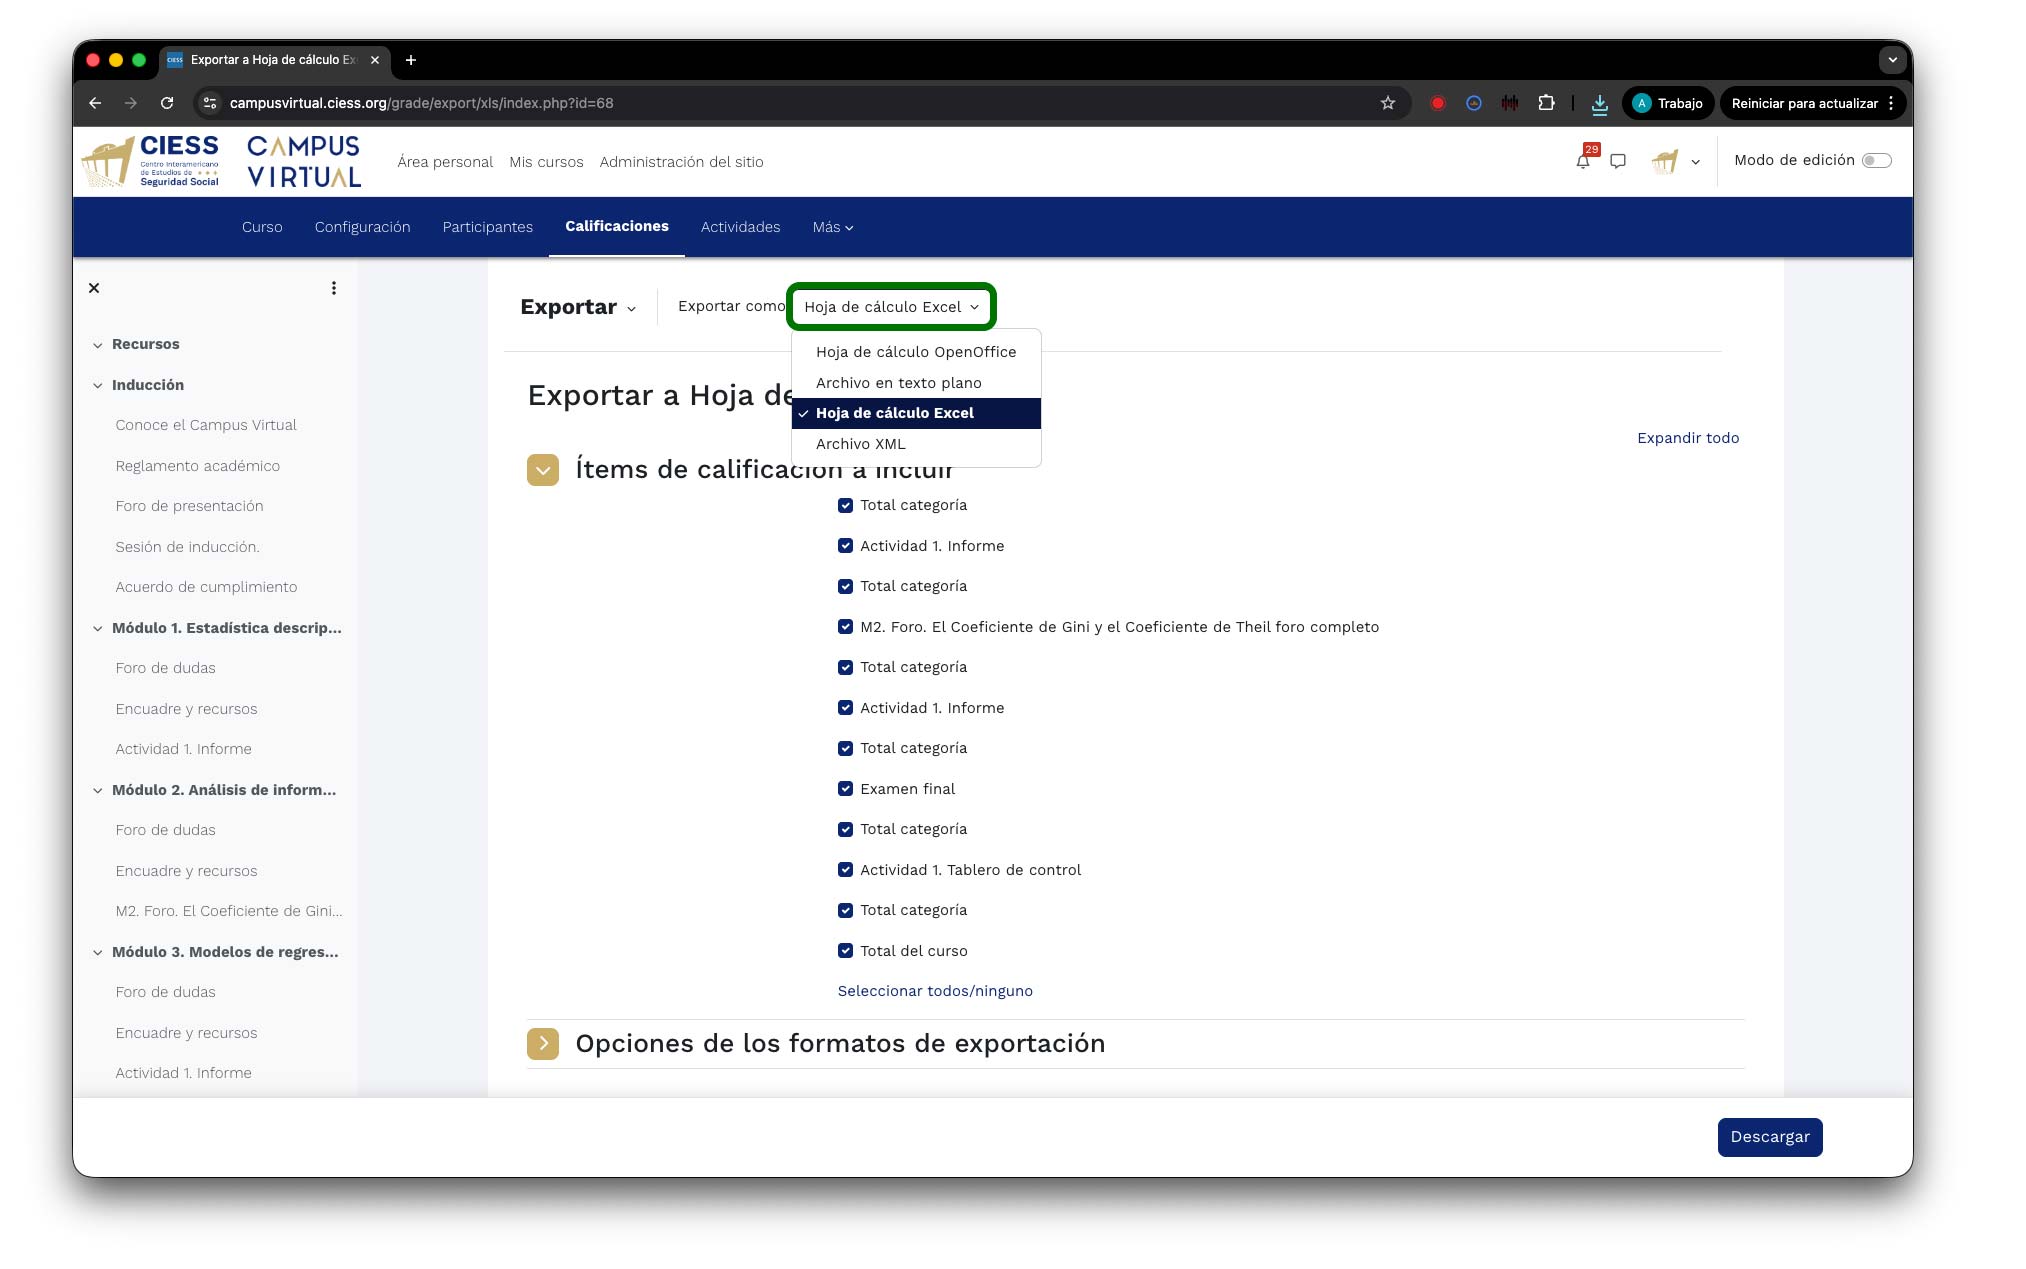
Select the export format: The platform offers several export formats. The most commonly used are:
- OpenDocument spreadsheet (ODS): Compatible with LibreOffice Calc and other open-source tools.
- Excel spreadsheet (XLSX): Compatible with Microsoft Excel, the most widely used format.
- Plain text file (CSV): A universal format compatible with any spreadsheet software or database system.
- XML format: For system integration purposes or advanced data processing.
Click on "Excel spreadsheet" for the most common use case.
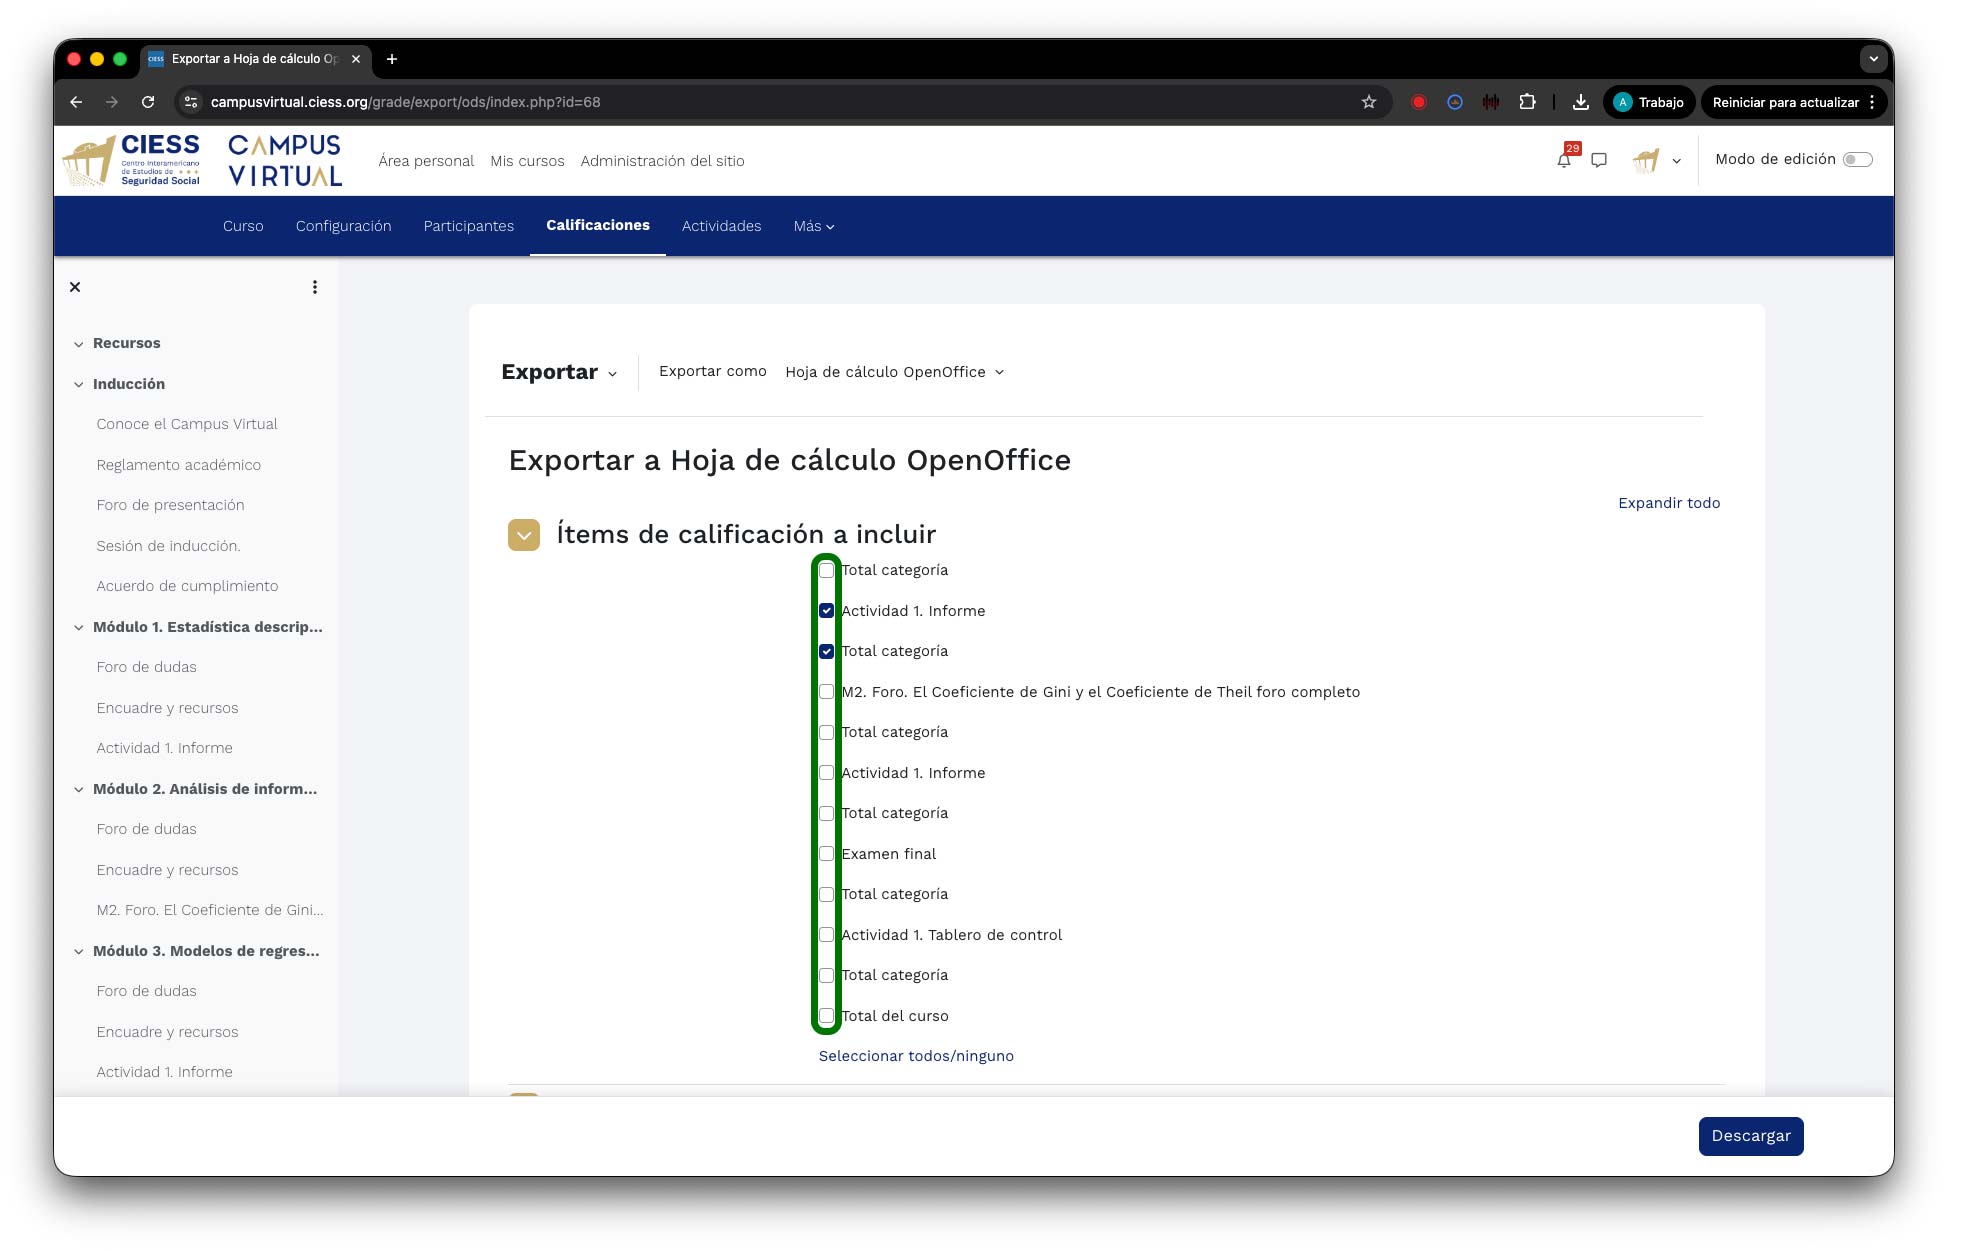
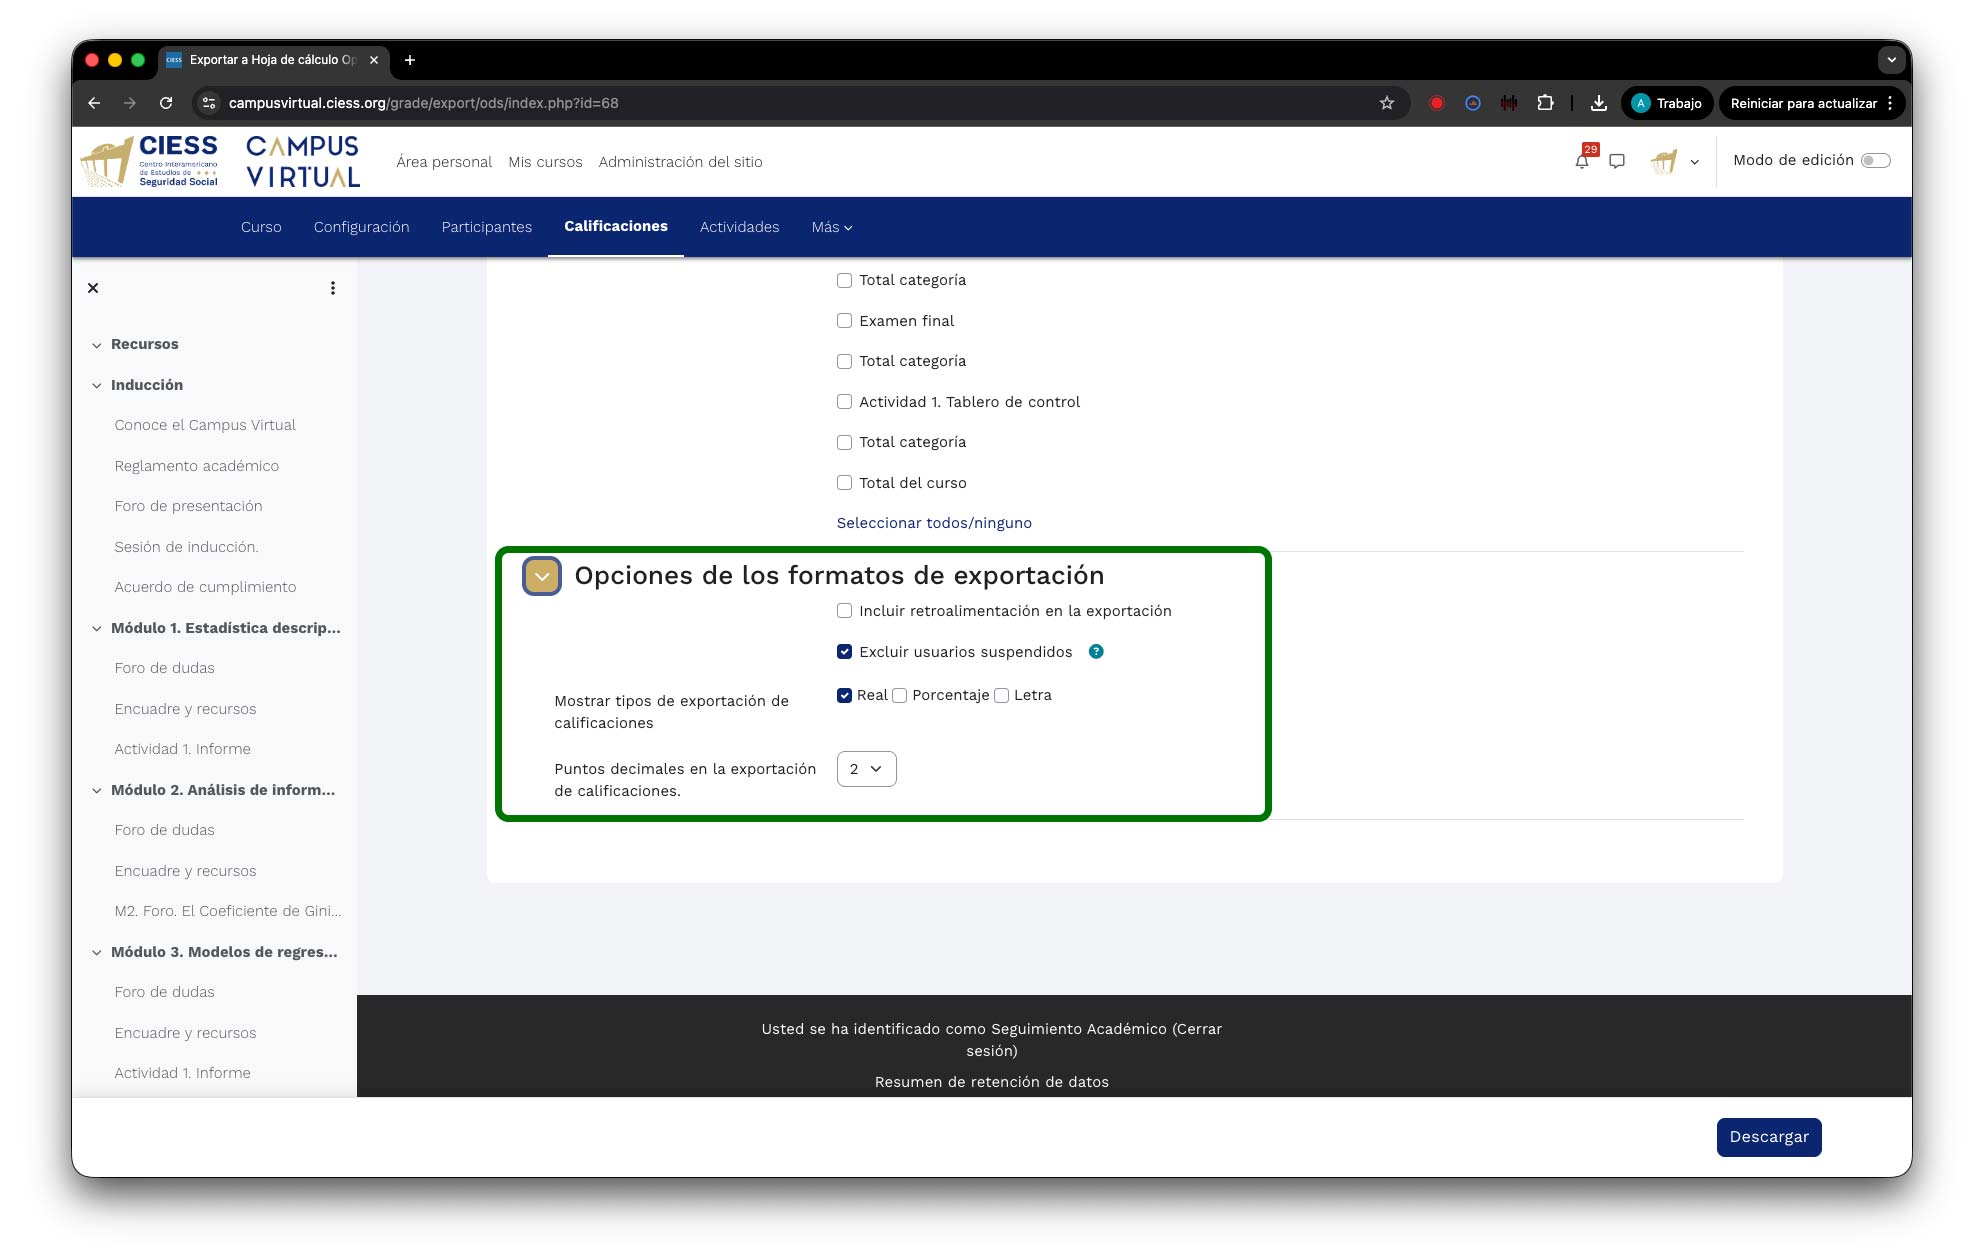
Configure export options: On the export configuration screen, you can customize what information will be included in the downloaded file:
- Grade items to include: Select which activities you want to export. By default, all graded items are selected. Uncheck any you wish to exclude.
- Grade format: Choose how grades will be displayed (real numbers, percentages, or letters).
- Include feedback: Check this option if you want the instructor's feedback comments to be included in the export file.
- Decimal points: Specify the number of decimal places for the exported grades.

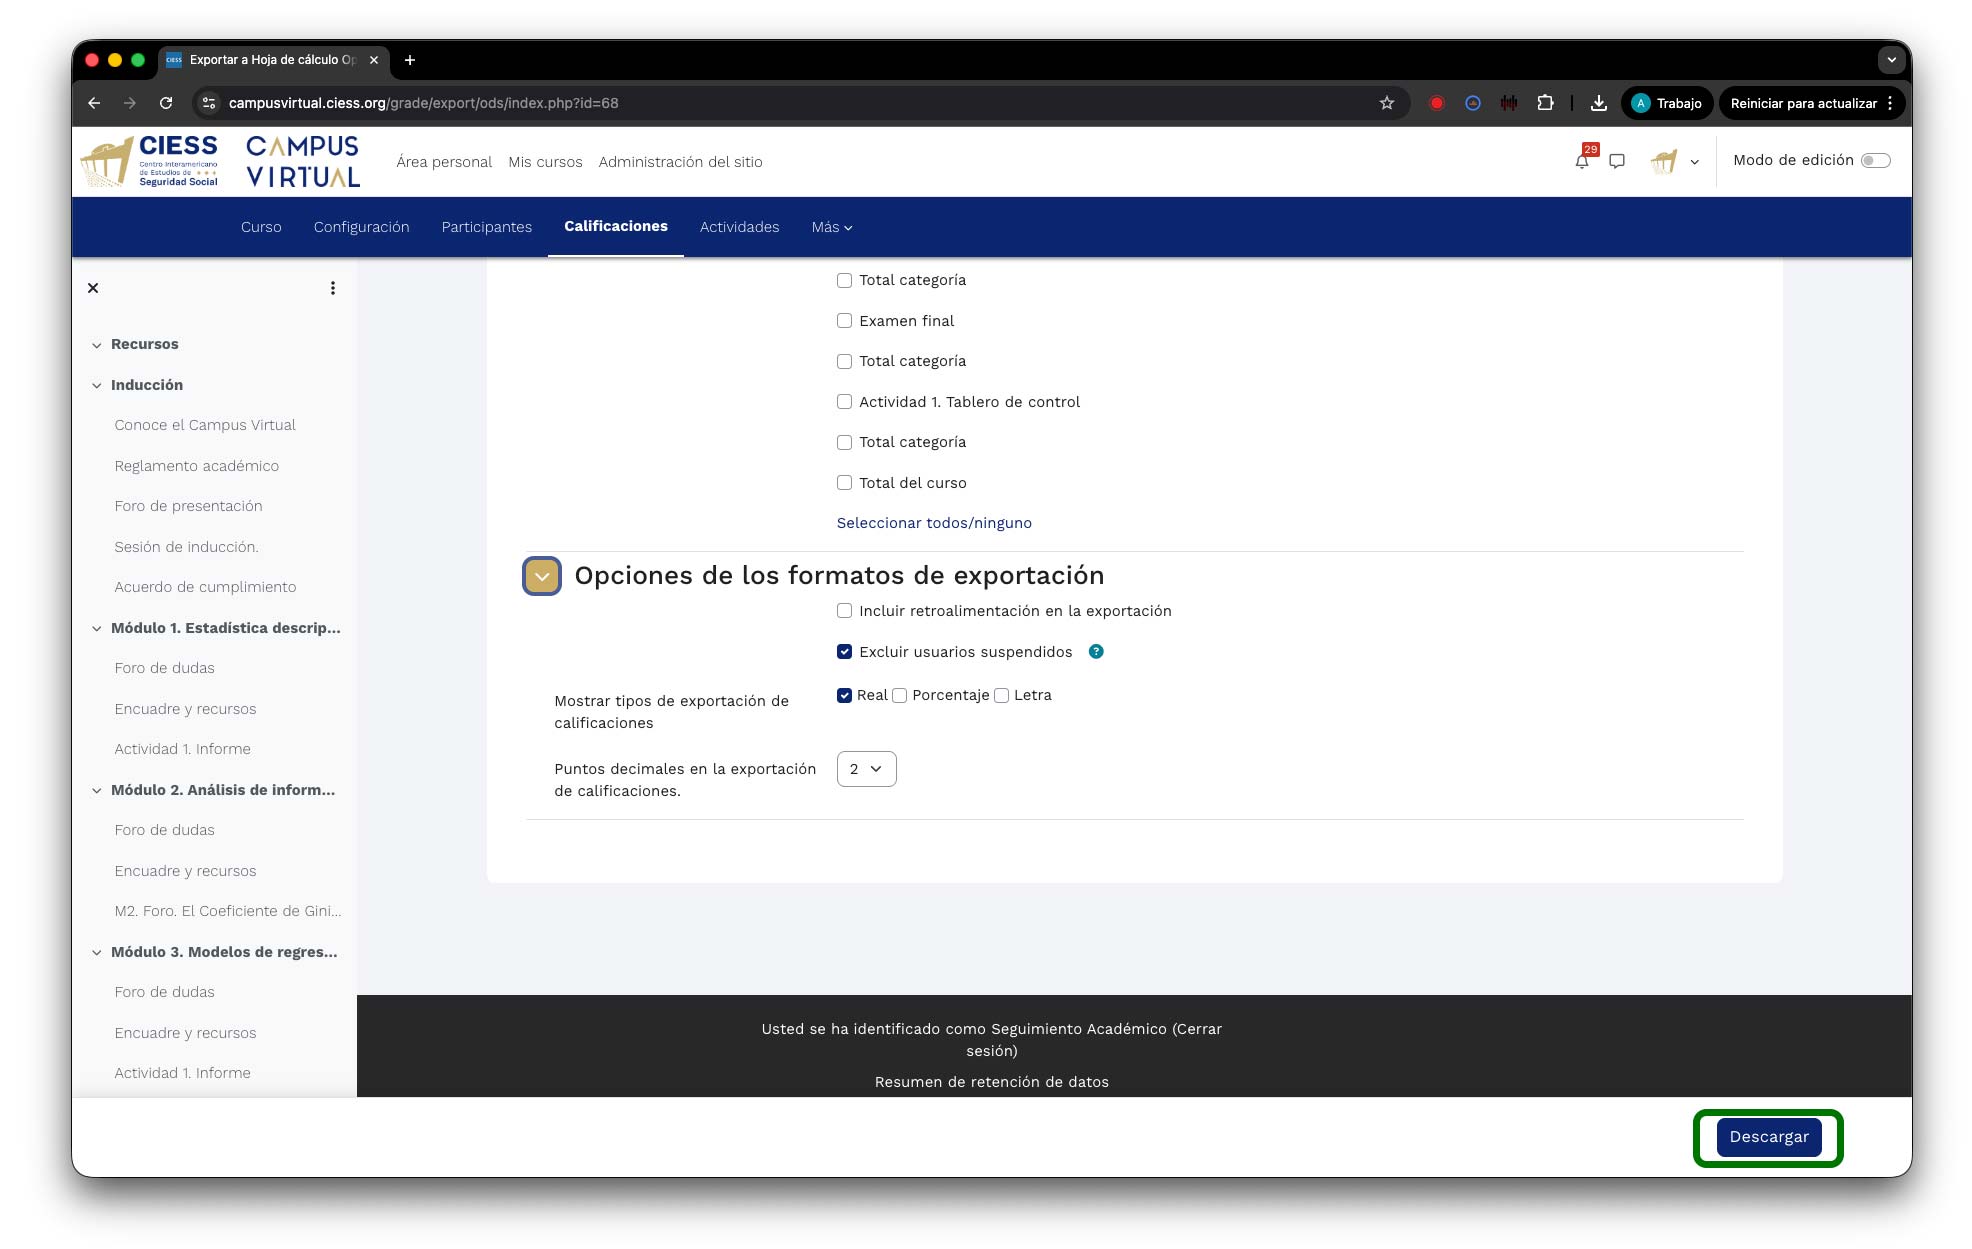
Preview and download: Once you have configured the options, click the "Download" button at the bottom of the screen. The system will generate the file and automatically download it to your device. Open the file in your spreadsheet software to verify that all data has been exported correctly.
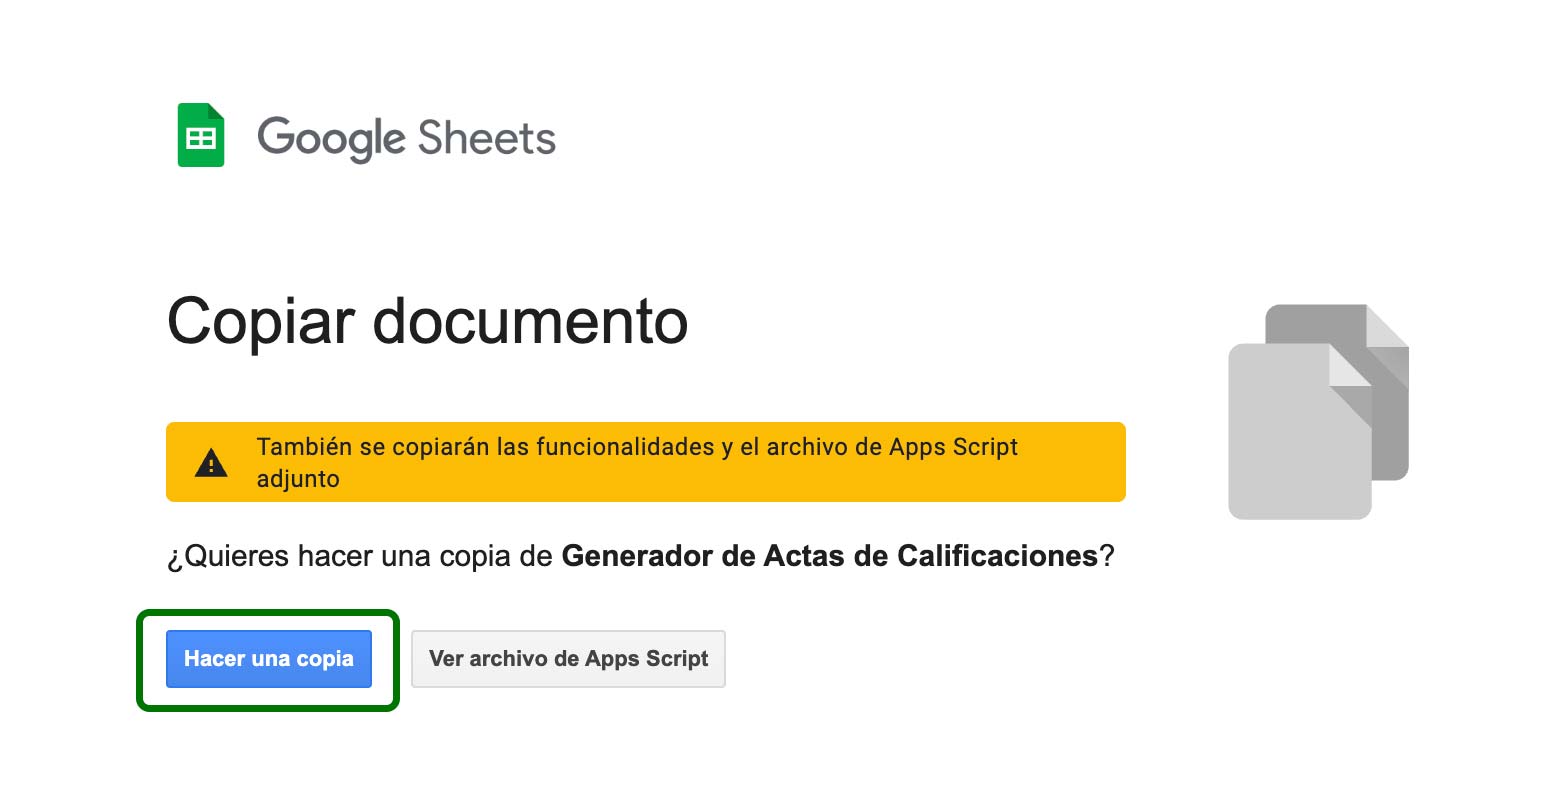
Tip: If you plan to share the exported file with other instructors or coordinators, consider removing the internal student ID numbers to protect personal data before distributing the file.
Important: The exported file reflects the grades at the exact moment of download. If you make grade changes after exporting, you will need to download a new file to have the updated information.
10. Generate Grade Report
The grade report (acta de calificaciones) is an official document that consolidates all student grades in a structured format. It is used for academic record-keeping, institutional reporting, and formal certification of completed activities.
Access the grade reports: Enter the academic activity and click on the settings gear (gear icon) in the top right area. In the dropdown menu, under the "Gradebook setup" section, locate and click on "View". A submenu will appear with the available report types.
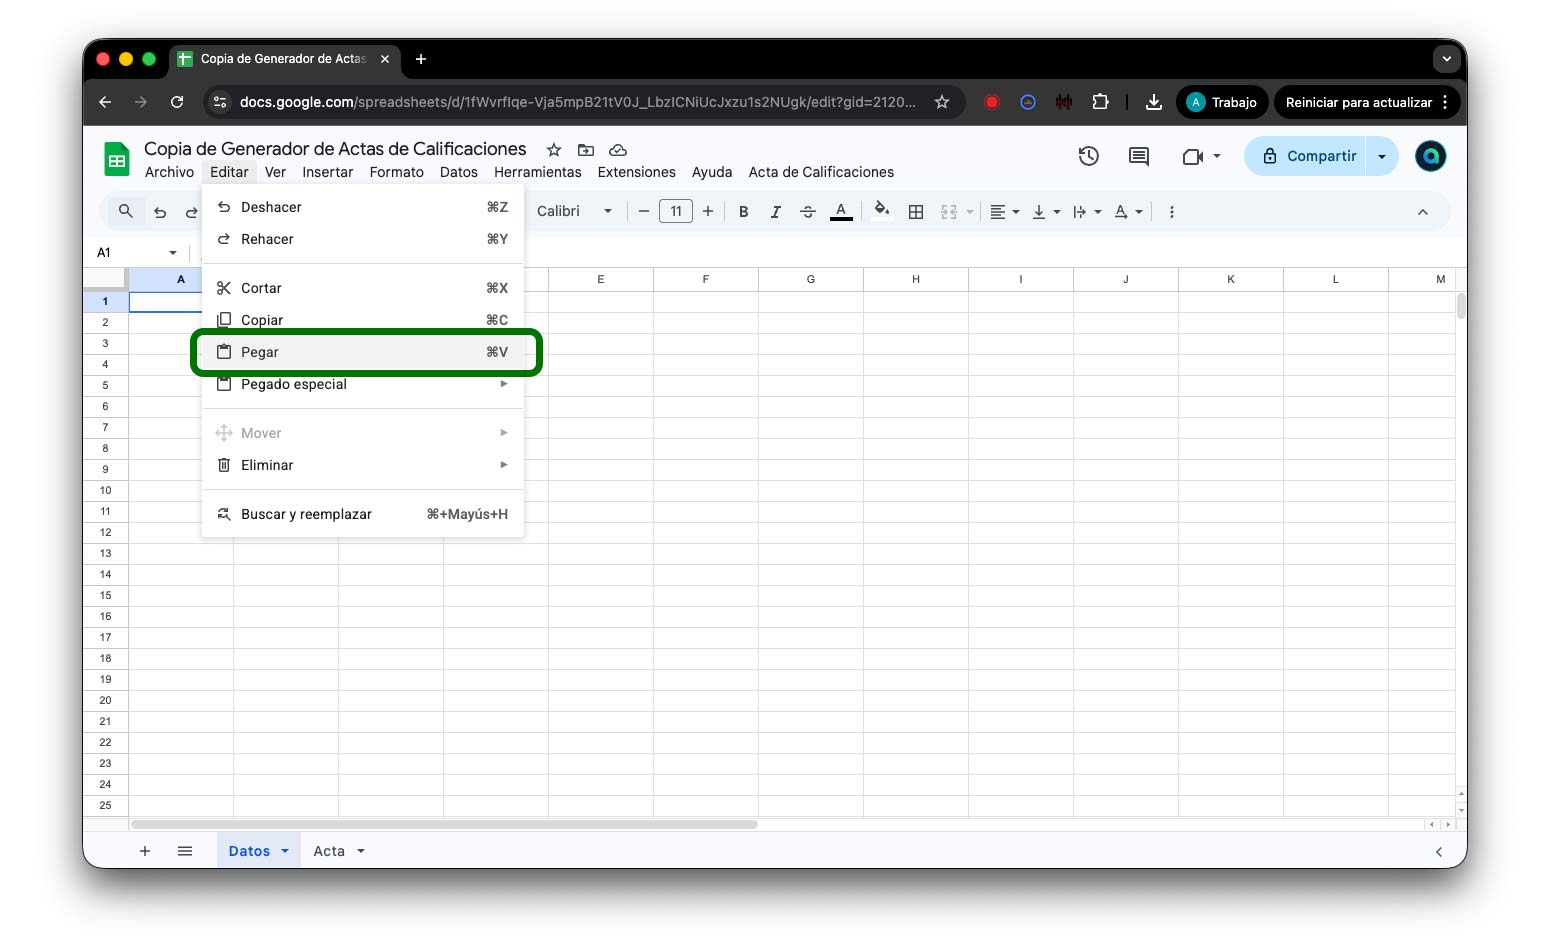
Select the report type: You will see several report options. To generate the grade report, select "Grade report" or the specific institutional report template if one is available. The system will display the report configuration screen.
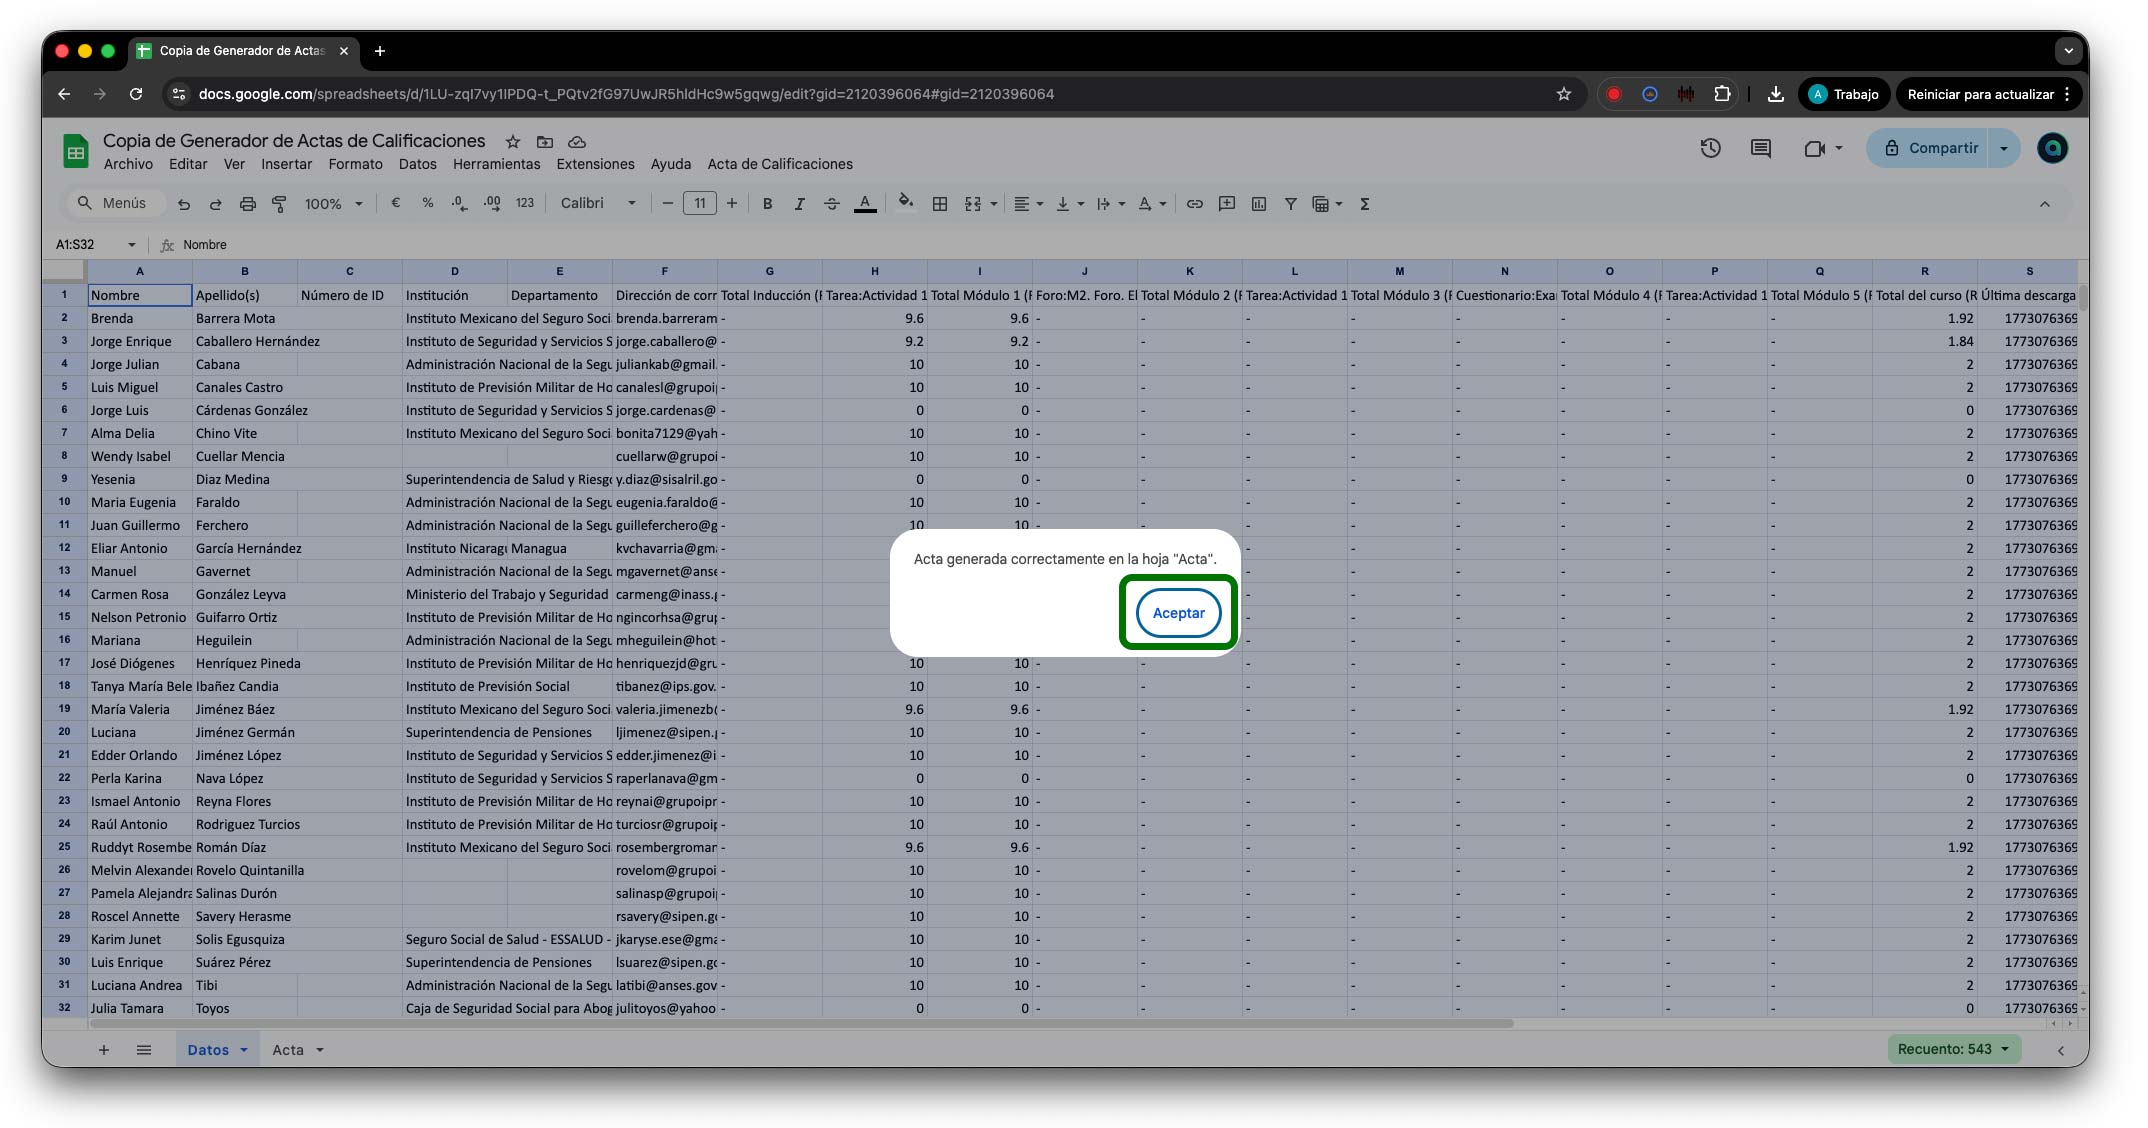
Configure the report parameters: On the report configuration screen, adjust the following options according to your needs:
- Group selection: If the activity has multiple groups, select whether to generate the report for all students or for a specific group.
- Score display: Choose whether to show grades as numbers, percentages, or letter grades.
- Included items: Select which graded activities will appear on the report.
- Show weights: Enable this option to display the weighting percentage of each activity.
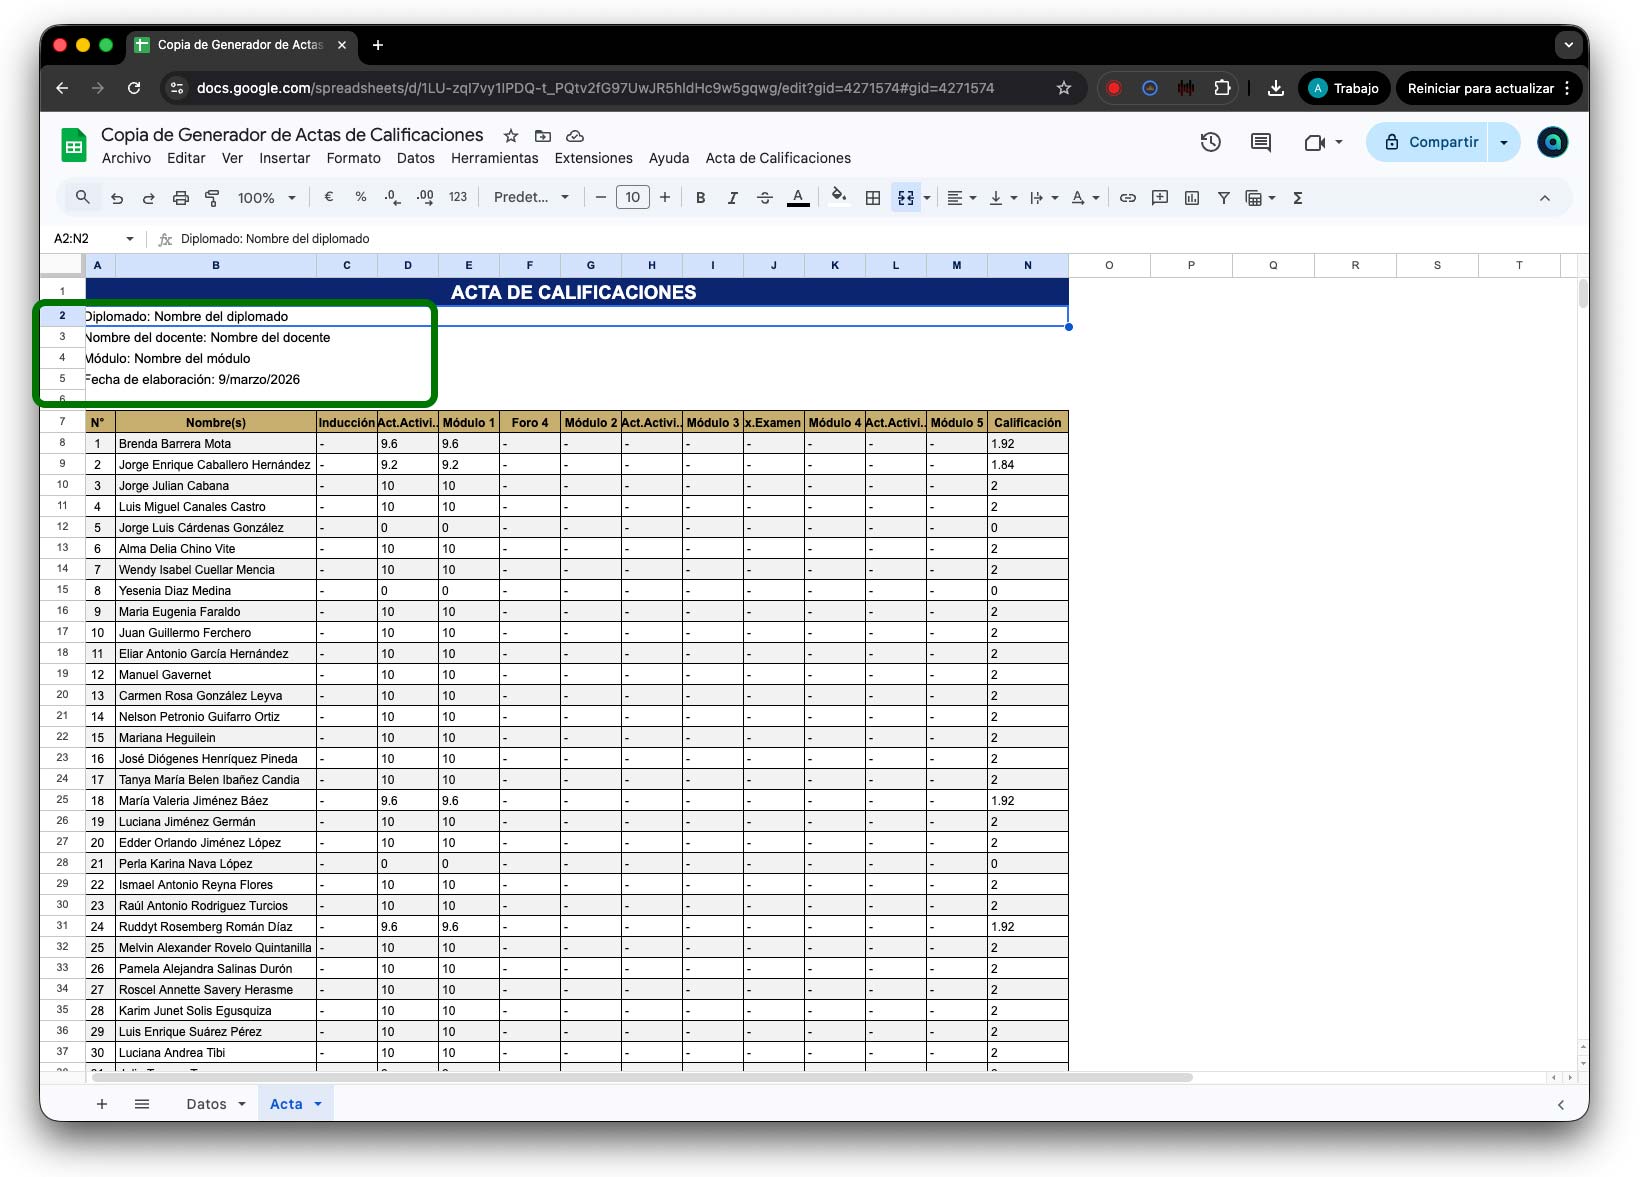
Generate and review the report: Click the "Generate report" button. The system will compile all grade data and display the report on screen. Review the information to verify that all grades, student names, and totals are correct.
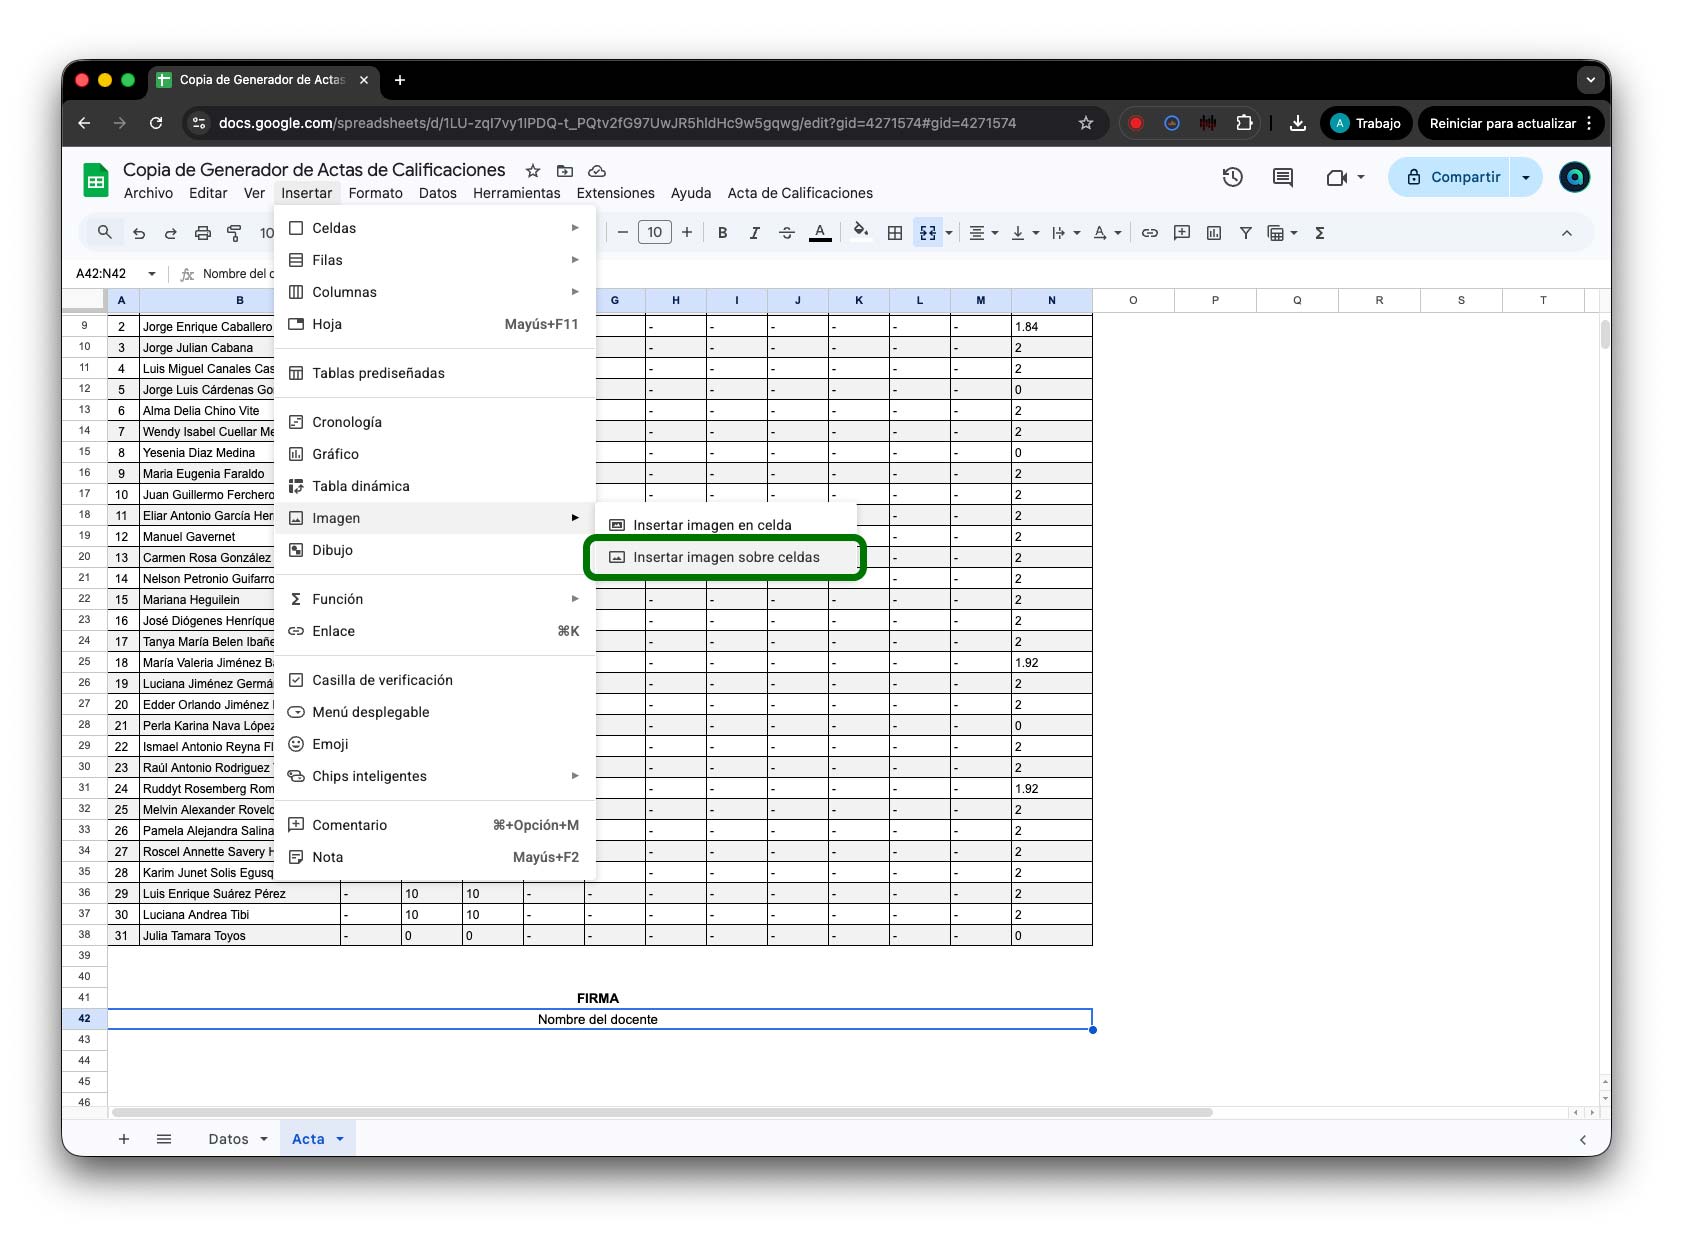
Download or print the report: Once you have verified the information, use your browser's print function (Ctrl + P or Cmd + P) to print the report directly or save it as a PDF file. Before printing, make sure to:
- Select "Save as PDF" as the destination if you want a digital copy.
- Set the page orientation to Landscape if the report has many columns.
- Disable headers and footers in the print options to avoid extra information on the document.
Important: Before generating the final grade report, verify that all activities have been graded and that there are no pending submissions. Grades marked as pending will not appear with a final value on the report, which could affect the course total calculation.
Recommendation: Generate a draft of the report before the final deadline to identify any missing grades or discrepancies in advance. This will allow you enough time to complete pending evaluations.
11. Additional Resources
This section compiles supplementary materials, technical requirements, and support channels to help you resolve any issues and make the most of the virtual campus tools.
Technical Requirements
To ensure an optimal experience on the virtual campus, verify that your equipment meets the following minimum requirements:
- Browser: Google Chrome (recommended), Mozilla Firefox, or Microsoft Edge. Always use the latest available version.
- Internet connection: Minimum 5 Mbps for standard content. For videoconferences, a minimum of 10 Mbps is recommended with low latency.
- Operating system: Windows 10 or later, macOS 10.14 or later, or a recent version of Linux.
- RAM: Minimum 4 GB, 8 GB or more recommended.
- Additional software: PDF reader (Adobe Acrobat or similar), office suite for viewing documents, and updated video and audio drivers.
Tip: Avoid using Internet Explorer or outdated versions of browsers, as they may cause display or functionality issues on the platform. Also, regularly clear your browser cache to prevent loading errors.
Videoconferencing Tools
The virtual campus integrates videoconferencing tools for live sessions. Make sure you have the following ready before each session:
- Zoom: Download and install the latest version of the Zoom desktop application. Test your audio and video at least 15 minutes before the session.
- Google Meet: Works directly in the browser without installation. Use Google Chrome for the best experience. Grant permissions for microphone and camera when prompted.
- Equipment: Use a headset with microphone to reduce background noise and echo. Ensure adequate lighting in front of you (avoid backlighting from windows).
Technical Support
If you encounter any technical issues during your activity, you have the following support channels available:
- Internal support ticket: Within each academic activity, use the Tracking module to send a direct message to the technical support team. Describe the problem in detail and, if possible, include a screenshot of the error.
- Email: Contact the platform support team at the institutional email address provided during your onboarding process.
- Response times: Support requests are typically answered within 24 to 48 business hours. For urgent issues during a live session, use the chat or tracking module for priority attention.
Important: When reporting a technical issue, always include the following information: your username, the name of the academic activity, a description of the problem, the steps you took before the error occurred, and a screenshot if possible. This will help the support team resolve your issue more quickly.
Supplementary Tutorials
To expand your knowledge of the platform tools, we recommend the following additional resources:
- Zoom for Instructors: Detailed guide on scheduling meetings, managing participants, using breakout rooms, and recording sessions.
- Google Meet for Instructors: Guide on creating meetings, screen sharing, using the chat, and managing participants.
- Virtual Campus for Students: Reference guide you can share with your students so they can navigate the platform and complete their activities independently.
Best Practices
Follow these recommendations to ensure a smooth academic experience for both you and your students:
- Log in regularly: Check the platform at least once a day during the activity period to stay informed of new submissions, forum posts, or messages.
- Grade on time: Establish a regular grading schedule to provide timely feedback. Students benefit most from feedback when it is received while the activity is still fresh.
- Communicate proactively: Use forums and announcements to keep students informed about any changes, upcoming deadlines, or clarifications.
- Back up your materials: Keep local copies of all resources, rubrics, and important documents you upload to the platform.
- Keep your profile updated: An updated profile with a clear photo and current contact information builds trust and facilitates communication with students.